
# 第一章 基础阶段
## 第1节课 开课介绍
### 1.1 Python应用方向
Python的应用方向其实有很多,包括但不限于以下几种:
- 工作与自动化脚本
- 数据科学与机器学习
- 人工智能与自然语言处理
- 自动化网页爬虫
- 游戏开发
- AI大模型领域
- Web网站开发
- 云计算与DevOps(Go语言)
- 安全与渗透测试
- 嵌入式和物联网
### 1.2 Python课程定位
**(1)从校招角度而言**
笔试必考,占比比较大,在于后面的编程大题
通用考点:
- 编程语言:包括但不限于C Java Python(Go C++)
- 计算机网络
- 操作系统与Linux
- 数据库
- 数据结构与算法
**(2)从云原生的角度而言**
Python在云原生岗位中的核心价值,是凭借高效脚本能力,丰富的云原生生态库,以及跨平台兼容性,打通从开发到运维与架构的流程(SRE)。是云原生技术当中最主力的编程语言(Shell Go)
**(3)从网安的角度而言**
Python在网络安全当中的核心价值,将网络操作与安全策略转换为可编程逻辑。
### 1.3 Python学习方法
**(1)属于研发类课程,之前的课程基本都属于应用类(HCIA,RHCSA...)**
概念性的东西以理解为主,重点在于敲代码实现业务逻辑。
**(2)如何去深入的理解知识**
三步走:它是啥?它能帮我解决什么问题?它如何去使用?
**(3)多写代码,最忌讳眼高手低**
听懂不代表会写,会写不代表能讲。
**(4)多做题目,将脑子中的思维转换为编程语言**
编程学习中第一大困难是:如何利用语法知识区解决实际问题。
找数据,列步骤,一步步实现
**(5)遇到问题及时解决**
编程学习中第二大困难是:报错太多,会打击自信
解决途经:问AI(详细询问),问同学问老师,同时你们也应该回归课本和书籍
### 1.4 Python课程大纲
| 章节 | 课程内容 | 课程目标 |
| ---------------- | ------------------------------------------------------------ | ------------------------------------------------------------ |
| Python 基础 | Python 简介与环境搭建、变量与数据类型、运算符与表达式 | 了解 Python 语言特点,熟练搭建编程环境,掌握基本数据类型和运算符 |
| 流程控制 | 条件语句(if - else)、循环语句(for、while)、跳转语句(break、continue) | 能够运用条件和循环语句实现复杂逻辑,掌握跳转语句灵活控制程序流程 |
| 函数与模块 | 函数定义与调用、函数参数与返回值、模块的导入与使用 | 学会定义和使用函数实现代码复用,了解模块概念并能正确导入和使用 |
| 数据结构 | 列表(List)、元组(Tuple)、字典(Dictionary)、集合(Set) | 熟练掌握各种数据结构的操作,能根据需求选择合适的数据结构解决问题 |
| 面向对象编程 | 类与对象的概念、类的属性和方法、继承与多态 | 理解面向对象编程思想,能够定义类和对象,运用继承和多态特性编写可维护代码 |
| 异常处理 | 异常的捕获与处理、自定义异常 | 学会捕获和处理程序运行时的异常,提高程序的稳定性和鲁棒性 |
| 文件操作 | 文件的打开与关闭、文件的读写操作、文件指针控制 | 掌握文件的基本操作,能进行数据的读写和文件内容的处理 |
| Python 高级特性 | 装饰器、迭代器与生成器、匿名函数(lambda) | 了解并运用 Python 的高级特性优化代码,提高编程效率和代码可读性 |
| 标准库与第三方库 | 常用标准库(如 datetime、re 等)的使用、第三方库的安装与使用(如 NumPy、pandas 等) | 熟悉常用标准库的功能,能够安装和使用第三方库解决特定领域的问题 |
| 项目实践 | 小型项目开发 | 综合运用所学知识,完成小型项目开发,提升实际编程能力和项目经验 |
## 第2节课 基础认知
### 2.1 软件开发概述
**(1)软件定义**
定义:是指**一系列**按照**特定顺序组织**的计算机**数据**与**指令**的集合。
> 程序 = 数据 + 指令
>
> 程序 = 数据结构 + 算法
软件分类:
- 系统软件:主要负责管理操作计算机底层硬件的,为用户提供了一个操作的界面,为用户提供最基本的计算机功能。
- Windows,HarmonyOS,Android,IOS,MACOS
- 应用软件:主要负责处理某一特殊领域功能的软件。
**(2)软件开发流程**
从生到死的一个过程,软件都经历了哪些环节:
1. 需求分析阶段:确定业务需求、用户痛点以及功能边界,形成需求文档。
- 产品经理:主导需求收集(用户调研,竞品分析,自研),协调各方确认需求优先级。
- 项目经理:评估需求可行性,制定项目计划与资源预算,同步需求变更风险。
2. 设计阶段:完成技术架构设计,交互逻辑设计以及数据库设计。
- 系统架构师:制定技术栈,设计系统分层架构,规划组件间通信协议。
- 数据库工程师:设计数据表结构,优化索引策略,指定数据存储与备份方案。
- UI/UX设计师:设计原型界面,交互流程以及用户体验相关的内容。
3. 开发阶段:按照设计文档进行具体的开发,完成测试与代码评审。
- 前端开发工程师:写Web页面的,对接后端API,优化页面加载。
- 移动端开发工程师:Android、IOS、HarmonyOS,各种平台的小程序
- 后端开发工程师:主要用于开发业务逻辑,封装API接口,继承第三方的一些应用的。
4. 测试阶段:验证功能正确性,检验功能覆盖的范围。
- 测试工程师
5. 部署与运维:将代码部署到生产环境,监控运行状态,处理线上问题。
- 运维工程师:配置服务器环境、监控运行状态,管理各种数据以及域名等问题。
- 网络工程师:负责网络架构设计,设备部署以及日常运维。
- 安全工程师:通过技术手段与策略设计,保护网络设备以及服务器设备,重点保护的应该是服务器中的程序与数据。
**(3)编程语言发展问题**
- 机器语言:最早期的编程语言,主要是有二进制0和1组成,计算机能够直接识别且运行的,但是对于开发者而言,学习门槛非常高,性能效率比较低。
- 汇编语言:通过助记符来进行操作的,对开发者而言必须要熟悉计算机底层操作,汇编语言本身就是按照计算机的运行流程来去操作的。
```
MOV AX,5
MOV BX,3
ADD AX,BX
......
```
- 高级编程语言:主要是以人类能够理解的内容来进行编程的,主要以英文符号和数字来表示,更加以人性化的方式编程,但是计算机看不懂,转换为机器代码:编译。
```python
a = 3
b = 4
c = a + b
```
### 2.2 计算机组成简介
主要介绍关于程序在内存中运行的流程:
硬盘、内存、CPU
程序的运行是在内存当中的(从硬盘当中把对应的可执行代码加载进内存当中,由CPU与内存进行交互读写数据进行计算),当关闭程序时实质上就是在内存中把对应程序的代码删掉(不从硬盘删除,硬盘是存储永久数据,内存是存储临时数据的)
### 2.3 Python发展历史
Python 的发展历程可分为四个主要阶段,每个阶段都伴随着技术革新与社区生态的扩张
**第一阶段:起源与设计哲学(1980~1990)**
- 诞生背景:1989 年圣诞节期间,荷兰人 Guido van Rossum(简称 “龟叔”)为打发假期无聊,在继承 ABC 语言(龟叔参与设计)的基础上,着手开发一种新的脚本语言,目标是 “简单、易读、可扩展”。
<img src="https://zh-1258460726.cos.ap-nanjing.myqcloud.com//typora-pic/image-20250703091610600.png" alt="image-20250703091610600" style="zoom:25%;" />
- 命名由来:龟叔是英国喜剧团体 Monty Python 的粉丝,遂将新语言命名为Python,既幽默又与编程的严谨形成反差。
- 关键版本:
- Python 0.9.0(1991):首个公开发行版,包含类、异常处理、函数等核心特性,已具备现代 Python 的雏形。
- Python 1.0(1994):引入函数式编程工具(如`map`、`filter`、`reduce`),确立开源社区协作模式。
<img src="https://zh-1258460726.cos.ap-nanjing.myqcloud.com//typora-pic/image-20250703092046820.png" alt="image-20250703092046820" style="zoom:25%;" />
**第二阶段:标准库扩张与社区成型(2000)**
- Python 2.x 时代:
- Python 2.0(2000):加入垃圾回收机制和列表推导式(如`[x*2 for x in range(10)]`),性能显著提升。
- Python 2.2(2001):统一类与类型系统,引入 生成器(generator) 和`yield`关键字,为异步编程奠定基础。
- Python 2.5(2006):新增`with`语句(用于资源管理)和`decimal`模块(高精度计算),被广泛用于 Web 开发(如 Django 框架)。
- 社区生态爆发:
- 2001 年:Travis Oliphant 创立 NumPy,开启 Python 在科学计算领域的统治地位。
- 2004 年:Django 框架诞生,推动 Python 成为 Web 开发主流语言。
- 2008 年:IPython 项目发布,提供交互式计算环境,后演变为 Jupyter Notebook。
**第三阶段:Python 3.x 的革新与争议(2008~2020)**
- 设计目标:修复 Python 2 的语法缺陷(如 Unicode 处理混乱、`print`语句设计不合理),但不兼容 2.x。
- 关键版本:
- Python 3.0(2008):核心改进包括:
- `print`变为函数(需加括号)。
- 统一 Unicode 处理(字符串默认是 Unicode)。
- 整数除法返回浮点数(如`5/2`结果为`2.5`,而非 Python 2 的`2`)。
- Python 3.4(2014):引入`asyncio`模块,原生支持异步 IO,推动 Python 在高并发场景(如 Web 服务器)的应用。
- Python 3.5(2015):新增`async/await`语法糖,使异步编程更简洁(如`async def func(): await asyncio.sleep(1)`)。
- Python 3.6(2016):加入格式化字符串(f-string),如`name = "Alice"; print(f"Hello, {name}!")`,大幅提升代码可读性。
- 版本过渡阵痛:
- 因不兼容 2.x,许多旧项目需重写,导致社区分裂。直至 2020 年 Python 2 停止维护,主流库(如 NumPy、Django)才全面转向 3.x。
**第四阶段:现代 Python 与 AI 时代(2020 年至今)**
- 语言特性持续进化:
- Python 3.7(2018):引入`dataclass`装饰器,简化类的定义(如自动生成`__init__`和`__repr__`方法)。
- Python 3.8(2020):赋值表达式(海象运算符`:=`),如`if (n := len(data)) > 10: print(f"Large data: {n}")`。
- Python 3.9(2021):字典合并操作符(`|`),如`d1 = {'a':1}; d2 = {'b':2}; print(d1 | d2)`。
- Python 3.10(2021):结构模式匹配(类似 C++ 的`switch`),提升复杂条件判断的可读性。
- AI 与数据科学主导地位:
- 深度学习框架:TensorFlow、PyTorch、Keras 均以 Python 为主要接口,推动 Python 成为 AI 开发的 “官方语言”。
- 数据科学工具链:Pandas(数据处理)、Matplotlib(可视化)、Scikit-learn(机器学习)形成完整生态。
- Web 与 DevOps 领域扩展:
- 异步 Web 框架:FastAPI(高性能)、Sanic(类似 Flask 的异步版)加速 Python 在微服务中的应用。
- 自动化工具:Ansible(配置管理)、Docker SDK for Python(容器编排),成为 DevOps 工程师的必备技能。
**总结:Python 成功的核心密码**
1. **设计哲学**:强调 “可读性” 和 “优雅”(如`import this`输出的《Python 之禅》),降低学习门槛。
2. **胶水语言特性**:可无缝调用 C/C++(通过 ctypes)和 Java(通过 Jython)代码,兼容遗留系统。
3. **社区驱动**:开源生态催生 NumPy、Django、Flask 等高质量库,覆盖全领域需求。
4. **时代机遇**:恰逢 AI 爆发,Python 凭借易用性和丰富的科学计算库,成为行业首选。
https://www.tiobe.com/tiobe-index/
## 第3节课 Python环境安装
### 3.1 Python开发包
**(1)下载安装包**
- 打开 Python 官方下载页面:https://www.python.org/downloads/
- 中文网:https://python.p2hp.com/
- Downloads:下载,下载python解释工具的导航,解释执行代码的工具称为 **解释器**
- Documentation:文档,官方第一手学习资料
- 在页面中,你可以看到针对不同操作系统提供的 Python 最新版本下载链接。对于 Windows 系统,根据你的计算机是 32 位还是 64 位,选择对应的 “Windows x86-64 executable installer”(64 位)或 “Windows x86 executable installer”(32 位)进行下载。
- 3.8:市场遗留项目主要版本,并且很多通用项目依然选择使用3.8版本;官方结束支持不代表这个版本淘汰,市场上很多第三方模块依赖python3.8版本并且还没有及时更新到最新版本;
- **3.12:市场新项目开发推荐的版本,**目前各种应用中的工作比较正常,比较稳定!进行**系统学习**、**新项目研发**时可以优先选择该版本进行处理;
- 3.13:当前最新版本,适合新特性研究,新突破技术的学习;不适合系统学习和项目研发,一旦出现新的问题(可能是全网你第一次遇到),大概率导致学习中断、项目流产!
下载-Windows
<img src="https://zh-1258460726.cos.ap-nanjing.myqcloud.com//typora-pic/image-20250310204705991.png" alt="image-20250310204705991" style="zoom:50%;" />
选择64bit
<img src="https://zh-1258460726.cos.ap-nanjing.myqcloud.com//typora-pic/image-20250310204932276.png" alt="image-20250310204932276" style="zoom:50%;" />
**(2)运行安装程序**
- 下载完成后,找到下载的安装程序文件(通常是一个 `.exe` 文件),双击运行它。
- 在安装程序界面中,勾选 “Add Python 版本号 to PATH” 选项,这个操作会自动将 Python 添加到系统的环境变量中,方便后续在命令行中直接使用 Python。然后点击 “Install Now” 开始安装。
勾选添加环境变量
<img src="https://zh-1258460726.cos.ap-nanjing.myqcloud.com//typora-pic/image-20250310205040702.png" alt="image-20250310205040702" style="zoom:50%;" />
选择自定义安装
<img src="https://zh-1258460726.cos.ap-nanjing.myqcloud.com//typora-pic/image-20250310205129869.png" alt="image-20250310205129869" style="zoom:50%;" />
默认,不动,直接点击Next
<img src="https://zh-1258460726.cos.ap-nanjing.myqcloud.com//typora-pic/image-20250310205217210.png" alt="image-20250310205217210" style="zoom:50%;" />
更改安装路径
<img src="https://zh-1258460726.cos.ap-nanjing.myqcloud.com//typora-pic/image-20250310205317859.png" alt="image-20250310205317859" style="zoom:50%;" />
直接点击Install
<img src="https://zh-1258460726.cos.ap-nanjing.myqcloud.com//typora-pic/image-20250310205442338.png" alt="image-20250310205442338" style="zoom:50%;" />
安装成功
**(3)验证安装完成**
- 安装完成后,按下 `Win + R` 组合键,输入 `cmd` 并回车,打开命令提示符。
- 在命令提示符中输入 `python --version` 并回车,如果显示出你安装的 Python 版本号,说明安装成功。

### 3.2 交互编程与脚本编程
**(1)交互式编程**
最致命的的问题,关掉窗口之后,代码就没有保存了,不能生成一个文件
一般在测试某一个代码,或者运行某一段程序时,主要是做测试使用的。
**(2)脚本编程**
就是把Python代码放到一个文件当中,永久保存
创建一个文本文件,改名"HelloWorld",改后缀名".txt"为".py"
> 打开文件的扩展名
>
> <img src="https://zh-1258460726.cos.ap-nanjing.myqcloud.com//typora-pic/image-20250704142336268.png" alt="image-20250704142336268" style="zoom:25%;" />
用记事本打开该文件,写入代码,记住保存`ctrl + s`:
```python
print("Hello World")
print(3 + 4)
print(3 * 4)
```
直接在当前目录的路径处,输入cmd即可
<img src="https://zh-1258460726.cos.ap-nanjing.myqcloud.com//typora-pic/image-20250310210648942.png" alt="image-20250310210648942" style="zoom:50%;" />
还有另外一种方式 `win + R`输入`cmd`
- `C:\Users\用户`:家目录
- `cd Desktop`:进入桌面目录
- `cd PyDay01`:进入代码目录
运行程序 `python HelloWorld.py`
### 3.3 PyCharm开发工具
这是一款jetbrains公司推出的专用开发工具,业内知名度非常高!
- Commuinity:社区免费版,可以开发纯python应用;现阶段学习没有任何障碍!
- Professional:专业收费版,可以开发以Python为核心的、主流的各种语法的项目应用!
**(1)下载**
官网:https://www.jetbrains.com/pycharm/download/,点击 “Download” 按钮进入下载页面,选择社区版 “Community”
**(2)安装**
- 双击下载的`.exe`文件,进入安装向导。
<img src="https://zh-1258460726.cos.ap-nanjing.myqcloud.com//typora-pic/image-20250704143541546.png" alt="image-20250704143541546" style="zoom: 50%;" />
- 在安装向导中,选择 PyCharm 的安装目录,建议选择除 C 盘外空间充足的磁盘,然后点击 “Next”。
<img src="https://zh-1258460726.cos.ap-nanjing.myqcloud.com//typora-pic/image-20250704143605696.png" alt="image-20250704143605696" style="zoom:50%;" />
<img src="https://zh-1258460726.cos.ap-nanjing.myqcloud.com//typora-pic/image-20250704143717434.png" alt="image-20250704143717434" style="zoom:50%;" />
- 勾选 “Create Desktop Shortcut” 创建桌面快捷方式;也可按需勾选 “Add 'Open folder as project'” 在右键菜单添加快捷功能等选项,然后点击 “Next”。
- <img src="https://zh-1258460726.cos.ap-nanjing.myqcloud.com//typora-pic/image-20250704143747873.png" alt="image-20250704143747873" style="zoom:50%;" />
<img src="https://zh-1258460726.cos.ap-nanjing.myqcloud.com//typora-pic/image-20250704143902526.png" alt="image-20250704143902526" style="zoom:50%;" />
<img src="https://zh-1258460726.cos.ap-nanjing.myqcloud.com//typora-pic/image-20250704143925336.png" alt="image-20250704143925336" style="zoom:50%;" />
- 点击 “Install”,等待安装完成后,点击 “Finish” 即可启动 PyCharm。
<img src="https://zh-1258460726.cos.ap-nanjing.myqcloud.com//typora-pic/image-20250704144049432.png" alt="image-20250704144049429" style="zoom:50%;" />
**创建项目**
(1)选择语言
<img src="https://zh-1258460726.cos.ap-nanjing.myqcloud.com//typora-pic/image-20250704144222476.png" alt="image-20250704144222476" style="zoom:50%;" />
(2)我同意
<img src="https://zh-1258460726.cos.ap-nanjing.myqcloud.com//typora-pic/image-20250704144245811.png" alt="image-20250704144245811" style="zoom:50%;" />
(3)不分享数据
<img src="https://zh-1258460726.cos.ap-nanjing.myqcloud.com//typora-pic/image-20250704144304850.png" alt="image-20250704144304850" style="zoom:50%;" />
(4)开始界面
<img src="https://zh-1258460726.cos.ap-nanjing.myqcloud.com//typora-pic/image-20250704144323767.png" alt="image-20250704144323767" style="zoom:50%;" />
(5)New Project 创建项目
<img src="https://zh-1258460726.cos.ap-nanjing.myqcloud.com//typora-pic/image-20250704144530331.png" alt="image-20250704144530331" style="zoom:50%;" />
(6)更改路径
<img src="https://zh-1258460726.cos.ap-nanjing.myqcloud.com//typora-pic/image-20250704144819302.png" alt="image-20250704144819302" style="zoom:50%;" />
<img src="https://zh-1258460726.cos.ap-nanjing.myqcloud.com//typora-pic/image-20250704144911182.png" alt="image-20250704144911182" style="zoom:50%;" />
- Project venv:Python虚拟环境
- Base Conda:基于Conda环境的Python
- Custom env:自定义环境
<img src="https://zh-1258460726.cos.ap-nanjing.myqcloud.com//typora-pic/image-20250704145051032.png" alt="image-20250704145051029" style="zoom:50%;" />
(7)创建Python源代码文件
填写文件名(不需要.py后缀名,直接写名称即可)
## 第4节课 数据与变量
### 4.1 内置基本数据类型
Python当中已经集成好了一些数据,数据类型有很多:基本数据类型、容器类型、对象类型
**(1)数值型**
就是数字
整数:它是可以任意大小的,不像其他语言对整数有取值范围的约束的,Python中没有约束
```python
# 没有取值范围的约束
print(172638628469873648762137846891237467821354612374 + 1)
print(12)
# 同时也支持其他进制的整数 二进制 八进制 十六进制 默认十进制
print(0b1010) # 二进制(0~1)
print(0o12) # 八进制(0~7)
print(0x12) # 十六进制(0~9 A~F)
```
浮点数(小数):同时也存在科学计数法,由于所有数值最终都由二进制存储的,所以小数存在一定的精度问题
```python
print(3.1415926)
print(3.1415926 + 1)
print(0.12e10) # 0.12 * 10^10
print(12e-2)
```
**(2)布尔型(bool)**
只有两个值 True 和 False , 表示真和假含义,一般用在比较、逻辑判断时(if while);从本质上而言,布尔类型其实就是数字0和1来表示。
```python
print(True + False) # 1
```
**(3)字符串类型(str)**
Python中字符串就是一组若干个字符组成的**文本信息**。Python中不存在字符数据类型的(char 单个字符)。
- 双引号
- 单引号
- 三引号
```python
print("123 + 123")
print('123 + 123')
print("""123 + 123""")
print('''123 + 123''')
print("") # 空串
```
关于字符串的左右边界符匹配
```python
print('123") # 报错
print("123+"123"") # 123+"123"
# 将特殊字符前面加转义符 \ 取消特殊字符的含义 只保留字符形状本身
print("123+\"123\"") # 123+"123"
报错的文件 报错的行数
File "C:\Users\HENG\Desktop\20250704Python\Demo.py", line 21
报错的具体代码
print('123")
^
报错的原因
SyntaxError: unterminated string literal (detected at line 21)
```
**(4)空值类型(None)**
`None` 空,理解为空集φ,主要在引用数据类型中使用,尤其涉及到对象方面的问题。
```python
print(None)
print(None + 1) # 报错
Traceback (most recent call last):
File "C:\Users\HENG\Desktop\20250704Python\Demo.py", line 26, in <module>
print(None + 1)
~~~~~^~~
TypeError: unsupported operand type(s) for +: 'NoneType' and 'int'
# 类型错误 不支持 空类型和整数进行加法运算
```
**(5)复数(complex)**
实部+虚部
```python
print(1 + 1j)
print(2 - 3j)
print((1 + 1j) * (2 - 3j)) # 2 - 3j + 2j + 3
```
### 4.2 变量与数据类型
**(1)变量的定义与赋值**
变量:就是用来临时存储某些数据使用的,在使用的过程中,我们可以取修改变量中的数据
```python
变量名 = 数据
```
- 将数据赋值给变量(变量名)
- Python中对变量的数据类型没有严格的限制,**想存啥就存啥**
- 如果变量第一次赋值 则为创建变量;否则为修改变量
```python
name = "张三" # 创建name变量并赋值"张三"
print(name)
name = 123 # 从上到下 已经存在name变量 此处为修改值为 123
print(name)
```
> 横向对比一下:
>
> ```c
> int a = 3; //定义
> a = 4; //修改
> a = 3.14; //修改 类型错误
> ```
```python
a = 3
b = 4
c = a + b # 加法运算
print(c)
s1 = "来了"
s2 = "老弟"
s3 = s1 + s2 # 拼接运算
print(s3)
print(a + s1) # 数据类型不匹配 报错
# TypeError: unsupported operand type(s) for +: 'int' and 'str'
```
**(2)标识符命名规则与规范**
在任何编程语言当中,但凡是自定义的名称都叫做**标识符**
命名规则:
- 只能由数字、字母、下划线组成,其中数字不能开头。(汉字可以作为标识符)
```python
年龄 = 18
print(年龄)
```
- 严格区分大小写
```python
age = 1
Age = 2
aGe = 3
AGE = 4
print(age + Age + aGe + AGE)
```
- 不能使用**关键字**和**内置函数**名称作为标识符
命名规范:
- 变量名称和函数名称的命名:蛇形命名法,所有单词小写,多个单词之间用下划线分割
```python
my_name
your_name
gender
```
- 类名称:大驼峰命名法,所有单词首字母大写,单词与单词之间不分割
```python
MyName
YourName
Gender
```
- 常量名称:所有单词大写,单词与单词之间用下划线分割
```python
MY_NAME
YOUR_NAME
GENDER
```
**(3)关键字与内置函数**
关键字:就是Python中已经定义好的一些特殊单词,本身就已经由其特殊的作用和含义。
```python
# 打印Python中所有的关键字
import keyword
print(keyword.kwlist)
# 输出的结果
['False', 'None', 'True', 'and', 'as', 'assert', 'async', 'await', 'break', 'class', 'continue', 'def', 'del', 'elif', 'else', 'except', 'finally', 'for', 'from', 'global', 'if', 'import', 'in', 'is', 'lambda', 'nonlocal', 'not', 'or', 'pass', 'raise', 'return', 'try', 'while', 'with', 'yield']
```
内置函数:就是Python中预先定义号并直接集成在解释器中的函数(小工具),无需导入其他的模块直接调用即可。
> 横向对比
>
> ```c
> #include<stdio.h> // 导入输入输出函数用的
> void main() {
> printf("%d",3);
> }
> ```
```python
print(123)
# 把print的功能赋值给了name
# name同时具有了输出的功能
# 就可以像使用print一样进行输出了
name = print
name(123)
# 函数名称 -> 变量 存的是某一个函数的功能而已
print = 3
name(print + 4)
```
```python
print(max(1,2,3,100)) # 最大值函数
min = 10
max = 10 # 变成了一个整数
```
查看所有的内置函数:
```python
print(dir(__builtins__))
# 输出结果
['ArithmeticError', 'AssertionError', 'AttributeError', 'BaseException', 'BaseExceptionGroup', 'BlockingIOError', 'BrokenPipeError', 'BufferError', 'BytesWarning', 'ChildProcessError', 'ConnectionAbortedError', 'ConnectionError', 'ConnectionRefusedError', 'ConnectionResetError', 'DeprecationWarning', 'EOFError', 'Ellipsis', 'EncodingWarning', 'EnvironmentError', 'Exception', 'ExceptionGroup', 'False', 'FileExistsError', 'FileNotFoundError', 'FloatingPointError', 'FutureWarning', 'GeneratorExit', 'IOError', 'ImportError', 'ImportWarning', 'IndentationError', 'IndexError', 'InterruptedError', 'IsADirectoryError', 'KeyError', 'KeyboardInterrupt', 'LookupError', 'MemoryError', 'ModuleNotFoundError', 'NameError', 'None', 'NotADirectoryError', 'NotImplemented', 'NotImplementedError', 'OSError', 'OverflowError', 'PendingDeprecationWarning', 'PermissionError', 'ProcessLookupError', 'RecursionError', 'ReferenceError', 'ResourceWarning', 'RuntimeError', 'RuntimeWarning', 'StopAsyncIteration', 'StopIteration', 'SyntaxError', 'SyntaxWarning', 'SystemError', 'SystemExit', 'TabError', 'TimeoutError', 'True', 'TypeError', 'UnboundLocalError', 'UnicodeDecodeError', 'UnicodeEncodeError', 'UnicodeError', 'UnicodeTranslateError', 'UnicodeWarning', 'UserWarning', 'ValueError', 'Warning', 'WindowsError', 'ZeroDivisionError', '__build_class__', '__debug__', '__doc__', '__import__', '__loader__', '__name__', '__package__', '__spec__', 'abs', 'aiter', 'all', 'anext', 'any', 'ascii', 'bin', 'bool', 'breakpoint', 'bytearray', 'bytes', 'callable', 'chr', 'classmethod', 'compile', 'complex', 'copyright', 'credits', 'delattr', 'dict', 'dir', 'divmod', 'enumerate', 'eval', 'exec', 'exit', 'filter', 'float', 'format', 'frozenset', 'getattr', 'globals', 'hasattr', 'hash', 'help', 'hex', 'id', 'input', 'int', 'isinstance', 'issubclass', 'iter', 'len', 'license', 'list', 'locals', 'map', 'max', 'memoryview', 'min', 'next', 'object', 'oct', 'open', 'ord', 'pow', 'print', 'property', 'quit', 'range', 'repr', 'reversed', 'round', 'set', 'setattr', 'slice', 'sorted', 'staticmethod', 'str', 'sum', 'super', 'tuple', 'type', 'vars', 'zip']
```
**(4)查看数据类型**
type内置函数用于查看变量或者数据的类型
```python
a = 1
# 查看a变量存储的数据的类型 而不是a变量的类型
print(type(a)) # 整数只有int
a = 3.14
print(type(a)) # 小数只有float
a = "123"
print(type(a))
a = True
print(type(a))
a = print
print(type(a))
```
**(5)变量交换与多重赋值**
```python
# 多重赋值
a = b = c = 1
print(a + b + c)
a, b, c = 1, 2, 3
print(a + b + c)
# a, b, c = 1, 2, 3, 4
# ValueError: too many values to unpack (expected 3)
# 变量交换
a = 10
b = 60
c = 80
a, b, c = c, a, b
print(a)
print(b)
print(c)
```
### 4.3 基本数据类型转换
**(1)隐式转换(自动转换)**
就是小的类型和大的类型进行计算时,结果会默认为大类型,主要出现在数值运算上
```python
a = 1 # 整数
b = 3.14 # 小数
c = a + b # 小数
print(type(c))
```
**(2)显示转换**
一般都是使用内置函数来去操作的
- 将其他类型转整数:int内置函数,默认以10进制转换,也可以指定进制数(2~36,0默认10)
```python
num = 3.9123
# 将小数转整数
print(int(num)) # 截断小数部分 只保留整数部分
# 将数字字符串转整数
s = "123"
print(int(s) + 1) # 将字符串中的整数解析出来 为一个整数
s = "123ah"
# 默认以十进制进行解析
# print(int(s))
# ValueError: invalid literal for int() with base 10: '123a'
# 因为a不属于十进制
#print(int(s, 12)) # 12 以12(0~9 a~b)进制进行解析数字
# 10*12**0 + 3*12**1 + 2*12**2 + 1*12**3
print(int(s, 18)) # 18 以18(0~9 a~h)进制进行解析数字
# print(int(s, 60))
# ValueError: int() base must be >= 2 and <= 36, or 0默认十进制
s = "21jk"
print(int(s, 21)) # 最小进制为21
# s = "迪丽热巴18岁"
# print(int(s)) # 报错
```
- 将其他类型转小数
```python
num = 10
print(float(num))
s = "3.123123123abc"
# 只能以十进制解析小数
print(float(s) + 1)
# ValueError: could not convert string to float: '3.123123123abc'
```
- 将其他类型转为布尔类型
```python
# 将数值类型转布尔类型:只有0为False 其他均为True
print(bool(999))
print(bool(3.14))
print(bool(-123))
print(bool(0))
# 将字符串类型转布尔类型:只有空串为False,其他均为True
print(bool("Hello"))
print(bool("a"))
print(bool(""))
print(bool(None))
# None一律为False
```
- 将其他类型转字符串:加str
```python
num1 = 10
num2 = 3.14
num3 = True
num4 = None
print(str(num1) + str(num2) + str(num3) + str(num4))
```
## 第5节课 输入与输出函数
### 5.1 print()输出函数
IPO类型程序:input 输入数据 process 处理 output 输出结果
print()函数本身也属于Python的内置函数
**(1)基本用法**
print()函数的语法参数格式
```python
print(*objects, sep=" ", end="\n")
```
- *objects:就是要打印的数据对象,可以没有也可以是多个。
```python
print(1, 2, 3, 3.14, "Hello World")
print() # 仅用作换行
a = 1
b = 3.14
c = True
print(a, b, c)
```
- sep:数据之间的分隔符,默认是空格
```python
print(1, 2, 3, 3.14, "Hello World", sep="#")
print() # 仅用作换行
a = 1
b = 3.14
c = True
print(a, b, c, sep="#")
# 输出
1#2#3#3.14#Hello World
1#3.14#True
```
- end:打印完数据之后,以哪个字符串结尾,默认为换行
```python
print(1, 2, 3, 3.14, "Hello World", sep="#", end="哈哈")
print() # 仅用作换行
a = 1
b = 3.14
c = True
print(a, b, c, end = "嘻嘻", sep="#")
```
**(2)格式化输出**
就是将输出的字符串内容和变量内容进行拼接
```python
name = "张三"
age = 18
# 我叫张三,今年18岁
print("我叫",name,",","今年",age,"岁", sep="")
```
- 旧式格式化输出:类似C语言中,使用`%`这个占位符引入变量数据
```python
name = "张三"
age = 18
height = 1.823
print("我叫%s,今年%d岁,身高%.3f米" % (name, age, height)
```
- 新式字符串格式化输出:使用`{}`表示占位符,通过字符串的`format()`函数传入参数
```python
name = "张三"
age = 18
height = 1.823
print("我叫{},今年{}岁,身高{:.2f}米".format(name, age, height))
print("我叫{abc},今年{bca}岁,身高{haha:.2f}米".format(abc="李四", bca=age, haha=2.123))
```
- f字符串格式化输出:可以直接将变量放入到占位符中,只不过这种情况下必须给字符串前面加一个f
```python
name = "张三"
age = 18
height = 1.823
print(f"我叫{name},今年{age}岁,身高{height:.2f}米")
```
关于f字符串中对齐的操作
```python
text1 = "我爱迪丽热巴"
text2 = "我爱迪丽热巴还爱古力娜扎更何况马尔扎哈"
print(f"<{text1}>")
# 打印的内容占据10个字符位置,默认靠左
print(f"<{text1:10}>")
print(f"<{text1:^10}>") # 居中
print(f"<{text1:>10}>") # 靠右
# 如果打印的内容>10个 自动填满
print(f"<{text2:10}>")
```
### 5.2 input()输入函数
**(1)基本用法**
input()也是Python内置函数,作用是暂停程序的运行,等待用户输入一行数据,然后将用户输入的内容以**字符串**的形式返回。
```python
num1 = input("请输入第一个数字:")
num1 = int(num1)
num2 = input("请输入第二个数字:")
num2 = int(num2)
print(num1 + num2)
# 简写为以下情况
num = int(input("请输入一个数字:"))
print(num + 1)
```
**(2)处理多值输入**
可以按照上述的代码进行逐行的输入,但是比较麻烦
一般而言,进行多值输入时,多个数据会在同一行进行输出的,例如:`1,2,3` 或 `1 2 3`
```python
num1, num2, num3 = input("请输入三个数字:").split(",")
num1 = int(num1)
num2 = int(num2)
num3 = int(num3)
print(num1 + num2 + num3)
# 相对而言还是比较麻烦的
```
可以使用map()内置函数来统一解决这个转换的问题
```python
"""
map的作用:将后续每一数据都要经历f函数的操作
'1' -> int() -> 1 -> num1
'2' -> int() -> 2 -> num2
'3' -> int() -> 3 -> num3
"""
num1, num2, num3 = map(int, input("请输入三个数字:").split(","))
print(num1 + num2 + num3)
# 如果输入的数据和转换的格式不匹配的话 则报错
num1, num2, num3 = map(float, input("请输入三个数字:").split(" "))
print(num1 + num2 + num3)
# 输入 1 True 迪丽热巴
# ValueError: could not convert string to float: 'True'
```
**(3)eval()函数**
内置函数,表示执行eval()中传入的代码字符串!
```python
eval("print('Hello World!')")
eval("print(3 + 2 ** 2 + (2j - 3) * (3j + 2))")
result = eval("1,2,3")
print(result)
a,b,c,d,e = eval("1,3.14,True,'热巴',None")
print(a,b,c,d,e)
# 1,True,迪丽热巴
# a,b,c = 1,True,迪丽热巴
# NameError: name '迪丽热巴' is not defined
# 1,True,'迪丽热巴'
a,b,c = eval(input("请输入数据:"))
print(a,b,c) # 语法报错了
# 使用eval()时 多个数据必须用英文逗号分隔
```
> eval()函数要慎用!
>
> 输入 exit() 试试 直接结束程序
## 第6节课 基本运算符
### 6.1 算数运算符
**(1)加法运算符 `+`**
- 如果左右两边都是数字,则为数学加法
- 如果左右两边都是序列,则为序列拼接
```python
s1 = "Hello"
s2 = "Fuck"
print(s1 + s2)
arr1 = [1,2,3]
arr2 = [4,5,6]
print(arr1 + arr2)
```
**(2)减法运算符 `-`**
- 如果左右两边都是数字,则为数学减法
- 如果左右两边都是集合,则为求差集
```python
set1 = {1,2,3,4}
set2 = {3,4,5,6}
print(set1 - set2)
print(set2 - set1)
print(set1 + set2) # 报错 不支持
```
**(3)乘法运算符 `*`**
- 如果左右两边都是数字,则为数学乘法
- 如果左右两边一个是整数另一个是序列,则为重复拼接
```python
print("我爱迪丽热巴" * 3)
print(3 * "我爱迪丽热巴")
```
**(4)除法运算符 `/` 与 `//`**
```python
print(10 / 4) # 小数除法 2.5
print(10 // 4) # 整数除法 2
```
**(5)取余运算符 `%`**
求余数
```python
print(10 % 3)
print(7 % 4)
```
**(6)幂运算符 `**`**
```python
print(2 ** 3)
print(9 ** 0.5)
```
### 6.2 位运算符
同样也是针对数字计算的,但考虑的是二进制计算
**(1)按位与运算符 `&`**
```python
num1 = 10
num2 = 6
print(num1 & num2)
"""
1010
& 0110
0010
"""
```
**(2)按位或运算符 `|`**
```python
print(num1 | num2)
"""
1010
| 0110
1110
"""
```
**(3)按位异或运算符 `^`**
```python
print(num1 ^ num2)
"""
相同为假 不同为真
1010
^ 0110
1100
"""
```
**(4)按位取反运算符 `~`**
将二进制0变1,1变0,在Python中数字有符号位,结果`-(x+1)`
```python
print(~num1) #-11
```
**(5)左移运算符 `<<`**
将二进制后面加若干个0
```python
print(10 << 3)
# 10 * 2**3 = 80
"""
1010
1010000
"""
```
**(6)右移运算符 `>>`**
将二进制后面删除若干个位
```python
print(121 >> 3)
# 121 // 2**3 = 15
"""
1111001
1111
"""
```
### 6.3 赋值运算符
赋值运算符常用于简化赋值操作。
| 运算符 | 名称 | 示例 | 等价于 |
| ------ | ------------ | ------- | ---------- |
| = | 简单赋值 | x = 5 | |
| += | 加法赋值 | x += 3 | x = x + 3 |
| -= | 减法赋值 | x -= 3 | x = x - 3 |
| *= | 乘法赋值 | x *= 3 | x = x * 3 |
| /= | 除法赋值 | x /= 3 | x = x / 3 |
| %= | 取模赋值 | x %= 3 | x = x % 3 |
| //= | 取整除赋值 | x //= 3 | x = x // 3 |
| **= | 幂赋值 | x **= 3 | x = x ** 3 |
| &= | 按位与赋值 | x &= 3 | x = x & 3 |
| \|= | 按位或赋值 | x \|= 3 | x = x \| 3 |
| ^= | 按位异或赋值 | x ^= 3 | x = x ^ 3 |
| >>= | 右移位赋值 | x >>= 3 | x = x >> 3 |
| <<= | 左移位赋值 | x <<= 3 | x = x << 3 |
> 注意,在Python当中是不存在 ++ 和 -- 操作的
>
> 如果某些地方用到了 `++`的概念 `+=1`;`--`用 `-=1`
>
> ```c
> #include<stdio.h>
> void main() {
> /*
> x++ x--
> (1)开辟一个临时存储区 将i的值放进去 :0 1 2 3 3
> (2)i变量自身+1 :1 2 3 3 3
> (3)临时存储区的值等待被调用 :
> ++x --x 直接算 再调用结果
> */
> int i = 0;
> i++;
> printf("%d", i); //1
> printf("%d", i++); //1
> int j = i++;
> printf("%d", j); //2
> printf("%d", i); //3
> i = i++;
> printf("%d", i); //3
> i = i++;
> printf("%d", i); //3
> }
> ```
## 第7节课 基础语法编程练习
### 7.1 摄氏温度转化为华氏温度
**题目描述**
输入一个摄氏温度的值,将它转变为华氏温度,并将结果输出
转换的公式为如下:
$$
fahrenheit=(9/5)*celsius+32
$$
**输入输出描述**
输入一个值表示摄氏温度celsius
输出华氏温度fahrenheit ,结果保留一位小数点
**示例**
> 输入:
>
> 43
>
> 输出:
>
> 109.4
```python
celsius = float(input("请输入摄氏温度:"))
fah = 9 / 5 * celsius + 32
print(f"华氏温度为{fah:.1f}")
```
### 7.2 计算圆柱体的体积
**题目描述**
输入圆柱的半径和高,并利用如下公式计算圆柱体的底面积和体积。
$$
area=radius*radius*π
$$
$$
volume=area*length
$$
**输入输出描述**
分别输入圆柱的半径radius和高度length,两个数据之间用空格分隔
输出两行,第一行为圆柱底面积area,第二行为圆柱体积volume,结果保留两位小数点
**示例**
> 输入:
>
> 5.5 12
>
> 输出:
>
> 95.03
>
> 1140.41
```python
radius, length = map(float, input().split(" "))
area = radius ** 2 * 3.1415926
volume = area * length
print(f"{area:.2f}")
print(f"{volume:.2f}")
```
### 7.3 对一个整数中的各位数字求和
**题目描述**
读取一个0到1000之间的整数,并计算它各位数字之和
**输入输出描述**
输入一个(0,1000)之间的整数
输出该数字的各位数字之和
**示例1**
> 输入:
>
> 999
>
> 输出:
>
> 27
>
> 解释:
>
> 999各位数之和为9 + 9 + 9 = 27
**示例2**
> 输入:
>
> 12
>
> 输出:
>
> 3
```python
num = int(input())
"""
123 % 10 = 3
12 % 10 = 2
1 % 10 = 1
"""
a = num % 10 # 54321 1
num //= 10 # 5432
b = num % 10 # 5432 2
num //= 10 # 543
c = num % 10 # 543 3
sum_of_digits = a + b + c
print(sum_of_digits)
print(num)
```
### 7.4 分割数字
**题目描述**
输入一个四位整数,并以反向顺序显示
**输入输出描述**
输入一个四位整数
输出四行,第一行为个位,第二行为十位,第三行为百位,第四行为千位
**示例**
> 输入:
>
> 5213
>
> 输出:
>
> 3125
```python
num = int(input())
a = num % 10
num //= 10
b = num % 10
num //= 10
c = num % 10
num //= 10
d = num % 10
num //= 10
print(a,b,c,d, sep="")
print(int(str(a) + str(b) + str(c) + str(d)))
print(a * 1000 + b * 100 + c * 10 + d)
print(num)
```
### 7.5 计算三角形的面积
**题目描述**
输入三角形的三个顶点坐标,并计算其面积,计算公式如下
$$
s=(side1+side2+side3)/2 \\
area = \sqrt{s(s-side1)(s-side2)(s-side3)}
$$
**输入输出描述**
输入六个数据,分别表示三角形三个顶点的坐标x1、y1、x2、y2、x3和y3,数据之间用空格分隔
输出三角形的面积,结果保留一位小数
**示例**
> 输入:
>
> 1.5 -3.4 4.6 5 9.5 -3.4
>
> 输出:
>
> 33.6
```python
x1, y1, x2, y2, x3, y3 = map(float, input().split(" "))
side1 = ((x1 - x2) ** 2 + (y1 - y2) ** 2) ** 0.5
side2 = ((x1 - x3) ** 2 + (y1 - y3) ** 2) ** 0.5
side3 = ((x2 - x3) ** 2 + (y2 - y3) ** 2) ** 0.5
s = (side1 + side2 + side3) / 2
area = (s * (s - side1) * (s - side2) * (s - side3)) ** 0.5
print(f"{area:.1f}")
```
### 7.6 显示当前时间
**题目描述**
输入你所在的时区,并输出当前的时间
**输入输出描述**
输入时区,如东八区为8,西五区为-5
输出二十四小时制的时间,格式为 时:分:秒
**示例**
> 输入:
>
> 8
>
> 输出:
>
> 21:43:12
```python
import time
time_zone = int(input())
# 总秒数
total_seconds = int(time.time())
# 当前秒数
current_seconds = total_seconds % 60
# 总分钟数
total_minutes = total_seconds // 60
# 当前分钟数
current_minutes = total_minutes % 60
# 总小时数
total_hours = total_minutes // 60
# 当前小时数
current_hours = total_hours % 24
print(f"{(current_hours + time_zone) % 24}:{current_minutes}:{current_seconds}")
```
### 7.7 最小数量的硬币
**题目描述**
假设硬币种类分为:一元硬币、两角五分硬币、一角硬币、五分硬币、一分硬币
输入总金额,并将总金额兑换成若干个硬币,并保证所兑换的硬币个数最少
**输入输出描述**
输入总金额
输出每种硬币的个数
**示例**
> 输入:
>
> 11.56
>
> 输出:
>
> 11个一元硬币
>
> 2个两角五分硬币
>
> 0个一角硬币
>
> 1个五分硬币
>
> 1个一分硬币
```python
cents = int(float(input()) * 100)
dollars = cents // 100
cents = cents % 100
quarters = cents // 25
cents = cents % 25
dimes = cents // 10
cents = cents % 10
nickels = cents // 5
cents = cents % 5
print(f"{dollars}个一元")
print(f"{quarters}个两角五分")
print(f"{dimes}个一角")
print(f"{nickels}个五分")
print(f"{cents}个一分")
```
## 第8节课 选择结构语句
### 8.1 比较运算符
比较运算符运算结果为布尔类型
| 运算符 | 名称 | 示例 | 描述 |
| ------ | ---------- | ---------- | ------------------------------------------------------------ |
| == | 等于 | x == y | 检查 x 和 y 的值是否相等,返回布尔值 True 或 False。 |
| != | 不等于 | x != y | 检查 x 和 y 的值是否不相等,返回布尔值 True 或 False。 |
| > | 大于 | x > y | 检查 x 是否大于 y,返回布尔值 True 或 False。 |
| < | 小于 | x < y | 检查 x 是否小于 y,返回布尔值 True 或 False。 |
| >= | 大于或等于 | x >= y | 检查 x 是否大于或等于 y,返回布尔值 True 或 False。 |
| <= | 小于或等于 | x <= y | 检查 x 是否小于或等于 y,返回布尔值 True 或 False。 |
| is | 身份运算符 | x is y | 检查 x 和 y 是否引用同一个对象(内存地址相同),而非值相等。 |
| is not | 身份运算符 | x is not y | 检查 x 和 y 是否引用不同的对象,与 `is` 相反。 |
| in | 成员运算符 | x in y | 检查 x 是否是容器(如列表、元组、字符串等)y 的成员。 |
| not in | 成员运算符 | x not in y | 检查 x 是否不是容器 y 的成员,与 `in` 相反。 |
这些比较运算符用于构建条件表达式,常用于控制流语句(如 `if`、`while`)和布尔逻辑中。
```python
print("abc" in "abcdefg")
print(3 in [2,4,6,8] )
```
```python
>>> a = 1
>>> b = 1
>>> id(a)
140714221496760
>>> id(b)
140714221496760
>>> a == b
True
>>> a is b
True
```
```python
>>> a = 300
>>> b = 300
>>> id(a)
2549268131952
>>> id(b)
2549271002864
>>> a == b
True
>>> a is b
False
```
> 因为在Python中,对于[-5,256]之间的整数会有常量驻留,
>
> 当我们运行任何Python程序时,解释器当中就默认把上述的数字进行了创建,后面再去使用这些数字时,直接复用即可,而不必重新创建。如果不在常量驻留之间,则为新建数据对象。
>
> <img src="https://zh-1258460726.cos.ap-nanjing.myqcloud.com//typora-pic/image-20250705163849967.png" alt="image-20250705163849967" style="zoom:25%;" />
链式比较与序列比较:
```python
num = 3
print(1 < num < 4)
print(2 > num < 4)
print(4 > num < 8)
print(2 > num > 7)
s1 = "abc"
s2 = "abd"
print(s1 < s2)
s1 = "w"
s2 = "a"
print(s1 < s2)
s1 = "abc"
s2 = "abcdefg"
print(s1 < s2) # 前面相等 但是长度不一样 比长度
```
### 8.2 逻辑运算符
逻辑运算符运算结果为布尔类型
| 运算符 | 逻辑名称 | 示例 | 描述 |
| ------ | -------- | ------- | ------------------------------------------------------------ |
| and | 逻辑与 | x and y | 当 x 和 y 都为 True 时返回 True,否则返回 False。 |
| or | 逻辑或 | x or y | 当 x 或 y 中有一个为 True 时返回 True,仅当两者都为 False 时返回 False。 |
| not | 逻辑非 | not x | 如果 x 为 True,则返回 False;如果 x 为 False,则返回 True。 |
短路特性说明:
- `and` 运算符:如果第一个操作数为 False,则直接返回 False,不计算第二个操作数。
- `or` 运算符:如果第一个操作数为 True,则直接返回 True,不计算第二个操作数。
这些逻辑运算符用于组合和操作布尔值,常用于条件判断和循环控制。
```python
print(3 > 2 and 4 > 3) # 与 有假则假
print(3 > 2 or 2 > 3) # 或 有真则真
print(not 3 > 2)
```
### 8.3 选择结构
三大结构:
- 顺序结构:在此之前写的所有代码都是顺序结构的,包括后面的代码宏观而言也是顺序结构的。
```mermaid
flowchart LR
A[开始] --> B[执行语句1]
B --> C[执行语句2]
C --> D[执行语句3]
D --> E[结束]
```
- 选择结构:在顺序结构基础上,可以进行分支的选择,在Python中用if-else语句来实现的。
- 循环结构
**(1)单if 语句**
```python
之前的代码
if 条件:
执行语句块 # 条件结果为 True 则执行此处
之后的代码
```
```c
if (条件表达式) {
执行语句
}
```
```mermaid
graph LR;
A[开始] --> B{条件}
B -->|是| C[执行语句块]
B -->|否| D[结束]
C --> D
```
```python
print("我是王大锤")
status = "沮丧的"
money = 100000009
if money > 10000:
status = "开心的"
print("迎娶迪丽热巴")
print(f"{status}吃饭")
print(f"{status}工作")
print(f"{status}生活")
```
**(2)if - else 语句**
```python
之前的代码
if 条件:
执行语句块1 # 条件结果为 True 则执行此处
else:
执行语句块2 # 条件结果为 False 则执行此处
之后的代码
```
```mermaid
graph LR;
A[开始] --> B{条件}
B -->|是| C[执行语句块1]
B -->|否| D[执行语句块2]
C --> E[结束]
D --> E
```
```python
print("我是王大锤")
status = ""
money = 100000000
if money > 10000:
status = "开心的"
print("迎娶迪丽热巴")
else:
status = "沮丧的"
print("迎娶哈士奇")
print(f"{status}吃饭")
print(f"{status}工作")
print(f"{status}生活")
```
**(3)if - elif - else 语句**
```python
之前的代码
if 条件1:
执行语句块1
elif 条件2:
执行语句块2
elif 条件3:
执行语句块3
else:
执行语句块4
之后的代码
```
```mermaid
graph LR;
A[开始] --> B{条件1}
B -->|是| C[执行语句块1]
B -->|否| D{条件2}
D -->|是| E[执行语句块2]
D -->|否| F{条件3}
F -->|是| G[执行语句块3]
F -->|否| H[执行else语句块]
C --> I[结束]
E --> I
G --> I
H --> I
```
**(4)嵌套选择语句**
```python
之前的代码
if 外层条件:
内层选择之前的代码
if 内层条件:
执行内层语句块1
else:
执行内层语句块2
内层选择之后的代码
else:
执行外层else语句块
之后的代码
```
```mermaid
graph LR;
A[开始] --> B{外层条件}
B -->|是| C{内层条件}
B -->|否| D[执行外层else语句块]
C -->|是| E[执行内层语句块1]
C -->|否| F[执行内层语句块2]
E --> G[外层后续语句]
F --> G
D --> G
G --> H[结束]
```
## 第9节课 选择语句编程练习
### 9.1 计算身体质量指数
**题目描述**
BMI是根据体重测量健康的方式,通过以千克为单位的体重除以以米为单位的身高的平方计算而出
BMI指数解读如下:
| BMI | 解释 |
| :----------------: | :--: |
| BMI < 18.5 | 超轻 |
| 18.5 ≤ BMI < 25.0 | 标准 |
| 25.0 ≤ BMI < 30.0 | 超重 |
| 30.0 ≤ BMI | 肥胖 |
**输入输出描述**
输入体重和身高,数据之间用空格分隔
输出BMI指数结果
**示例**
> 输入:
>
> 60 1.8
>
> 输出:
>
> 标准
```python
weight, height = map(float, input().split(" "))
BMI = weight / height ** 2
"""
判断的逻辑:
取值范围的筛选的话
建议 从小到大或者从大到小筛选过程
建议 先筛选大范围的,再初筛选小范围的
"""
"""
if 25.0 <= BMI < 30.0:
pass
elif 18.5 <= BMI < 25.0
pass
elif BMI < 18.5:
pass
else:
pass
"""
if BMI < 18.5:
print("超轻")
elif BMI <25.0:
print("标准")
elif BMI < 30.0:
print("超重")
else:
print("肥胖")
```
### 9.2 判定闰年
**题目描述**
一个年份如果能被4整除但不能被100整除,或者能被400整除,那么这个年份就是闰年
**输入输出描述**
输入一个年份
输出Yes表示该年份为闰年,No则表示不是闰年
**示例1**
> 输入:
>
> 2008
>
> 输出:
>
> Yes
**示例2**
> 输入:
>
> 2002
>
> 输出:
>
> No
```python
year = int(input())
# not > and > or
if year % 4 == 0 and year % 100 != 0 or year % 400 == 0:
print("闰年")
else:
print("平年")
```
### 9.3 中彩票
**题目描述**
随机产生一个两位数数字,然后用户输入一个两位数数字,并根据以下规则判定用户赢得的奖金是多少
(1)输入的数字和随机产生的数字完全相同(包括顺序),奖金为10000元
(2)输入的数字和随机产生的数字相同(不包括顺序),奖金为3000元
(3)输入的数字和随机产生的数字有一位数相同,奖金为1000元
(4)输入的数字和随机产生的数字都不相同,没有奖金,0元
**输入输出描述**
输入一个两位数
输出两行,第一行输出那个随机产生的两位数,第二行输出用户的奖金
**示例1**
> 输入:
>
> 12
>
> 输出:
>
> 12
>
> 10000
**示例2**
> 输入:
>
> 12
>
> 输出:
>
> 21
>
> 3000
**示例3**
> 输入:
>
> 12
>
> 输出:
>
> 23
>
> 1000
**示例4**
> 输入:
>
> 12
>
> 输出:
>
> 45
>
> 0
```python
import random
random_num = random.randint(10, 99)
# random_num = 88
print(random_num)
user_num = int(input())
"""
12
r1 = 1
r2 = 2
34
u1 = 3
u2 = 4
"""
r1 = random_num % 10
r2 = random_num // 10
u1 = user_num % 10
u2 = user_num // 10
"""
if random_num == user_num:
print(10000)
elif r1 == u2 and r2 == u1:
print(3000)
elif r1 == u1 or r1 == u2 or r2 == u1 or r2 == u2:
print(1000)
else:
print(0)
"""
"""
12
42
21
"""
if r1 != u1 and r1 != u2 and r2 != u1 and r2 != u2:
print(0)
elif r1 == u1 and r2 != u2 or r1 == u2 and r2 != u1 or r2 == u1 and r1 != u2 or r2 == u2 and r1 != u1:
print(1000)
elif r1 == u2 and r2 == u1 and r1 != r2:
print(3000)
else:
print(10000)
```
### 9.4 解一元二次方程
**题目描述**
一元二次方程$ax^2+bx+c=0 (a != 0)$ 的解可以使用下面的公式计算
$$
r_1=\frac{-b+\sqrt{b^2-4ac}}{2a},r_2=\frac{-b-\sqrt{b^2-4ac}}{2a}
$$
其中$b^2-4ac$称为判别式,如果它为正,则方程有两个实数解;为零,方程只有一个实数解;为负,没有实数解
**输入输出描述**
输入a、b、c三个数据,数据之间用空格分隔
两个解每行输出一个;一个解单行输出;无解则单行输出无实数解,保留两位小数
**示例1**
> 输入:
>
> 1.0 3 1
>
> 输出:
>
> -0.38
>
> -2.62
**示例2**
> 输入:
>
> 1 2.0 1
>
> 输出:
>
> -1.00
**示例3**
> 输入:
>
> 1 2 3
>
> 输出:
>
> 无实数解
```python
a, b, c = map(float, input().split(" "))
delt = b ** 2 - 4 * a * c
if delt > 0:
print(f"x1 = {(-b + delt ** 0.5) / (2 * a):.2f}, x2 = {(-b - delt ** 0.5) / (2 * a):.2f}")
elif delt == 0:
print(f"x = {-b / (2 * a):.2f}")
else:
print("无实数解")
```
### 9.5 未来是周几
**题目描述**
输入表示今天是一周内哪一天的数字(星期天是0,星期一是1,...,星期六是6)
并输入今天之后到未来某天的天数,然后输出该天是星期几
**输入输出描述**
输入两个数据,分别表示今日星期几的数字和未来某天的天数,数据之间用空格分隔
输出未来某天是星期几
**示例1**
> 输入:
>
> 1 3
>
> 输出:
>
> 星期四
**示例2**
> 输入:
>
> 0 31
>
> 输出:
>
> 星期三
```python
today, future = map(int, input().split(" "))
future_day = (today + future) % 7
if future_day == 0:
print("星期天")
elif future_day == 1:
print("星期一")
elif future_day == 2:
print("星期二")
elif future_day == 3:
print("星期三")
elif future_day == 4:
print("星期四")
elif future_day == 5:
print("星期五")
elif future_day == 6:
print("星期六")
```
### 9.6 一周的星期几
**题目描述**
泽勒的一致性是一个由泽勒开发的算法,用于计算一周的星期几,公式如下:
$$
h=(q+\lfloor\frac{26(m+1)}{10}\rfloor+k+\lfloor\frac{k}{4}\rfloor+\lfloor\frac{j}{4}\rfloor+5j) \% 7
$$
(1)$h$是指一周的星期几(0表示星期六、1表示星期天、...、6表示星期五)
(2)$q$是一个月的哪一天
(3)$m$是月份(3表示三月、4表示四月、...、12表示十二月),其中一月和二月都是按照前一年的13月和14月来计数的,所以还得把年份改为前一年
(4)$j$是世纪数,即$\lfloor\frac{year}{100}\rfloor$
(5)$k$是一个世纪的某一年,即$year \% 100$
(6)$\lfloor\rfloor$为向下取整符号
**输入输出描述**
输入年、月、日三个数据,数据之间用空格分隔
输出该日是周几
**示例1**
> 输入:
>
> 2013 1 25
>
> 输出:
>
> 星期五
**示例2**
> 输入:
>
> 2012 5 12
>
> 输出:
>
> 星期六
```python
year, m, q = map(int, input().split(" "))
if m == 1 or m == 2:
m += 12
year -= 1
k = year % 100
j = year // 100
h = (q + 26 * (m + 1) // 10 + k + k // 4 + j // 4 + 5 * j) % 7
if h == 0:
print("星期六")
elif h == 1:
print("星期天")
elif h == 2:
print("星期一")
elif h == 3:
print("星期二")
elif h == 4:
print("星期三")
elif h == 5:
print("星期四")
elif h == 6:
print("星期五")
```
### 9.7 剪刀石头布 I
**题目描述**
计算机随机产生一个数字0、1和2分别表示剪刀、石头和布
用户输入数字0、1或2,输出用户赢、计算机赢或平局
**输入输出描述**
输入数字0、1或2
输出有三行,第一行输出计算机出的啥,第二行输出用户出的啥,第三行输出结果
**示例1**
> 输入:
>
> 0
>
> 输出:
>
> 计算机出的 石头
>
> 用户出的 剪刀
>
> 计算机赢
**示例2**
> 输入:
>
> 1
>
> 输出:
>
> 计算机出的 剪刀
>
> 用户出的 石头
>
> 用户赢
**示例3**
> 输入:
>
> 2
>
> 输出:
>
> 计算机出的 布
>
> 用户出的 布
>
> 平局
```python
import random
comp_num = random.randint(0, 2)
user_num = int(input())
comp_str = ""
if comp_num == 0:
comp_str = "剪刀"
elif comp_num == 1:
comp_str = "石头"
else:
comp_str = "布"
user_str = ""
if user_num == 0:
user_str = "剪刀"
elif user_num == 1:
user_str = "石头"
else:
user_str = "布"
print(f"电脑出的是{comp_str}")
print(f"用户出的是{user_str}")
res = user_num - comp_num
if res == 0:
print("平局")
elif res == -2 or res == 1:
print("用户赢")
else:
print("电脑赢")
"""
用户赢
user comp
0 2 -2
1 0 1
2 1 1
电脑赢
user comp
0 1 -1
1 2 -1
2 0 2
"""
```
### 9.8 回文数
**题目描述**
输入一个三位整数,然后判断其是否为一个回文数
如果一个数从左向右和从右向左读取时是一样的,那么这个数就是回文数
**输入输出描述**
输入一个数字
输出Yes表示是回文数,否则输出No
**示例1**
> 输入:
>
> 121
>
> 输出:
>
> Yes
**示例2**
> 输入:
>
> 123
>
> 输出:
>
> No
```python
num = int(input())
origin_num = num
# 123
a = num % 10 #3
num //= 10
b = num % 10 #2
num //= 10
c = num % 10 #1
num //= 10
reversed_num = a * 100 + b * 10 + c
if reversed_num == origin_num:
print("是回文")
else:
print("不是回文")
```
### 9.9 两个圆
**题目描述**
编写程序提示用户输入两个圆的中心坐标以及它们的半径,然后判断第二个圆与第一个圆之间的关系(包含、重叠、相离)。
<img src="https://zh-1258460726.cos.ap-nanjing.myqcloud.com//typora-pic/image-20250304172103796.png" alt="image-20250304172103796" style="zoom:50%;" />
**输入输出描述**
输入:输入两行数字 分别表示圆的中心坐标和半径
输出:两个圆的关系
**示例1**
> 输入:
>
> 0.5 5.1 13
>
> 1 1.7 4.5
>
> 输出:
>
> 包含
**示例2**
> 输入:
>
> 4.4 5.7 5.5
>
> 6.7 3.5 3
>
> 输出:
>
> 相交
**示例3**
> 输入:
>
> 4.4 5.5 1
>
> 5.5 7.2 1
>
> 输出:
>
> 相离
```python
x1, y1, r1 = map(float, input().split(" "))
x2, y2, r2 = map(float, input().split(" "))
distance = ((x1 - x2) ** 2 + (y1 - y2) ** 2) ** 0.5
if distance <= r1 - r2:
print("包含")
elif distance >= r1 + r2:
print("相离")
else:
print("相交")
```
## 第10节课 for循环语句结构
在Python中,循环语句主要分为两种结构,for 循环结构,while循环结构。
循环可以将那些**代码重复**且具**有规律可循**的代码片段进行封装。
### 10.1 循环概述
**(1)循环常见的解决问题**
- 指定次数去执行某个代码片段或者当满足一定条件时去执行某个代码片段,直到次数用完或者条件不满足为止,循环就结束
- 打印有规律的图形或者数字组合
- 遍历一组数据,对数据进行相同的操作 -> 批量处理
- 模拟一些操作
**(2)循环四要素**
1. 循环的初始化:循环从哪里开始
2. 循环的继续条件:循环是否继续,循环何时结束
3. 循环体:需要被重复执行的代码片段
4. 循环的控制变量:用于控制循环的次数,条件,更迭继续条件
示例1:向前走10步 -> 有明显循环次数 for
- 从第一步开始
- 只要还没走到第十步则继续
- 向前走的一步
- 向前走的步数
示例2:向前走,直到碰墙为止 -> 有明显的条件 while
- 与墙之间的距离
- 只要距离大于0则继续
- 向前走一步,距离缩减
- 人与墙之间的距离
### 10.2 for循环基本使用
```c
// 打印1到10的数字
for (int i = 1; i <= 10;i++) {
printf("%d\n", i);
}
// int i = 1 初始化
// i <= 10 继续条件
// printf("%d\n", i); 循环体
// i++ 控制变量
```
Python中for循环,一般由于迭代序列,通常for结合 range()函数去使用的
```python
# 1 2 3 4 5 6 7 8 9 10
for i in range(1, 11):
print(i)
```
range(a,b,c):用于产生一个`[a, b)`之间且步长为 `c`的序列(默认为1)
- a:循环的初始化
- b:循环的继续条件
- `print(i)`:循环体
- c:控制变量是 i ,c 用于改变 i(将i向后跳转,而不是所谓的 i += 1)
<img src="https://zh-1258460726.cos.ap-nanjing.myqcloud.com//typora-pic/image-20250707142702613.png" alt="image-20250707142702613" style="zoom:25%;" />
```python
# a = 0, b = 10, c = 1
for i in range(10):
print(i)
# a = 10, b = 2, c = 1
# 正数步长 a->b 递增
for i in range(10, 2):
print(i)
# 负数步长 a->b 递减
for i in range(10, 2, -2):
print(i)
for s in "Hello World!":
print(s)
```
一般在使用range()时,主要有三种情况:
- range(b):从0到b,步长1
- range(a,b):从a到b,步长1
- range(a,b,c):从a到b,步长c
```mermaid
graph LR;
A[开始] --> B[初始化迭代变量]
B --> C{是否还有元素}
C -->|是| D[执行循环体]
D --> E[更新迭代变量]
E --> C
C -->|否| F[结束]
```
**案例:寻找最值**
首先输入一个n,表示接下来要输入n个数字
其次连续输入n个数字,寻找n个数字当中的最大值和最小值
```python
n = int(input("输入n:"))
min_num = 99999999999
max_num = -99999999999
for i in range(n):
num = int(input())
if num < min_num:
min_num = num
if num > max_num:
max_num = num
print(min_num)
print(max_num)
n = int(input("输入n:"))
min_num = 0
max_num = 0
for i in range(n):
num = int(input())
if i == 0:
min_num = num
max_num = num
else:
if num < min_num:
min_num = num
if num > max_num:
max_num = num
print(min_num)
print(max_num)
```
**案例:计算平均数**
首先输入一个n,表示接下来要输入n个数字
其次连续输入n个数字,计算n个数字的平均值
```python
n = int(input())
sum_of_digits = 0
for i in range(n):
num = int(input())
sum_of_digits += num
print(sum_of_digits / n)
n = int(input())
sum_of_digits = 0
for _ in range(n):
num = int(input())
sum_of_digits += num
print(sum_of_digits / n)
```
**案例:蒙特卡罗模拟**
<img src="https://zh-1258460726.cos.ap-nanjing.myqcloud.com//typora-pic/image-20250707145617550.png" alt="image-20250707145617550" style="zoom:25%;" />
```python
import random
n = int(input())
m = 0
for _ in range(n):
x = random.uniform(-1, 1)
y = random.uniform(-1, 1)
if (x ** 2 + y ** 2) ** 0.5 <= 1:
m += 1
print(f"π的近似值为:{4 * m / n}")
```
### 10.3 循环嵌套
就是指某一个循环的循环体是另一个循环结构,循环嵌套不宜过多,顶多就两层即可,如果发现需要多层循环解决某一个问题,则考虑更换你的算法思路了。
**案例:打印矩形**
```python
"""
*****
*****
*****
*****
"""
for i in range(4):
print("*****")
print("=" * 20)
for i in range(5):
print("*", end="")
print()
for i in range(5):
print("*", end="")
print()
for i in range(5):
print("*", end="")
print()
for i in range(5):
print("*", end="")
print()
print("=" * 20)
for i in range(4):
for j in range(5):
print("*", end="")
print()
```
**案例:打印直角星**
```python
"""
*
**
***
****
*****
"""
"""
for j in range(1):
print("*", end="")
print()
x1
for j in range(2):
print("*", end="")
print()
x2
for j in range(3):
print("*", end="")
print()
x3
"""
for i in range(1, 100):
for j in range(i):
print("*", end="")
print()
```
**案例:打印反直角星**
```python
""" i k
* 1 4
** 2 3
*** 3 2
**** 4 1
***** 5 0
"""
"""
for k in range(4):
print(" ", end="")
for j in range(1):
print("*", end="")
print()
for k in range(3):
print(" ", end="")
for j in range(2):
print("*", end="")
print()
for k in range(2):
print(" ", end="")
for j in range(3):
print("*", end="")
print()
"""
lines = 100
for i in range(1, lines):
for k in range(lines - 1 - i):
print(" ", end="")
for j in range(i):
print("*", end="")
print()
```
**案例:打印乘法口诀表**
```python
"""
1 × 1 = 1
2 × 1 = 2 2 × 2 = 4
3 × 1 = 3 3 × 2 = 6 3 × 3 = 9
i j
1 1
2 1 2
3 1 2 3
for i in range(1,3):
print(f"2 × {i} = {2 * i}", end="\t")
print()
for i in range(1,4):
print(f"3 × {i} = {3 * i}", end="\t")
print()
"""
for line in range(1, 10):
for i in range(1, line + 1):
print(f"{line} × {i} = {line * i}", end="\t")
print()
```
## 第11节课 循环控制语句
### 11.1 break循环控制语句
用于在循环执行过程中,当满足一定条件时,可以跳出循环(提前结束)
一般和 `for - else` 结合使用
```python
for:
循环体
break
else:
循环正常结束后执行的代码
```
**案例:是否连续递增**
输入一个n,接着输入n个数字,判断该n个数字是否连续递增。
```python
n = int(input())
pre = 0
# flag = True # 默认循环正常执行完毕
# for i in range(n):
# num = int(input())
# if i == 0:
# pre = num
# else:
# if num >= pre:
# pre = num
# else:
# flag = False
# break
# # flag 用于标记循环的结束状态的
# if flag: # 在条件表达式当中 一般不对布尔类型的变量进行判断
# print("Yes")
# else:
# print("No")
for i in range(n):
num = int(input())
if i == 0:
pre = num
else:
if num >= pre:
pre = num
else:
print("No")
break
else:
print("Yes")
```
**案例:判断素数**
```python
num = int(input())
for i in range(2, num):
if num % i == 0:
print("不是素数")
break
else:
print("是素数")
```
**案例:找出2~100内所有素数**
```python
for num in range(2, 101):
for i in range(2, num):
if num % i == 0:
break
else:
print(num)
```
### 11.2 continue循环控制语句
用于在循环结构中,当满足一定条件时可以跳过本次循环,接着下一轮循环。
**案例:100以内不能被3或5整除的数**
```python
for num in range(1, 101):
if num % 3 == 0 or num % 5 == 0:
continue
print(num)
for num in range(1, 101):
if num % 3 != 0 and num % 5 != 0:
print(num)
```
**案例:正数的平均值**
```python
# n = int(input())
# sum_of_digits = 0
# count = 0
# for i in range(n):
# num = int(input())
# if num <= 0 :
# continue
# count += 1
# sum_of_digits += num
# print(sum_of_digits / count)
n = int(input())
sum_of_digits = 0
count = 0
for i in range(n):
num = int(input())
if num > 0 :
count += 1
sum_of_digits += num
print(sum_of_digits / count)
```
## 第12节课 while循环语句结构
### 12.1 while循环基本使用
和for循环很像,在Python中,只不过相对而言while循环要比for循环更加灵活一些,所之前写的for代码都可以被while实现,但是while写的代码for不一定能实现。
```python
1.循环初始化
while 2.循环的继续条件:
3.循环体
4.循环的控制变量
```
```python
num = 1
while num <= 10:
print(num)
num += 1
"""
*
**
***
****
*****
"""
"""
count = 0
while count < 3:
print("*", end="")
count += 1
print()
count = 0
while count < 4:
print("*", end="")
count += 1
print()
"""
line = 1
while line <= 5:
count = 0
while count < line:
print("*", end="")
count += 1
print()
line += 1
num = int(input())
i = 2
while i < num:
if num % i == 0:
print("不是素数")
break
i += 1
else:
print("是素数")
```
```mermaid
graph LR;
A[开始] --> B{条件判断}
B -->|真| C[执行循环体]
C --> D[更新循环变量]
D --> B
B -->|假| E[结束]
```
**案例:打印前50个素数**
```python
num = 2
count = 0
while count < 50:
for i in range(2, num):
if num % i == 0:
break
else:
print(num, end="\t")
count += 1
if count % 10 == 0:
print()
num += 1
```
### 12.2 while-True结构
不管三七二十一,先进循环再说。有弊端,稍不注意就死循环了。
**所以,一般结合break去使用**,防止死循环,循环的终止条件
```python
while True:
1.循环的初始化 含义 4.循环的控制变量
2.循环的继续条件:break
3.循环体
```
**案例:计算数学公式**
```python
"""
expression = input("请输入>>>")
while expression != "quit":
print(eval(expression))
expression = input("请输入>>>")
"""
while True:
expression = input("请输入>>>")
if expression == "quit":
break
print(eval(expression))
```
## 第13节课 循环语句编程练习
### 13.1 打印数字 I
**题目描述**
利用循环,寻找规律,打印如下数字模式:
```python
模式A
1
1 2
1 2 3
1 2 3 4
1 2 3 4 5
1 2 3 4 5 6
模式B
1 2 3 4 5 6
1 2 3 4 5
1 2 3 4
1 2 3
1 2
1
模式C
1
2 1
3 2 1
4 3 2 1
5 4 3 2 1
6 5 4 3 2 1
模式D
1 2 3 4 5 6
1 2 3 4 5
1 2 3 4
1 2 3
1 2
1
```
```python
"""
1
1 2
1 2 3
1 2 3 4
1 2 3 4 5
1 2 3 4 5 6
"""
for i in range(1, 7):
for j in range(1, i + 1):
print(j, end=" ")
print()
""" i j
1 2 3 4 5 6 6 1~i
1 2 3 4 5 5
1 2 3 4 4
1 2 3 3
1 2 2
1 1
"""
for i in range(6, 0, -1):
for j in range(1, i + 1):
print(j, end=" ")
print()
""" i j k(6-i)
1 1 i~1 5
2 1 2 4
3 2 1 3 3
4 3 2 1 4 2
5 4 3 2 1 5 1
6 5 4 3 2 1 6 0
"""
for i in range(1, 7):
for k in range(6 - i):
print(" ", end=" ")
for j in range(i, 0, -1):
print(j, end=" ")
print()
""" i j k
1 2 3 4 5 6 6 1~i 0
1 2 3 4 5 5 1
1 2 3 4 4 2
1 2 3 3 3
1 2 2 4
1 1 5
"""
for i in range(6, 0, -1):
for k in range(6 - i):
print(" ", end=" ")
for j in range(1, i + 1):
print(j, end=" ")
print()
```
### 13.2 打印数字 II
**题目描述**
利用循环,寻找规律,打印如下数字模式:
```python
1
2 1 2
3 2 1 2 3
4 3 2 1 2 3 4
5 4 3 2 1 2 3 4 5
6 5 4 3 2 1 2 3 4 5 6
7 6 5 4 3 2 1 2 3 4 5 6 7
```
```python
"""
1
2 1 2
3 2 1 2 3
4 3 2 1 2 3 4
5 4 3 2 1 2 3 4 5
6 5 4 3 2 1 2 3 4 5 6
7 6 5 4 3 2 1 2 3 4 5 6 7
"""
for i in range(1, 8):
for k in range(7 - i):
print(" ", end=" ")
for j in range(i, 0, -1):
print(j, end=" ")
for j in range(2, i + 1):
print(j, end=" ")
print()
for i in range(1, 8):
for k in range(7 - i):
print(" ", end=" ")
for x in range(1 - i, i):
print(abs(x) + 1, end=" ")
print()
```
### 13.3 打印菱形 I
**题目描述**
如下所示,是一个高度为9的菱形
```
*
* *
* * *
* * * *
* * * * *
* * * *
* * *
* *
*
```
用户输入菱形高度n,并打印出该高度下的菱形
**输入输出描述**
输入高度n,n为奇数
输出该高度的菱形
**示例**
> 输入:
>
> 5
>
> 输出:
>
> ```
> *
> * *
> * * *
> * *
> *
> ```
<img src="https://zh-1258460726.cos.ap-nanjing.myqcloud.com//typora-pic/image-20250708142646828.png" alt="image-20250708142646828" style="zoom:50%;" />
```python
""" i j k
* 1 1 -4
* * 2 2 -3
* * * 3 3 -2
* * * * 4 4 -1
* * * * * 5 5 0
* * * * 6 4 1
* * * 7 3 2
* * 8 2 3
* 9 1 4
"""
n = 99
for i in range(1, n + 1):
for k in range(abs(i - n // 2 - 1)):
print(" ",end="")
for j in range(n // 2 + 1 - abs(i - n//2 - 1)):
print("*", end=" ")
print()
""" i j
* 1 1
* * 2 1 2
* * * 3 1 2 3
* * * * 4 1 2 3 4
* * * * * 5 1 2 3 4 5 j <= i
* * * * 6 1 2 3 4
* * * 7 1 2 3
* * 8 1 2
* 9 1 j <= 10 - i
j <= i and j <= 10 - i
"""
n = 99
for i in range(1, n + 1):
for k in range(abs(i - n // 2 - 1)):
print(" ", end="")
j = 1
while j <= i and j <= n + 1 - i:
print("*", end=" ")
j += 1
print()
```
### 13.4 打印菱形 II
**题目描述**
如下所示,是一个高度为9的菱形
```
*
* *
* *
* *
* *
* *
* *
* *
*
```
用户输入菱形高度n,并打印出该高度下的菱形
**输入输出描述**
输入高度n,n为奇数
输出该高度的菱形
**示例**
> 输入:
>
> 5
>
> 输出:
>
> ```
> *
> * *
> * *
> * *
> *
> ```
```python
""" i j
* 1 1
* * 2 1 2
* * 3 1 2 3
* * 4 1 2 3 4
* * 5 1 2 3 4 5 j <= i
* * 6 1 2 3 4
* * 7 1 2 3
* * 8 1 2
* 9 1 j <= 10 - i
j <= i and j <= 10 - i
边的条件
j == 1 or j == i or i + j == 10
"""
n = 99
for i in range(1, n + 1):
for k in range(abs(i - n // 2 - 1)):
print(" ", end="")
j = 1
while j <= i and j <= n + 1 - i:
if j == 1 or j == i or i + j == n + 1:
print("*", end=" ")
else:
print(" ", end=" ")
j += 1
print()
```
### 13.5 猜数字
**题目描述**
计算机随机生成一个[0,100]之间的整数,程序提示用户连续地输入数字直到它与那个随机生成的数字相同
对于用户输入的数字,程序会提示它是过高还是过低
**输入输出描述**
每次输入一个整数
每次输出该数字是过高还是过低,如果猜中则输出猜中的数字并结束
**示例**
> 输入:50
>
> 输出:高了
>
> 输入:25
>
> 输出:低了
>
> 输入:42
>
> 输出:高了
>
> 输入:39
>
> 输出:猜中了!答案就是39
```python
import random
random_num = random.randint(0, 100)
while True:
num = int(input("请输入>>>"))
if num > random_num:
print("大了")
elif num < random_num:
print("小了")
else:
print("恭喜你猜对了", random_num)
break
```
### 13.6 最大公约数 I
**题目描述**
输入两个正整数,计算其最大公约数,例如4和2的最大公约数是2,16和24的最大公约数是8
**输入输出描述**
输入两个数字
输出最大公约数
**示例1**
> 输入:
>
> 16 24
>
> 输出:
>
> 8
**示例2**
> 输入:
>
> 7 3
>
> 输出:
>
> 1
```python
"""
16 24
→
1 2 3 4 5 6 7 8 9 10 11 12 13 14 15 16
i
"""
num1, num2 = map(int, input().split(" "))
min_num = min(num1, num2)
for i in range(min_num, 0, -1):
if num1 % i == 0 and num2 % i == 0:
print(i)
break
```
### 13.7 整数的素因子
**题目描述**
输入一个正整数,然后找出它所有的最小因子,也称之为素因子
**输入输出描述**
输入一个正整数
输出多行,每行输出一个素因子
**示例1**
> 输入:
>
> 120
>
> 输出:
>
> 2 2 2 3 5
>
> 解释:
>
> 2 * 2 * 2 *3 * 5 = 120
**示例2**
> 输入:
>
> 100
>
> 输出:
>
> 2 2 5 5
```python
"""
120: 2 3 4 5 6 ... 120 2
i
60: 2 3 4 5 6 ... 60 2
i
30: 2 3 4 5 6 ... 30 2
i
15: 2 3 4 5 6 ... 15 3
i
5: 2 3 4 5 5
i
1
"""
num = int(input())
while num != 1:
# 120 60 30 15 5 1
for i in range(2, num + 1):
if num % i == 0:
print(i, end=" ") # 2 2 2 3 5
num //= i
break
```
### 13.8 剪刀石头布 II
**题目描述**
延伸【剪刀石头布 I】的问题,利用循环将程序改为,计算机和电脑谁先赢三次,谁就是终极胜利者
```python
import random
comp_wins = 0
user_wins = 0
while True:
comp_num = random.randint(0, 2)
user_num = int(input("请用户输入:>>>"))
comp_str = ""
if comp_num == 0:
comp_str = "剪刀"
elif comp_num == 1:
comp_str = "石头"
else:
comp_str = "布"
user_str = ""
if user_num == 0:
user_str = "剪刀"
elif user_num == 1:
user_str = "石头"
else:
user_str = "布"
print(f"电脑出的是{comp_str}")
print(f"用户出的是{user_str}")
res = user_num - comp_num
if res == 0:
print("平局")
elif res == -2 or res == 1:
print("用户赢")
user_wins += 1
else:
print("电脑赢")
comp_wins += 1
if user_wins == 3:
print("最终,用户胜利!")
break
if comp_wins == 3:
print("最终,电脑胜利!")
break
```
### 13.9 堆叠相加
**题目描述**
现有堆叠相加模式$a+aa+aaa+aaaa+aaaaa+......$
例如:$2+22+222+2222+22222$,其中a为2,且有5组数字
**输入输出描述**
输入两个数据分别为数字a和组数n
输出按照堆叠相加模式算出的和
**示例**
> 输入:
>
> 3 4
>
> 输出:
>
> 3702
>
> 解释:
>
> 3 + 33 + 333 + 3333 = 3702
```python
"""
a,n = map(int, input().split(" "))
sum_of_digits = 0
for i in range(1, n + 1):
sum_of_digits += int(str(a) * i)
print(sum_of_digits)
"""
"""
x = 0
x = x*10 + 2 = 2
x = x*10 + 2 = 22
x = x*10 + 2 = 222
"""
a, n = map(int, input().split(" "))
sum_of_digits = 0
x = 0
for i in range(n):
x = x * 10 + a
sum_of_digits += x
print(sum_of_digits)
```
## 第14节课 函数基础
### 14.1 函数的定义与调用
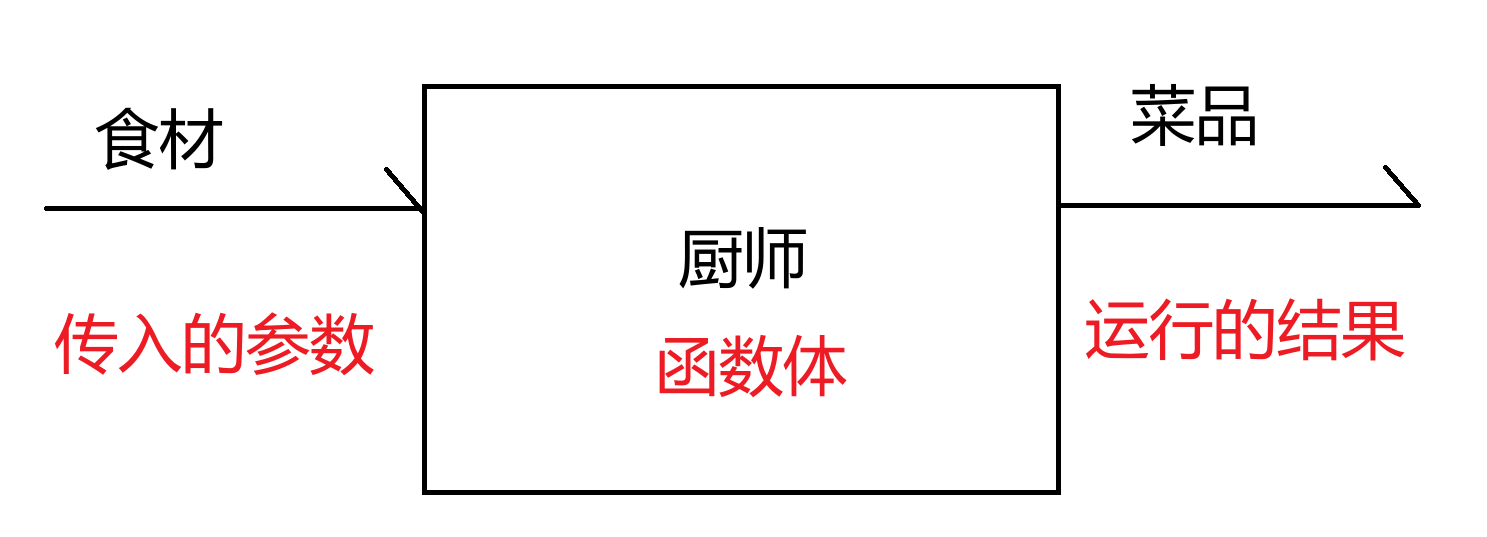
函数的定义:将那些具有**重复性的**、**独立功能性**的、有固定参数但**参数值不一样且没有规律**的这些代码进行的封装。
更高的含义:将代码进行模块化管理,每一个函数就是一个独立的“积木”,写业务时就相当于在"搭积木",如果某个函数出现问题则直接修改该函数即可,不会影响其他函数的执行,便于管理和维护。【解耦】
```python
a = 3
b = 8
print(a ** b)
a = 8
b = 4
print(a ** b)
a = 2
b = 10
print(a ** b)
###############################################
def my_pow(a, b):
c = a ** b
return c
d = my_pow(1,2)
print(d)
print(my_pow(2,3))
```
函数的语法细节:
```python
def 函数名称(参数列表):
函数体
```
- def:关键字,用于创建函数使用的
- 函数名称:对该函数进行起名,自定义名称,属于标识符
- 参数列表:需要给函数传入的一些数据,用于函数进行计算的;别名,形式参数,用于承接/接受外界传来的数据。【可有可无】
- 函数体:函数功能的具体实现流程。
- return:**!!!表示结束函数!!!**,如果需要向外界返回计算结果时,再将计算结果写在return之后!【必有得,**但是有些时候是隐藏的**,没有返回值的时候其实默认返回 None,但是这句代码是隐藏可以不写的,不代表没有】
- 返回值:就是函数计算的结果,如需返回给外界/函数的调用者,则写在return之后。【可有可无】
- 函数的调用:必须是定义在先,调用在后
> 函数的定义不能重名,如果重名了,则后面定义的函数直接覆盖前面定义的函数
>
> ```python
> def show():
> print("Hello")
> def show():
> print("World!")
> show()
> # World!
> ```
>
> 就算函数重名,但参数列表不一致,同样也是后者覆盖前者(在别的语言当中,当前情况属于【函数重载】)
>
> ```python
> def add(a, b):
> print(a + b)
> def add(a, b, c):
> print(a + b + c)
> add(1,3)
> ```
### 14.2 函数的参数与返回值
- 有参,有反
**判断素数**
```python
def is_prime(num):
for i in range(2, num):
if num % i == 0:
return False
return True
print(is_prime(11))
print(is_prime(8))
```
- 有参,无反
**寻找双素数**
就是说a和b都是素数,且a + 2 = b,寻找1000以内所有的双素数
```python
def double_prime(n):
for a in range(2, n - 1):
if is_prime(a) and is_prime(a + 2):
print(a, a + 2)
# return None
def is_prime(num):
for i in range(2, num):
if num % i == 0:
return False
return True
print(double_prime(1000))
```
- 无参,有反
> 要么从外界来,访问外界的数据;要么就是函数内部写死
**返回当前总秒数**
```python
import time
def get_seconds():
return int(time.time())
print(get_seconds())
```
- 无参,无反
**水仙花数字**
```python
"""
三位数 abc
a^3 + b ^ 3 + c ^ 3 = abc
123
1**3 + 2**3 + 3**3 = 123 X
100~999
"""
def shui_xian_hua():
for num in range(100, 1000):
temp = num
a = temp % 10
temp //= 10
b = temp % 10
temp //= 10
c = temp
cur = a ** 3 + b ** 3 + c ** 3
if cur == num:
print(cur)
# for a in range(1, 10):
# for b in range(0,10):
# for c in range(0, 10):
# num = a * 100 + b * 10 + c
# cur = a ** 3 + b ** 3 + c ** 3
# if num == cur:
# print(cur)
shui_xian_hua()
```
### 14.3 局部变量与全局变量
```python
def show():
n = 10 # 在函数内部,创建变量n,并赋值为10 【局部变量】只有在函数内部可以被调用
print(n) # 10
show()
print(n) # 由于n是在函数内部创建的,外界看不到,将n理解为【全局变量】
# NameError: name 'n' is not defined
n = 666 # 在函数外部创建的变量n,并赋值666,【全局变量】
def show():
n = 10 # 在函数内部,创建变量n,并赋值为10 【局部变量】
print(n) # 10
show()
print(n) # 666 【全局变量】
n = 666 # 全局变量 创建
def show():
n += 10 # 默认n为局部,但是+=时 n必须要有初始化和定义
# UnboundLocalError: cannot access local variable 'n' where it is not associated with a value
print(n)
show()
print(n)
n = 666 # 全局变量 创建
def show():
print(n) # 666 函数内部没有n的定义,则向外寻找 全局变量n
# 函数内部可以访问全局变量的内容,但不能修改
show()
print(n) # 666 全局变量
n = 666 # 全局变量 创建
def show():
global n # 声明函数内部接下来使用的n变量为全局变量
n += 10 # 修改全局变量n
print(n)
show()
print(n) # 676
n = 666
def show():
print(n)
# SyntaxError: name 'n' is used prior to global declaration
global n
n += 10
print(n)
show()
print(n)
```
`global x`:在函数内部声明x变量来自于外界(全局变量),函数内部后续对于 `x`的操作都是以全局变量为主
- 在 Python 中,如果你想在函数内部修改一个全局变量,必须在函数内部使用 `global` 关键字声明该变量。不过,`global` 声明必须在变量被使用之前进行。
函数的形式参数主要用于接受外界传来的数据(实际参数),然而形式参数本身就是函数内部创建的局部变量!
```python
def show(a, b):
# a b 形式参数 用于接受外界传来的数据
# a b 就是函数内部创建的局部变量
print(a, b) # a = 10 b = 20
a = 30 # 修改局部
b = 40 # 修改局部
print(a + b)
a = 10 #全局 创建
b = 20 #全局 创建
show(a, b) # a b 实际参数
print(a, b)
```
综合案例分析:
```python
n = 10 # 全局 创建
m = 20 # 全局 创建
a = 30 # 全局 创建
b = 40 # 全局 创建
def show(n, m):
# n 局部 创建 10
# m 局部 创建 40
global a # 声明以下的a为全局的
n = n * 2 # 局部 修改 n = 20
m = m * 2 # 局部 修改 m = 80
a = a * 2 # 全局 修改 a = 60
print(n,m,a,b) # b 全局 访问 40
show(n, b)
print(n,m,a,b) # 10 20 60 40
```
## 第15节课 变量与函数内存分析
### 15.1 变量内存分析
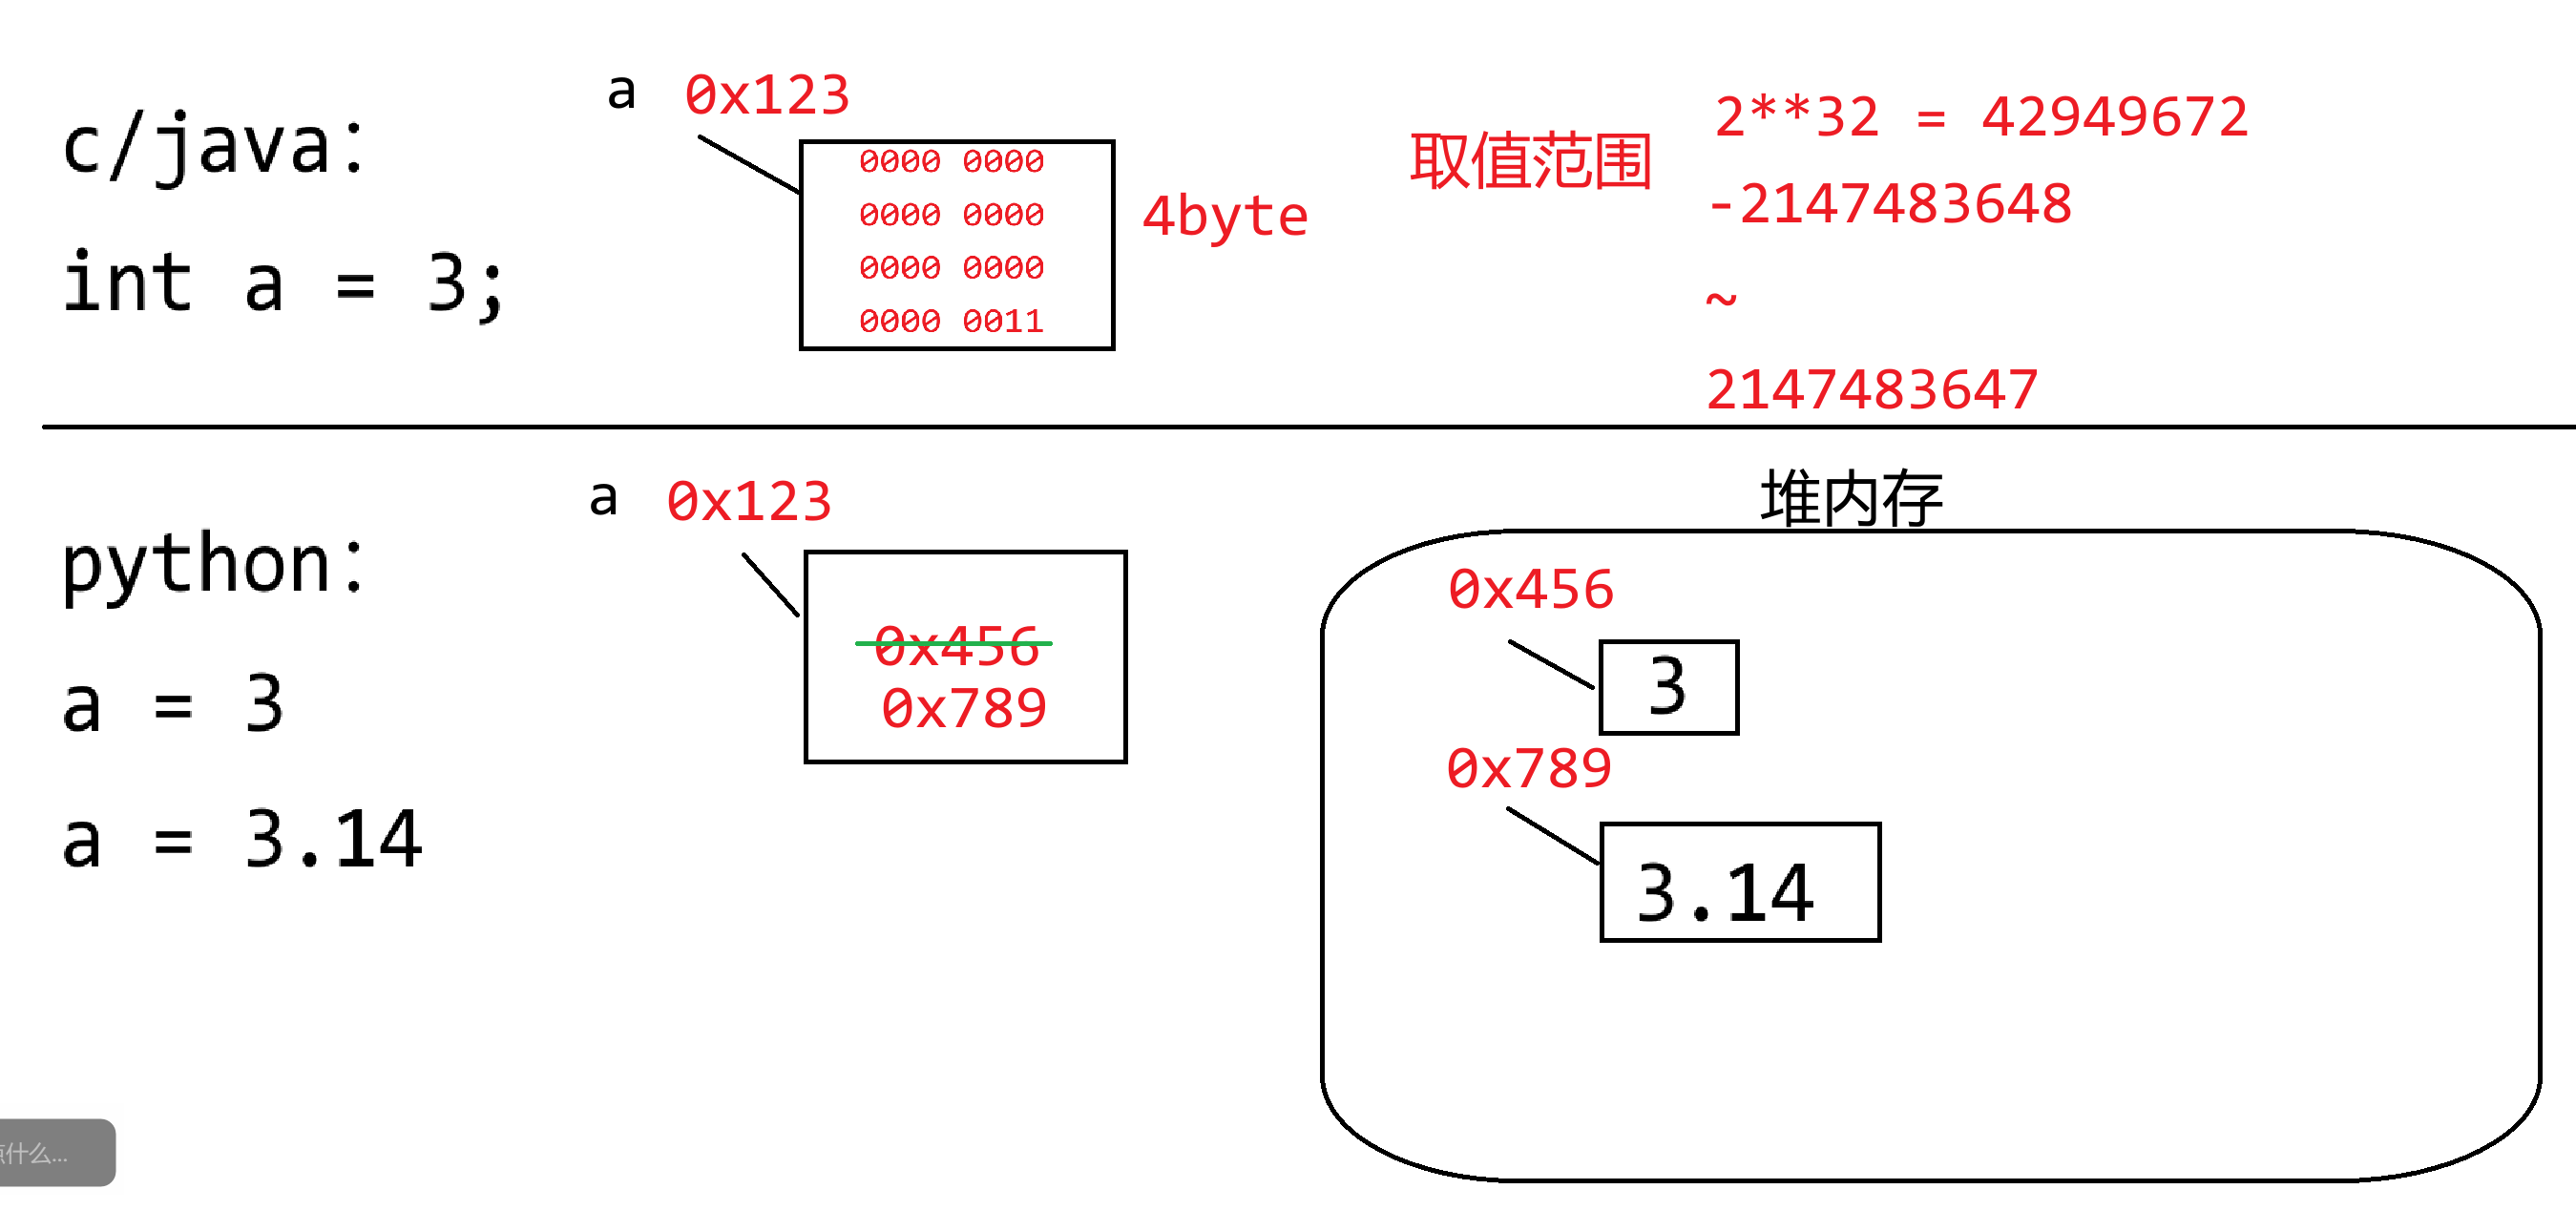
现在的高级编程语言主要分类两个大类:
- 静态编译型语言:C、C++、Java
- 编译:源代码不能直接被计算机执行,必须要先进行编译,生成一个二进制可执行文件,然后计算机去执行该文件即可。`.c`经过编译产生一个`.exe`文件,`.java`经过编译产生一个`.class`文件。【将一本英文书,进行全部的翻译之后,重新生成了一本全中文的书】
- 静态:变量的定义必须要有数据类型的约束,变量只能存储对应数据类型的数据(或者向下兼容)
```c
int c = 3;
double d = 3.14;
double f = 4;
```
- 动态解释型语言:Python、JS、PHP
- 解释:源代码不能直接被计算机执行,编译器/解释器会逐行对代码进行编译并运行,其实会产生一个编译过后的二进制文件(在内存中临时存储的而已),只不过在运行期间是透明的,对用户感知不到的。【同声传译】
- 动态:变量的定义不需要数据类型的约束,变量中可以存储任意数据类型的数据
```python
a = 10
a = "Hello"
a = 3.14
a = True
a = print
```
**因为在Python中,任意数据都叫做对象,而对象存储在堆内存当中,变量存储的仅仅只数据对象在堆内存当中的地址而已!不会将数据本身存储在变量空间中**
**(1)小整数驻留常量池**
Python的解释器在任何一个.py文件运行时,都会默认先把 `[-5,256]`这些常用整数提前创建好了,后续代码在使用这些整数时,直接从驻留常量池中获取即可,而不用重新创建。整数【不可变对象】
**前提,在交互模式中,CMD**
```python
>>> a = 1
>>> b = 1
>>> id(a)
140712529815992
>>> id(b)
140712529815992
>>> a is b # is 判断两个对象是否为同一个 对象地址是否一致
True
>>> a == b # == 比较对象数据内容
True
>>> a = 300 # 第一次出现 则创建300这个数据对象
>>> b = 300 # 第二次出现 则创建300这个数据对象
>>> id(a)
1728315502704
>>> id(b)
1728318439152
>>> a is b # 不是同一个数据对象 地址不一样
False
>>> a == b # 数据内容一样
True
```
**在脚本环境下,编译环境**
脚本编译模式下,它会对数据内容进行整理和优化。
```python
a = 1
b = 1
print(id(a))
print(id(b))
print(a is b)
print(a == b)
"""
140712529815992
140712529815992
True
True
"""
a = 300 # 第一次出现300 新建的
b = 300 # 第二次出现 但已经存在了 则复用
print(id(a))
print(id(b))
print(a is b)
print(a == b)
"""
2258846133712
2258846133712
True
True
"""
```
**(2)字符串常量驻留问题**
字符串仅仅表示的是文本信息,字符串一旦创建则不可更改。【不可变对象】
如果前面已经有定义好的且明确的字符串常量,后面再使用时则复用之前的,除非是通过变量动态计算(新建),**特殊字符除外**
```python
# 交互下
>>> haha = "你好!" # 特殊字符串 新建
>>> xixi = "你好!" # 特殊字符串 新建
>>> haha is xixi
False
>>> haha == xixi
True
# 脚本下
haha = "你好" # 特殊字符串 新建
xixi = "你好" # 特殊字符串 已有 复用
print(haha is xixi)
print(haha == xixi)
"""
True
True
"""
```
**交互模式下**
```python
>>> s1 = "abcdef" # 第一次出现 则创建
>>> s2 = "abc" # 第一次出现 则创建
>>> s3 = "def" # 第一次出现 则创建
>>> s4 = "abc" + "def" # 已有 则复用
>>> s5 = s2 + s3 # 不确定 等运行
>>> s1 is s4
True
>>> s1 is s5
False
>>> s1 == s4
True
>>> s1 == s5
True
```
<img src="https://zh-1258460726.cos.ap-nanjing.myqcloud.com//typora-pic/image-20250710150301143.png" alt="image-20250710150301143" style="zoom:25%;" />
**脚本编译下**
```python
s1 = "abcdef"
s2 = "abc"
s3 = "def"
s4 = "abc" + "def"
s5 = s2 + s3
print(s1 is s4)
print(s1 is s5)
print(s1 == s4)
print(s1 == s5)
"""
True
False
True
True
"""
```
### 15.2 函数内存分析
**全局命名空间**
就是用于存储全局变量的地方,属于内存中的一个区域
**函数的运行是基于栈内存**
栈,一个先进后出的容器,函数在运行是也是基于此种方式来运行的。
可以把函数当成是栈中的某一个元素(栈帧),当函数被调用时,则加载进栈中,谁在栈顶谁优先运行。
如果函数在运行期间又调用了别的函数,则别的函数进栈,当前函数则**暂停**运行,新进来的函数优先运行,直到运行完毕弹栈,老栈顶函数**继续**执行,直到弹栈。如果栈中没有任何函数,则表示程序运行完毕。
```python
a = 1
b = 2
c = 3
d = 4
def my_pow(a, b):
c = a ** b
return c
def show(a,b):
global d
e = a + b + c + d
d = my_pow(e, c)
return d + 1
f = show(a, b)
print(f)
print(a,b,c,d)
haha = my_pow
print(haha(3,4))
```
<img src="https://zh-1258460726.cos.ap-nanjing.myqcloud.com//typora-pic/image-20250710160928964.png" alt="image-20250710160928964" style="zoom: 25%;" />
## 第16节课 函数的递归
### 16.1 递归本质
递归:说白了就是函数调用函数自身的代码场景。
```python
# RecursionError: maximum recursion depth exceeded
def show():
print("show run...")
show()
show()
```
此种场景非常容易导致栈内存溢出的问题,我们就得需要控制一下递归的深度/层数
<img src="https://zh-1258460726.cos.ap-nanjing.myqcloud.com//typora-pic/image-20250710163511502.png" alt="image-20250710163511502" style="zoom:25%;" />
```python
def show(n):
print(n)
if n == 1:
return
show(n - 1)
return
show(3)
```
- 绿色箭头的流程:递归的**前进段**
- 红色的圈圈:递归的**边界条件**,写任何一个递归的函数都必须要先确定边界条件。
- 蓝色箭头的流程:递归的**返回段**
<img src="https://zh-1258460726.cos.ap-nanjing.myqcloud.com//typora-pic/image-20250710163934638.png" alt="image-20250710163934638" style="zoom:25%;" />
分析递归的特点:
- 每一层递归执行的逻辑一样
- 处理的数据量在变小(变大),有规律的变化,直到不满足边界条件为止【处理的数据规模在变化,更接近于边界】
土豆 -> 土豆块 -> 土豆片 -> 土豆丝:**分治思想**
递归能解决哪些问题:
- 某一个大型的问题可以被分为若干个小问题进行计算。直到该问题不能再划分为止。
- 无论划分为那个级别的小问题,操作的流程都是一样的。
- 所有小问题的解,最终可以合并为原先大问题的解。
但凡循环能够解决的问题,递归都可以;
但是递归解决的问题,循环不一定!
### 16.2 递归案例
**从1加到100**
```python
"""
f(100) = 1 + 2 + 3 + ... + 99 + 100
f(100) = f(99) + 100 1+2+3+...+99 + 100
f(99) = f(98) + 99
....
f(4) = f(3) + 4 1+2+3 + 4
f(3) = f(2) + 3 1+2 + 3
f(2) = f(1) + 2 1 + 2
f(1) = 1
1, x = 1
f(x)
f(x-1) + x, x > 1
"""
def f(x):
if x == 1:
return 1
return f(x - 1) + x
print(f(3))
```
**斐波那契数列**
```python
"""
1 1 2 3 5 8 13 21 34 55 89 144...
f(x) 斐波那契数列的第x项
f(4) = f(3) + f(2)
f(3) = f(2) + f(1)
f(2) = 1
f(1) = 1
1, x = 1 or x = 2
f(x)
f(x-1) + f(x-2)
"""
def f(x):
if x == 1 or x == 2:
return 1
return f(x - 1) + f(x - 2)
print(f(100))
```
<img src="https://zh-1258460726.cos.ap-nanjing.myqcloud.com//typora-pic/image-20250710165852732.png" alt="image-20250710165852732" style="zoom:25%;" />
## 第17节课 函数基础编程练习
### 17.1 求一个整数各个数字的和
编写一个函数,计算一个整数各个数字的和,例如 输入234,输出9,因为2 + 3 + 4 = 9
```python
"""
1234 % 10 = 4
123 % 10 = 3
12 % 10 = 2
1 % 10 = 1
0
"""
def sum_of_digits(num):
sum_of_number = 0
while num != 0:
sum_of_number += num % 10
num //= 10
print(sum_of_number)
return sum_of_number
num = int(input("请输入一个数字:"))
result = sum_of_digits(num)
print(result)
```
### 17.2 回文整数
编写函数,判断一个数字是否为回文数
```python
"""
123456
re_num = 0
re_num = re_num * 10 + 6 6
re_num = re_num * 10 + 5 65
re_num = re_num * 10 + 4 654
re_num = re_num * 10 + 3
re_num = re_num * 10 + 2
re_num = re_num * 10 + 1
654321
"""
def reversed_number(num):
# num = 123
re_num = 0 # 0 3 32 321
while num != 0: # 123 12 1 0
re_num = re_num * 10 + num % 10
num //= 10
return re_num
def is_palindrome(num):
return reversed_number(num) == num
num = int(input("请输入一个数字:"))
print(is_palindrome(num))
```
### 17.3 计算三角形面积
编写函数,读入三角形三边的值,若输入有效则计算面积,否则显示输入无效。
```python
def is_valid(s1, s2, s3):
return s1 + s2 > s3 and s1 + s3 > s2 and s2 + s3 > s1
def area(s1, s2, s3):
if is_valid(s1, s2, s3):
s = (s1 + s2 + s3) / 2
area = (s * (s - s1) * (s - s2) * (s - s3)) ** 0.5
return area
else:
print("输入无效")
# return None
s1, s2, s3 = map(int, input("请输入三边的长度:").split(" "))
result = area(s1, s2, s3)
print(result)
```
### 17.4 显示0和1构成的矩阵
编写函数,打印一个元素由0、1和2,产生的 n × n 矩阵(方阵),主对角线上全为1,右上部分全为0,左下部分全为2
```python
1 0 0 0
2 1 0 0
2 2 1 0
2 2 2 1
```
```python
"""
j = 0 1 2 3
0 1 0 0 0
1 2 1 0 0
2 2 2 1 0
3 2 2 2 1
i
"""
def print_matrix(n):
for i in range(n):
for j in range(n):
if i == j:
print(1, end=" ")
elif j > i:
print(0, end=" ")
else:
print(2, end=" ")
print()
print_matrix(int(input("输入一个n:")))
```
### 17.5 平方根的近似求法
有几种实现开平方$\sqrt{n}$的技术,其中一个称为巴比伦法
它通过使用下面公式的反复计算近似地得到:
$$
nextGuess=(lastGuess+n/lasetGuess)/2
$$
当nextGuess和lastGuess几乎相同时,nextGuess就是平方根的近似值
lastGuess初始值为1,如果nextGuess和lastGuess的差值小于一个很小的数,比如0.0001,就可以认为nextGuess是n的平方根的近似值;否则,nextGuess成为下一次计算的lastGuess,近似过程继续执行
编写代码,求解n的平方根的近似值
```python
def my_sqrt(n):
lastGuess = 1
while True:
nextGuess = (lastGuess + n / lastGuess) / 2
if abs(nextGuess - lastGuess) < 0.0001:
return nextGuess
lastGuess = nextGuess
print(my_sqrt(int(input("Enter n:"))))
```
### 17.6 回文素数
回文素数是指一个数既是素数又是回文数,例如131既是素数也是回文数
输出显示前100个回文素数,每行显示10个
```python
def is_prime(num):
for i in range(2, num):
if num % i == 0:
return False
return True
def reversed_num(num):
re_num = 0
while num != 0:
re_num = re_num * 10 + num % 10
num //= 10
return re_num
def is_palindrome(num):
return reversed_num(num) == num
def print_palindrome_and_prime():
num = 2
count = 0
while count < 100:
if is_prime(num) and is_palindrome(num):
print(num, end="\t")
count += 1
if count % 10 == 0:
print()
num += 1
print_palindrome_and_prime()
```
<img src="https://zh-1258460726.cos.ap-nanjing.myqcloud.com//typora-pic/image-20250711112001750.png" alt="image-20250711112001750" style="zoom:25%;" />
### 17.7 打印日历
以1970年1月1日周四为基准,打印一个年份的日历
```
请输入年份(1970年起步):2025
January
---------------------------------
Mon Tue Wed Thu Fri Sat Sun
1 2 3 4 5
6 7 8 9 10 11 12
13 14 15 16 17 18 19
20 21 22 23 24 25 26
27 28 29 30 31
February
---------------------------------
Mon Tue Wed Thu Fri Sat Sun
1 2
3 4 5 6 7 8 9
10 11 12 13 14 15 16
17 18 19 20 21 22 23
24 25 26 27 28
March
---------------------------------
Mon Tue Wed Thu Fri Sat Sun
1 2
3 4 5 6 7 8 9
10 11 12 13 14 15 16
17 18 19 20 21 22 23
24 25 26 27 28 29 30
31
```
```python
# 获取month月的英文单词
def get_month_english(month):
months = ["January", "February", "March", "April", "May", "June",
"July", "August", "September", "October", "November", "December"]
return months[month - 1]
# 打印month月的表头
def print_month_title(month):
print(f"{get_month_english(month):^32}")
print("-" * 33)
print("Mon Tue Wed Thu Fri Sat Sun")
# 返回year年month月1日 是周几
def get_month_begin(year, m, q):
if m == 1 or m == 2:
m += 12
year -= 1
k = year % 100
j = year // 100
h = (q + 26 * (m + 1) // 10 + k + k // 4 + j // 4 + 5 * j) % 7
if h >= 2:
return h - 1
else:
return h + 6
# 获取year年month月的天数
def get_month_days(year, month):
if month in [1,3,5,7,8,10,12]:
return 31
elif month in [4,6,9,11]:
return 30
elif year % 4 == 0 and year % 100 != 0 or year % 400 == 0:
return 29
else:
return 28
# 打印year年month月的日期内容
def print_month_body(year, month):
begin = get_month_begin(year, month, 1)
count = 0 # 记录打印单位的次数
# 打印前面的占位
for i in range(1, begin):
print(" " * 5, end="")
count += 1
# 再去打印日期
for i in range(1, get_month_days(year, month) + 1):
print(f"{i:^5}", end="")
count += 1
if count % 7 == 0:
print()
print()
# 打印year年第month月的日历
def print_month(year, month):
# 先打印表头信息
print_month_title(month)
# 再打印具体的日期内容
print_month_body(year, month)
# 打印year年的日历
def print_calendar(year):
for month in range(1, 13):
print_month(year, month)
year = 2025
print_calendar(year)
```
# 第二章 进阶阶段
## 第18节课 列表
### 18.1 内置容器与序列
在Python中,我们经常需要处理和组织多个数据的,而不是仅对少量数据进行操作。内置容器就是为我们提供了方便的方式,来取存储和管理数据的集合。
> 数字 布尔 字符串 复数 空值 :内置基本数据
Python中内置容器:
- 序列
- 集合
- 字典
序列,是一种特殊的内置容器,主要强调的是元素的**有序性**和**可迭代性**
- 有序性:不是指排序问题,而是指元素的出入顺序是可以确定的。
- 可迭代性:按照一定的顺序进行访问,序列其实就是一个**线性表**
- 线性表:`a1 a2 a3 a4 ... ai-1 ai ai+1 .... an`
- 一共有n个元素,`a1`是线性表的第一个元素,`an`是线性表的最后一个元素
- 除了`a1`没有直接前驱,`an`没有直接后继之外,其他元素都有唯一的前驱和后继。
常用的序列:
- 列表
- 元组
- 字符串
- Range对象
### 18.2 列表的定义与创建
列表是一种**有序**的**可变**序列,它可以容纳任意类型的元素,当然了为了后续统一管理和操作,一般都建议存储同类型的数据。
- 有序:元素的出入顺序是可以确定的
- 可变:列表中的元素可以改变;列表的长度可以改变。
实际上列表类似于其他编程语言中的**数组**这个概念。
从内存逻辑上而言,所谓的列表实际上就是一堆内存空间地址**连续**的一组变量。
```python
a = 1
b = 2
c = 3
arr = [1,2,3]
```
<img src="https://zh-1258460726.cos.ap-nanjing.myqcloud.com//typora-pic/image-20250711145805415.png" alt="image-20250711145805415" style="zoom:25%;" />
列表是由`[]`包含起来的一组数据,数据与数据之间用`,`分隔。
```python
# 创建一个空列表
arr = []
print(arr)
# 通过list()内置函数创建一个空列表
arr = list()
print(arr)
# 通过list()内置函数将其他类型的序列转换为列表
arr = list("我爱迪丽热巴")
print(arr)
print(range(1, 10, 2)) # Range对象
print(3 in range(1, 10, 2))
arr = list(range(1, 10, 2))
print(arr)
# 指定元素创建列表
arr = [1, 2, 3, 4, 5, 6, 7, 8, 9, 10]
print(arr)
arr = [1, 3.14, True, "Fuck", 3 + 2j, print, arr]
print(arr)
# 指定长度创建列表 必须有默认值
arr = ['Fuck'] * 10
print(arr)
# 列表推导式 方便快速创建一组指定的数据
arr = [i for i in range(1, 10, 2)]
print(arr)
arr = [i ** 2 for i in range(1, 10, 2)]
print(arr)
arr = [str(i) + 'Hello' for i in range(1, 10, 2)]
print(arr)
arr = [i for i in range(1, 101) if i % 3 == 0 and i % 5 == 0]
print(arr)
arr = [i // 10 for i in arr]
print(arr)
arr = [i.upper() for i in "Hello World!"]
print(arr)
# 多只输入如何处理
# arr = input("请输入多个数字,用空格分隔:").split(" ")
# print(arr)
# arr = list(map(int,input("请输入多个数字,用空格分隔:").split(" ")))
# print(arr)
arr = [int(i) for i in input("请输入多个数字,用空格分隔:").split(" ")]
print(arr)
a, b, c = arr # [1, 2, 3]
print(a, b, c)
```
### 18.3 序列的通用操作
**(1)索引**
也叫做角标、下标,表示的是元素在序列中的位置。对于一个长度为n的序列而言,索引范围`[0, n-1]`。其次,序列也只是负数索引,表示倒数第几个的元素,索引范围`[-1,-n]`
```python
arr = [1, 2, 3, 4, 5]
print(arr[0])
print(arr[4])
# print(arr[6]) # IndexError: list index out of range
print(arr[-1])
print(arr[-5])
# print(arr[-6]) # IndexError: list index out of range
```
**(2)切片**
就是一种快速获取序列中连续的子区间使用的
`sequence[start:stop:step]`:这个和range(a,b,c)很像,`[start, stop)`
- start:开始索引,默认为 0
- stop:最后索引,默认为 n
- step:步长,默认为1
```python
arr = [1, 2, 3, 4, 5, 6, 7, 8, 9, 10]
print(arr[:]) # [1, 2, 3, 4, 5, 6, 7, 8, 9, 10]
print(arr[::2]) # [1, 3, 5, 7, 9]
print(arr[::-1]) # [10, 9, 8, 7, 6, 5, 4, 3, 2, 1]
print(arr[3:]) # [4, 5, 6, 7, 8, 9, 10]
print(arr[3:8]) # [4, 5, 6, 7, 8]
print(arr[2:8:2]) # [3, 5, 7]
print(arr[-6:-2:2]) # [5, 7]
print(arr[-2:-6:2]) # []
print(arr[-2:-6:-2]) # [9, 7]
print(arr[:8:2]) # [1, 3, 5, 7]
print(arr[-7:8:2]) # [4, 6, 8]
```
正步长 > 0,start在前,stop在后,start -> stop 从左向右
负步长 < 0,start在后,stop在前,start -> stop 从右向左
**(3)连接与重复**
- `+` 拼接
- `*` 重复
**(4)长度与最值**
主要用的是内置函数 `len()`、`min()`、`max()`
```python
arr = [1,3,2,4,6,8,9,4,2]
print(len(arr))
print(min(arr))
print(max(arr))
```
**(5)成员存在性**
`in`和`not in`,用于判断元素是否存在于序列当中
### 18.4 列表对象函数
内置函数:不需要导入任何东西,直接使用即可
自定义函数:用户自定义的内容,先定义再调用
对象函数:必须通过某一个对象来去调用的函数,而且这些函数已经被创建好了。
`对象.函数名称()`
**(1)append(object)**:默认在表尾添加元素object
**(2)insert(index, object)**:在指定角标index处,插入元素object,如果索引右边越界加表尾,左边越界加表头。
**(3)extend(sequence)**:将其他序列中的元素依次添加在表尾,相当于把其他序列中的元素依次append()
**(4)remove(value)**:从左到右删除列表中第一次出现的元素value,没有返回值,**找不到会报错**
**(5)pop(index)**:删除指定角标index处的元素,并将其返回,**如果角标不在合法范围内,则报错**,如果不写index则默认删除表尾。
**(6)del 关键字**:不是列表对象函数,删除指定元素但不返回其指
**(7)sort()**:排序
**(8)reverse()**:反转列表
**(9)count(value)**:统计元素value出现的次数
**(10)index(value)**:从左到右查找value第一次出现的角标
**(11)clear()**:清空列表
**(12)copy()**:浅层拷贝
<img src="https://zh-1258460726.cos.ap-nanjing.myqcloud.com//typora-pic/image-20250711163458158.png" alt="image-20250711163458158" style="zoom:25%;" />
```python
arr = []
arr.append(1)
arr.append(2)
arr.append(3)
print(arr)
arr.insert(1,4)
print(arr)
arr.insert(666,5)
print(arr)
arr.insert(-666,6)
print(arr)
arr1 = [1,2,3]
arr2 = [4,5,6]
arr3 = [7,8,9]
arr2.append(arr1)
print(arr2)
arr3.extend(arr1)
print(arr3)
arr4 = [1,2,3,1,2,3,1,2,3]
arr4.remove(1)
print(arr4)
# arr4.remove(6) # ValueError: list.remove(x): x not in list
print(arr4.pop(1))
print(arr4)
print(arr4.pop())
print(arr4)
del arr4[3]
print(arr4)
del arr4[::2]
print(arr4)
arr5 = [5,4,9,1,8,2,3,7,6]
arr5.sort()
print(arr5)
arr5 = [5,4,9,1,8,2,3,7,6]
arr5.sort(reverse=True)
print(arr5)
arr5.reverse()
print(arr5)
arr6 = [1,2,3,1,2,3,1,1,1,2,3,1,2,3]
print(arr6.count(1))
print(arr6.index(3))
arr6.clear()
print(arr6)
arr1 = [1,2,3,4,5]
arr2 = arr1.copy()
arr1[0] = 666
print(arr1)
print(arr2)
arr1 = [1,2,[3,4,5]]
arr2 = arr1.copy()
arr1[2][1] = 666
print(arr1)
print(arr2)
arr1[2] = [9,8,7]
print(arr1)
print(arr2)
```
### 18.5 多维列表
所谓的多维列表,本质上就是一个一维列表中的元素是另一个一维列表.....
```python
arr = [
[1, 2, 3],
[4, 5],
[6, 7, 8, 9]
]
print(len(arr))
print(len(arr[0]))
print(len(arr[1]))
print(len(arr[2]))
# 遍历二维列表/数组 通用方法
for i in range(len(arr)):
for j in range(len(arr[i])):
print(arr[i][j], end=" ")
print()
```
```python
arr = [
[1, 2, 3],
[4, 5],
[6, 7, 8, 9]
]
print(len(arr))
print(len(arr[0]))
print(len(arr[1]))
print(len(arr[2]))
# 遍历二维列表/数组 通用方法
# 既可以访问 也可修改
for i in range(len(arr)):
for j in range(len(arr[i])):
print(arr[i][j], end=" ")
print()
# 只能访问 不能修改元素
for line in arr: # line = arr[i]
for num in line: # num = line[j]
print(num, end=" ")
print()
```
## 第19节课 列表算法
### 19.1 常用算法
**(1)遍历**
```python
arr = [1,2,3,4]
# 通过角标遍历
for index in range(len(arr)):
print(arr[index])
# 通过for-each循环遍历
for item in arr: # arr[i]
print(item)
```
**(2)最值**
```python
arr = [1,2,3,4]
print(min(arr))
print(max(arr))
min_value = arr[0]
max_value = arr[0]
for index in range(1, len(arr)):
if arr[index] < min_value:
min_value = arr[index]
if arr[index] > max_value:
max_value = arr[index]
print(min_value)
print(max_value)
```
**(3)存在性**
```python
arr = [1,2,3,4]
print(5 in arr)
print(3 in arr)
# 只判断单个元素是否在序列中
print([2,3] in arr)
# 顺序查找 O(n)
def is_exist(num, arr):
for item in arr:
if item == num:
return True
return False
print(is_exist(3, arr))
print(is_exist(8, arr))
```
**(4)反转**
```python
arr = [1,2,3,4]
arr.reverse()
print(arr)
print(arr[::-1]) # 得到一个新的序列
print(arr)
"""
1 2 3 4 5 6 7 8
0 1 2 3 4 5 6 7
l r
"""
# 原地翻转
def reverse_lst(arr):
l = 0
r = len(arr) - 1
while l < r:
arr[l], arr[r] = arr[r], arr[l]
l += 1
r -= 1
reverse_lst(arr)
print(arr)
```
**(5)乱序**
```python
import random
arr = [1,2,3,4,5,6,7,8,9]
random.shuffle(arr)
print(arr)
import random
arr = [1,2,3,4,5,6,7,8,9]
for i in range(len(arr)):
j = random.randint(0, len(arr) - 1)
arr[i],arr[j] = arr[j], arr[i]
print(arr)
```
### 19.2 查找算法
**(1)二分查找**
它是属于线性查找算法,前提是数据必须有序(升序,降序),它是按照元素的位置来进行二分查找的。
```python
arr = [1,2,3,4,5,6,7,8,9]
# O(logN)
def binary_search(arr, key):
low = 0
high = len(arr) - 1
mid = (low + high) // 2
while arr[mid] != key:
if arr[mid] < key:
low = mid + 1
else:
high = mid - 1
if high < low:
return -1 # 表示元素不存在
mid = (low + high) // 2
return mid
print(binary_search(arr, 8))
print(binary_search(arr, 1))
print(binary_search(arr, 2.5))
print(binary_search(arr, 1000))
print(binary_search(arr, -1000))
```
用递归的思路实现二分查找/折半查找/搜索
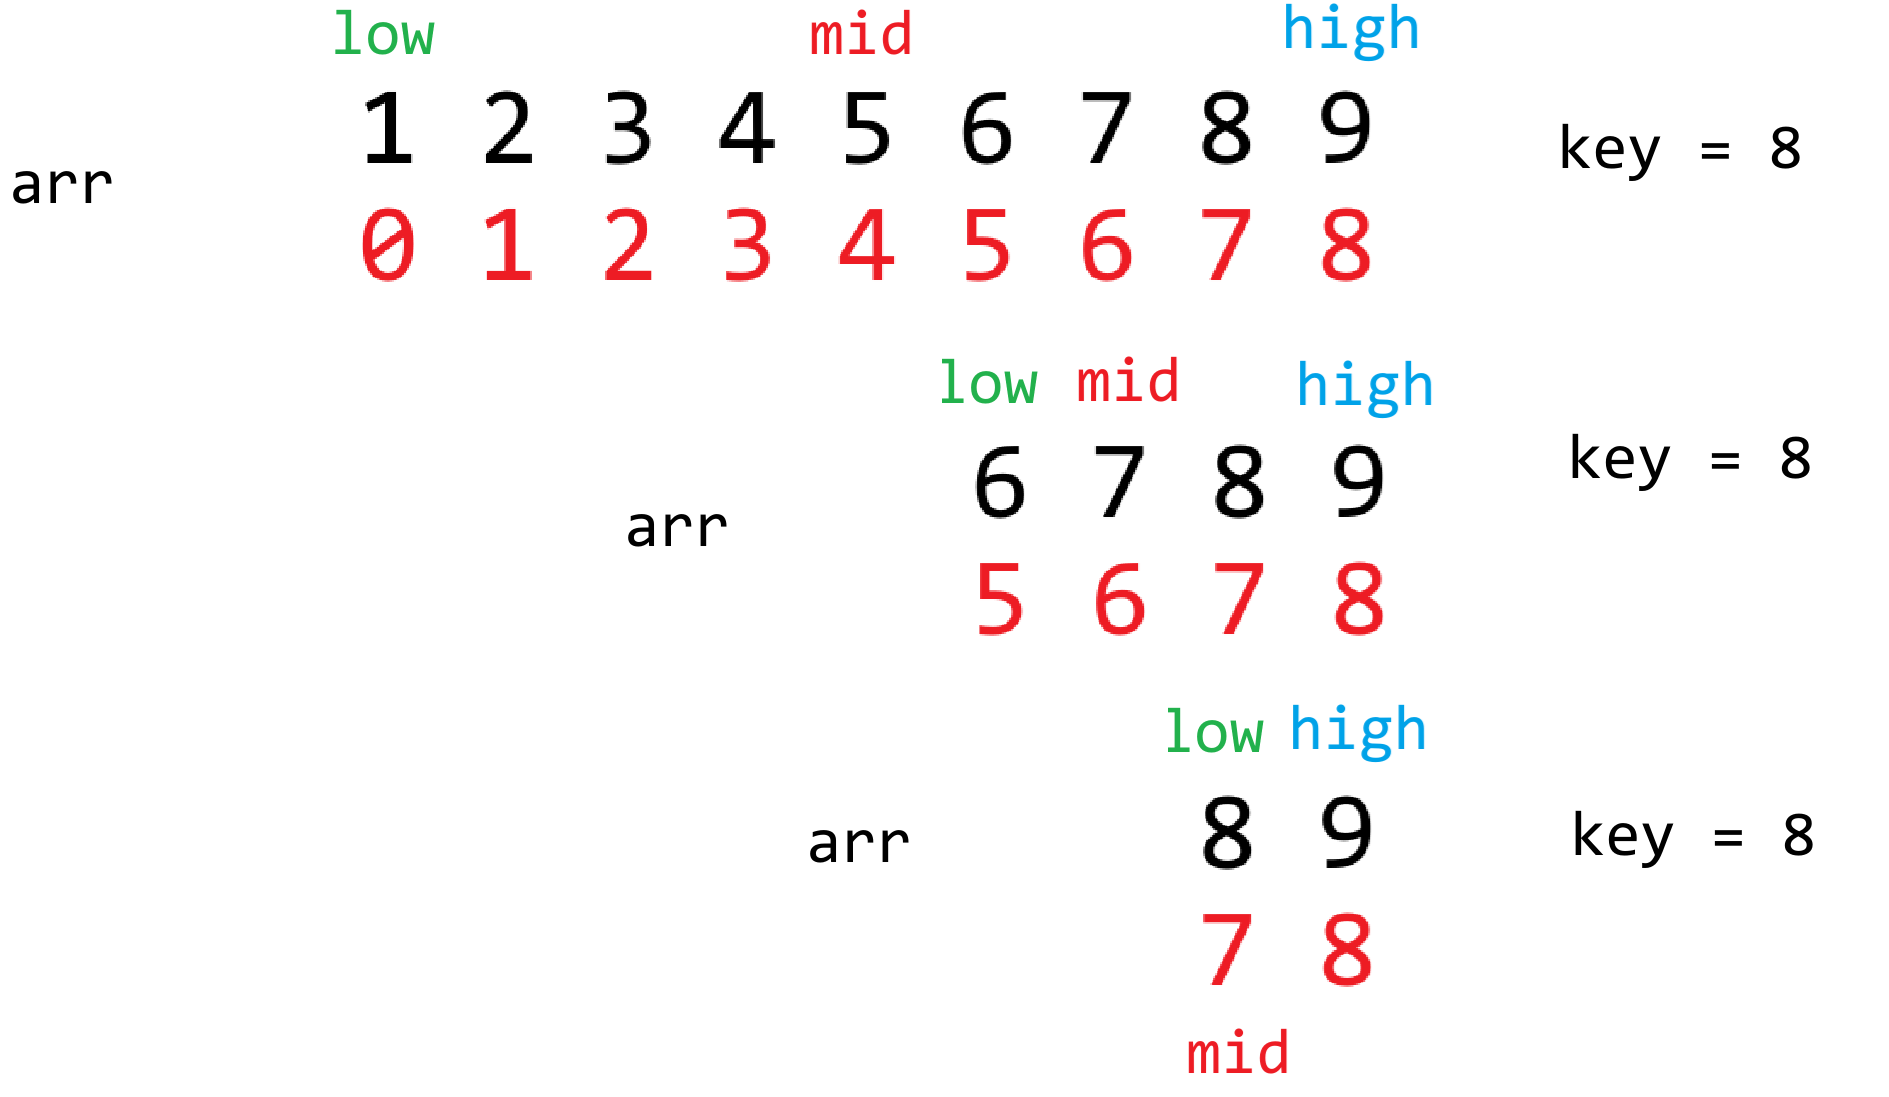
```python
def binary_search_recursion(arr, low, high, key):
if low > high:
return -1
mid = (low + high) // 2
if arr[mid] == key:
return mid
if arr[mid] < key:
return binary_search_recursion(arr, mid + 1, high, key)
else:
return binary_search_recursion(arr, low, mid - 1, key)
arr = [1, 2, 3, 4, 5, 6, 7, 8, 9]
print(binary_search_recursion(arr,0, len(arr) - 1, 8))
print(binary_search_recursion(arr,0, len(arr) - 1, 2.5))
```
**(2)插值查找**
是二分查找的改进版本,二分查找它只是根据元素的位置来进行一个划分的,并没有考虑元素的分布情况。插值查找主要考虑的是元素在区间的大致分布情况来决定大概位置所在。
```python
"""
mid = (key - arr[low]) / (arr[high] - arr[low]) * (high - low) + low
(目标值 - 当前区间最小值) / (当前区间最大值 - 当前区间最小值) * (区间范围) + 偏移量
[1 2 3 4 5 6 7 8 9 10]
0 1 2 3 4 5 6 7 8 9
low high
key = 9
mid = (9 - 1) / (10 - 1) * (9 - 0) + 0
= 8
key = 3
mid = (3 - 1) / (10 - 1) * (9 - 0) + 0
= 2
[1 2 3 4 5 6 7 8 9 10]
0 1 2 3 4 5 6 7 8 9
low high
key = 6
mid = (6 - 4) / (9 - 4) * (8 - 3) + 3
= 5
10 18 22 28 40 52 53 54 55 60 80 82 90
0 1 2 3 4 5 6 7 8 9 10 11 12
l h
key = 55
mid = (55 - 10) / (90 - 10) * (12 - 0) + 0
= 7
mid = (55 - 55) / (90 - 55) * (12 - 8) + 8
= 8
弊端 查找 1000
mid = (1000 - 10) / (90 - 10) * (12 - 0) + 0
= 148
"""
arr = [1,2,3,4,5,6,7,8,9]
def interpalation_search(arr, key):
low = 0
high = len(arr) - 1
while True:
mid = low + int((key - arr[low]) / (arr[high] - arr[low]) * (high - low))
# 表示要查找的元素不在区间内
if mid < low or mid > high:
return -1
if arr[mid] == key:
return mid
if arr[mid] < key:
low = mid + 1
else:
high = mid - 1
# 表示要查找的元素范围在区间内,但元素不存在
if low > high:
return -1
print(interpalation_search(arr, 8))
```
递归咋写?
```python
"""
mid = (key - arr[low]) / (arr[high] - arr[low]) * (high - low) + low
(目标值 - 当前区间最小值) / (当前区间最大值 - 当前区间最小值) * (区间范围) + 偏移量
[1 2 3 4 5 6 7 8 9 10]
0 1 2 3 4 5 6 7 8 9
low high
key = 9
mid = (9 - 1) / (10 - 1) * (9 - 0) + 0
= 8
key = 3
mid = (3 - 1) / (10 - 1) * (9 - 0) + 0
= 2
[1 2 3 4 5 6 7 8 9 10]
0 1 2 3 4 5 6 7 8 9
low high
key = 6
mid = (6 - 4) / (9 - 4) * (8 - 3) + 3
= 5
10 18 22 28 40 52 53 54 55 60 80 82 90
0 1 2 3 4 5 6 7 8 9 10 11 12
l h
key = 55
mid = (55 - 10) / (90 - 10) * (12 - 0) + 0
= 7
mid = (55 - 55) / (90 - 55) * (12 - 8) + 8
= 8
弊端 查找 1000
mid = (1000 - 10) / (90 - 10) * (12 - 0) + 0
= 148
"""
arr = [1, 2, 3, 4, 5, 6, 7, 8, 9]
def interpalation_search_recursion(arr, low, high, key):
if low > high:
return -1
mid = low + int((key - arr[low]) / (arr[high] - arr[low]) * (high - low))
if mid < low or mid > high:
return -1
if arr[mid] == key:
return mid
if arr[mid] < key:
return interpalation_search_recursion(arr, mid + 1, high, key)
else:
return interpalation_search_recursion(arr, low, mid - 1, key)
print(interpalation_search_recursion(arr,0, len(arr) - 1, 8))
print(interpalation_search_recursion(arr,0, len(arr) - 1, 1000))
print(interpalation_search_recursion(arr,0, len(arr) - 1, -1000))
print(interpalation_search_recursion(arr,0, len(arr) - 1, 2.5))
```
对比一下两者的性能优势:
```python
count_i = 0
count_b = 0
# 递归版 插值查找
def interpalation_search_recursion(arr, low, high, key):
global count_i
count_i += 1
if low > high:
return -1
mid = low + int((key - arr[low]) / (arr[high] - arr[low]) * (high - low))
if mid < low or mid > high:
return -1
if arr[mid] == key:
return mid
if arr[mid] < key:
return interpalation_search_recursion(arr, mid + 1, high, key)
else:
return interpalation_search_recursion(arr, low, mid - 1, key)
# 递归版 二分查找
def binary_search_recursion(arr, low, high, key):
global count_b
count_b += 1
if low > high:
return -1
mid = (low + high) // 2
if arr[mid] == key:
return mid
if arr[mid] < key:
return binary_search_recursion(arr, mid + 1, high, key)
else:
return binary_search_recursion(arr, low, mid - 1, key)
# 完全规律的数据
arr = []
for i in range(1,100001):
arr.append(i)
binary_search_recursion(arr,0, len(arr) - 1,8888)
interpalation_search_recursion(arr,0, len(arr) - 1,8888)
print(count_b)
print(count_i)
# 完全不规律的数据
import random
arr = []
for i in range(1,100001):
arr.append(random.randint(1,100000000000))
arr.sort()
binary_search_recursion(arr,0, len(arr) - 1,8888)
interpalation_search_recursion(arr,0, len(arr) - 1,8888)
print(count_b)
print(count_i)
```
### 19.3 排序算法
十大排序算法:比较类(选择、冒泡、插入、希尔、归并、堆、快速)、非比较类(计数排序、基数排序、桶排序)
有意思但没实际意义的排序:猴子排序,睡眠排序.....
**(1)选择排序**
<img src="https://zh-1258460726.cos.ap-nanjing.myqcloud.com//typora-pic/image-20250716163104746.png" alt="image-20250716163104746" style="zoom:25%;" />
```python
# 时间复杂度 O(n^2) 空间复杂度 S(1) O(1)
def selection_sort(arr):
for i in range(len(arr) - 1):
for j in range(i + 1, len(arr)):
if arr[i] > arr[j]:
arr[i], arr[j] = arr[j], arr[i]
arr = [6,9,1,8,2,7,5,3,4]
selection_sort(arr)
print(arr)
```
**(2)冒泡排序**
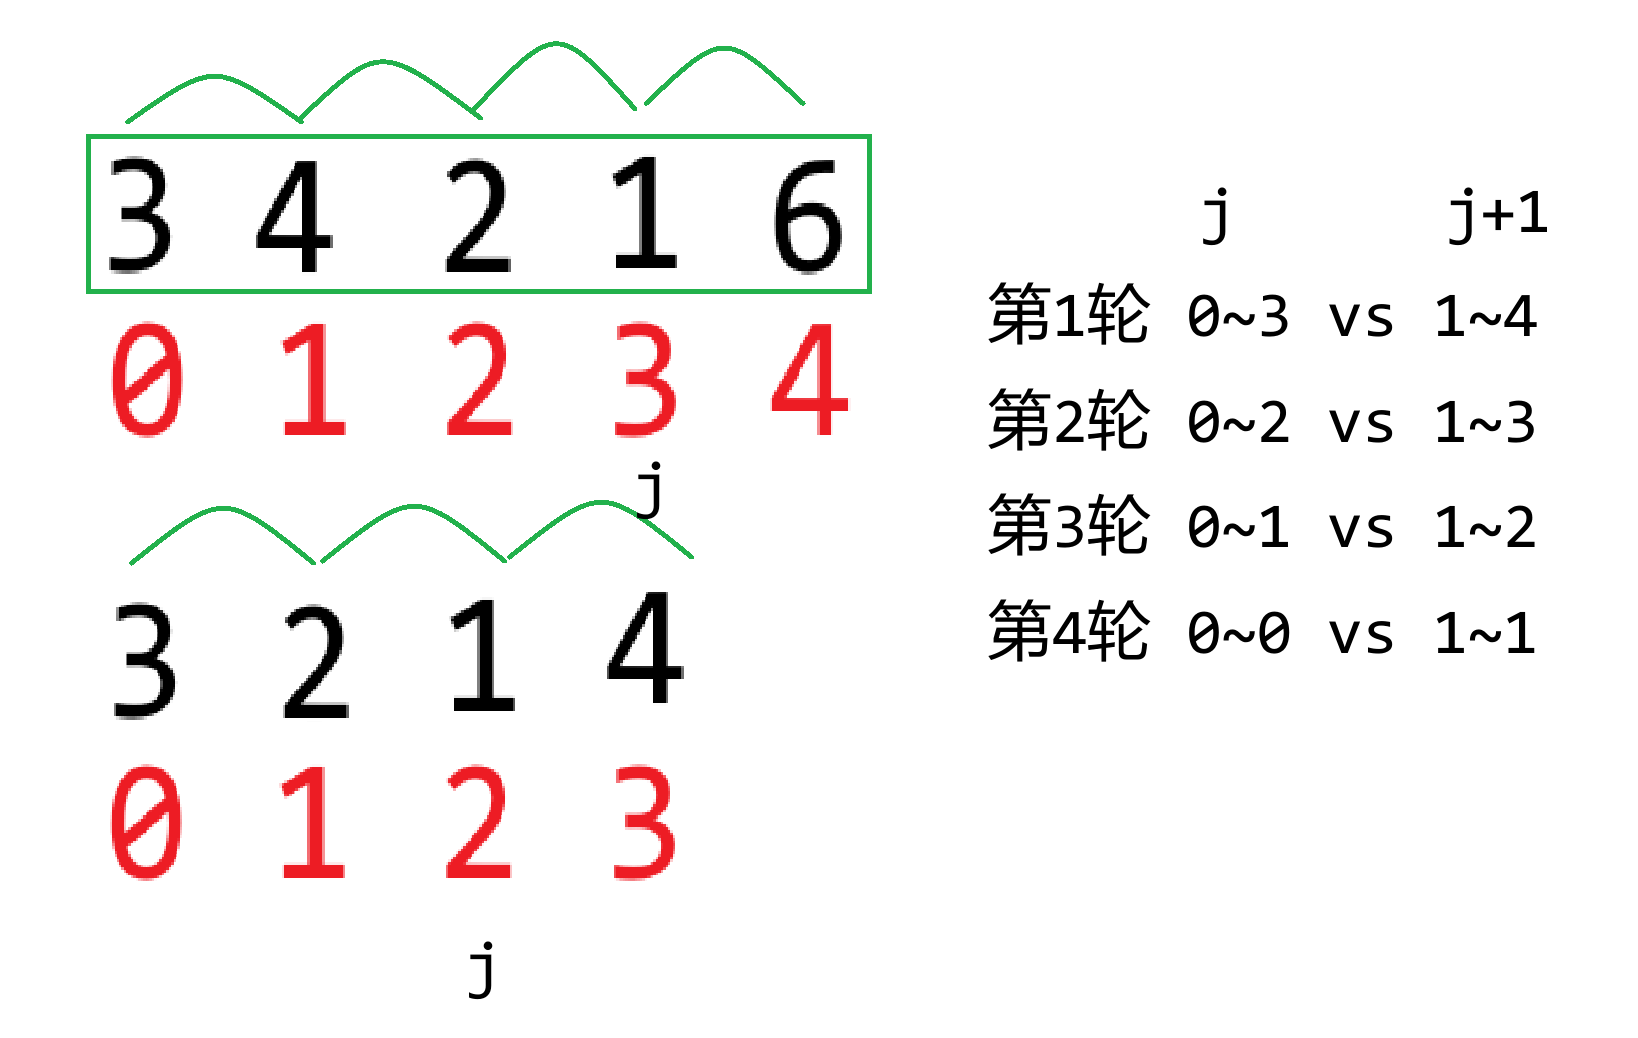
```python
# 时间 O(n^2) 空间O(1)/S(1)
def bubble_sort(arr):
"""
i: -1 少比一轮
j: len(arr) - i - 1
-i 有效区间在减小
-1 最多取该区间的倒数第2位
"""
for i in range(len(arr) - 1):
for j in range(0, len(arr) - i - 1):
if arr[j] > arr[j + 1]:
arr[j], arr[j + 1] = arr[j + 1], arr[j]
arr = [6,9,1,8,2,7,5,3,4]
bubble_sort(arr)
print(arr)
```
**(3)插入排序**
过滤掉一些没有必要的比较!前两者相当于是全排列式的比较
```python
# 时间 O(n^2) 空间O(1)
def insertion_sort(arr):
for i in range(1, len(arr)):
j = i
while j > 0 and arr[j - 1] > arr[j]:
arr[j - 1], arr[j] = arr[j], arr[j - 1]
j -= 1
arr = [6,9,1,8,2,7,5,3,4]
insertion_sort(arr)
print(arr)
```
## 第20节课 列表编程练习题
### 20.1 计算数字的出现次数
**题目描述**
读取1到100之间的整数,然后计算每个数出现的次数
**输入输出描述**
输入两行,第一行为整数的个数n,第二行为n个整数
输出多行,每行表示某数及其出现的次数,顺序按照数字从小到大
**示例**
> 输入:
>
> 9
>
> 2 5 6 5 4 3 23 43 2
>
> 输出:
>
> 2出现2次
>
> 3出现1次
>
> 4出现1次
>
> 5出现2次
>
> 6出现1次
>
> 23出现1次
>
> 43出现1次
```python
# 思路一 排序 比较连续相等 O(n*logn)
def count_arr_A(arr):
# 排序也耗时间 O(n*logn)
arr.sort()
# 以下代码时间O(n)
i = 0
while i < len(arr):
count = 1
j = i + 1
while j < len(arr) and arr[i] == arr[j]:
count += 1
j += 1
print(f"{arr[i]}出现了{count}次")
i = j
# 思路二 牺牲空间 换取时间
# 计数排序 数字跨度不宜太大 O(n+m) n和m之间要取一个平衡
def count_arr_B(arr):
# 最值决定temp数组的长度
min_value = min(arr)
max_value = max(arr)
temp = [0] * (max_value - min_value + 1)
# 统计次数 O(n)
for num in arr:
temp[num - min_value] += 1
# 遍历统计结果 O(m)
# 同时把遍历的结果回填给arr
arr.clear()
for index in range(len(temp)):
if temp[index] != 0:
num = index + min_value
count = temp[index]
print(f"{num}出现了{count}次")
# 回填给arr
arr.extend([num] * count)
n = int(input())
arr = [int(x) for x in input().split(" ")]
# count_arr_A(arr)
count_arr_B(arr)
# OverflowError: cannot fit 'int' into an index-sized integer
print(arr)
```
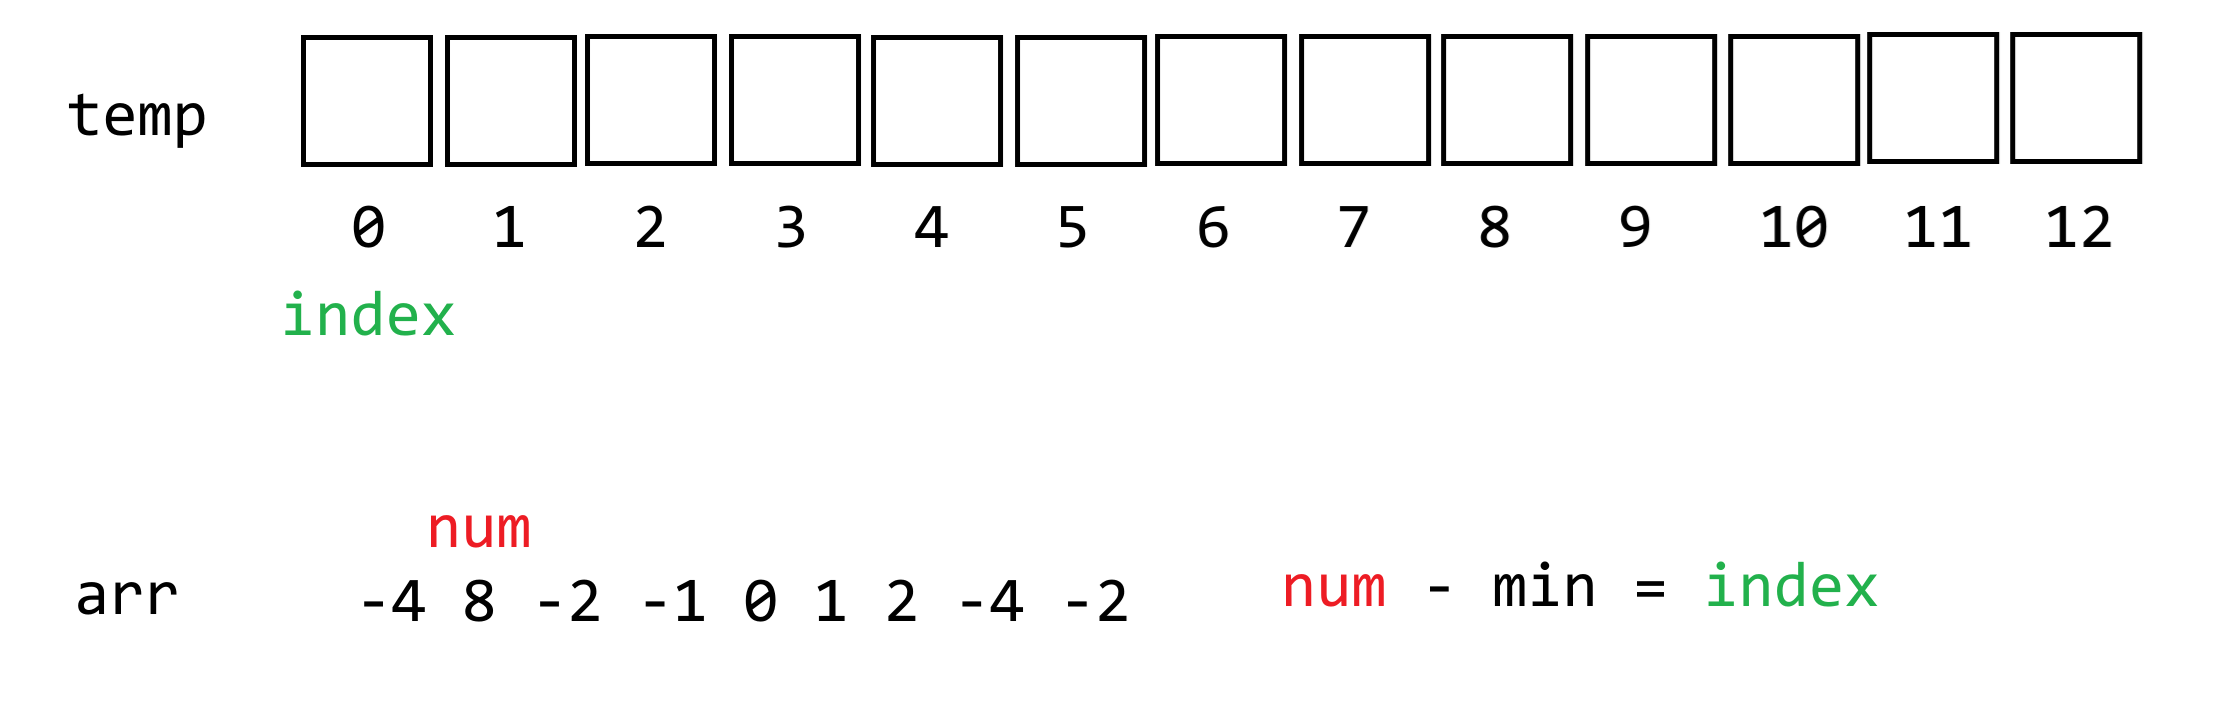
### 20.2 按奇偶排序数组
**题目描述**
给你一个整数数组 nums,将 nums 中的的所有偶数元素移动到数组的前面,后跟所有奇数元素。
返回满足此条件的 任一数组 作为答案。
**输入输出描述**
输入数组长度n,接下来输入n个整数
输出排序后的数组
**示例**
> 输入:
>
> 4
>
> 3 1 2 4
>
> 输出:
>
> 2 4 3 1
>
> 解释:
>
> [4,2,3,1]、[2,4,1,3] 和 [4,2,1,3] 也会被视作正确答案
```python
# 思路一 删除奇数往后塞
# O(n^2)
def func_A(arr):
count = 0
for num in arr:
if num % 2 == 0:
count += 1
i = 0
while i < len(arr) and count > 0:
if arr[i] % 2 == 1:
temp = arr.pop(i)
arr.append(temp)
else:
i += 1
count -= 1
# 思路二 创建一个新的列表存储偶数奇数
# O(n^2) S(n)
def func_B():
global arr
temp = []
for num in arr:
if num % 2 == 0:
temp.insert(0, num)
else:
temp.append(num) # O(1)
arr = temp
# 思路三 创建两个新的列表分别存储偶数和奇数 合并
# O(n) S(n)
def func_C():
global arr
tempA = [] # 偶数
tempB = [] # 奇数
for num in arr:
if num % 2 == 0:
tempA.append(num)
else:
tempB.append(num)
arr = tempA + tempB
# 思路四 对向双指针 划分区间
# O(n) S(1)
def func_D():
global arr
l = 0
r = len(arr) - 1
while l < r:
if arr[l] % 2 == 0 and arr[r] % 2 == 1:
# 左偶 右奇
l += 1
r -= 1
elif arr[l] % 2 == 1 and arr[r] % 2 == 0:
# 左奇 右偶
arr[l], arr[r] = arr[r], arr[l]
elif arr[l] % 2 == 0 and arr[r] % 2 == 0:
# 左偶 右偶
l += 1
else:
# 左奇 右奇
r -= 1
arr = [1,2,4,3,6,7,8]
# arr = [1,3,5,7,9]
# arr = [2,4,6,8]
# func_A(arr)
# func_B()
# func_C()
func_D()
print(arr)
```
### 20.3 合并两个有序数组
**题目描述**
给定两个有序递增的数组A和数组B,将其进行合并成一个新的数组C,且保持有序递增,并输出数组C
**输入输出描述**
第一行输入数组A的长度n,第二行输入n个元素,第三行输入数组B的长度m,第四行输入m个元素
输出数组C的n+m个元素
**示例**
> 输入:
>
> 5
>
> 1 5 16 61 111
>
> 4
>
> 2 4 5 6
>
> 输出:
>
> 1 2 4 5 5 6 16 61 111
```python
# 思路一 拼接 排序 O((n+m)*log(n+m))
def sovle_A(nums1, nums2):
nums3 = nums1 + nums2
nums3.sort()
return nums3
# 思路二 将一组数据插入到另一组数据中 O(nm)
def sovle_B(nums1, nums2):
# O(n)
for num in nums1:
i = 0
# O(m)
while i < len(nums2) and nums2[i] <= num:
i += 1
# O(m)
nums2.insert(i, num)
return nums2
# 思路三 牺牲空间 交替赋值 往nums3末尾添加
# O(n+m) S(n+m)
def solve_C(nums1, nums2):
nums3 = []
p1 = 0
p2 = 0
while p1 < len(nums1) or p2 < len(nums2):
if p1 == len(nums1):
nums3.append(nums2[p2])
p2 += 1
elif p2 == len(nums2):
nums3.append(nums1[p1])
p1 += 1
elif nums1[p1] <= nums2[p2]:
nums3.append(nums1[p1])
p1 += 1
else:
nums3.append(nums2[p2])
p2 += 1
return nums3
nums1 = [1, 2, 3, 6, 7, 9]
nums2 = [1, 3, 4, 6, 8, 9]
# nums3 = sovle_A(nums1, nums2)
# nums3 = sovle_B(nums1, nums2)
nums3 = solve_C(nums1, nums2)
print(nums3)
# 变形 同一个数组中有两个部分是递增的 进行合并
# O(n) 是 归并排序 的核心!
def merge(nums):
L1 = 0
R1 = 5
L2 = 6
R2 = 11
p1 = L1
p2 = L2
aux = []
while p1 <= R1 or p2 <= R2:
if p1 > R1:
aux.append(nums[p2])
p2 += 1
elif p2 > R2:
aux.append(nums[p1])
p1 += 1
elif nums[p1] <= nums[p2]:
aux.append(nums[p1])
p1 += 1
else:
aux.append(nums[p2])
p2 += 1
for i in range(len(nums)):
nums[i] = aux[i]
nums = [1, 2, 3, 6, 7, 9, 1, 3, 4, 6, 8, 9]
merge(nums)
print(nums)
```
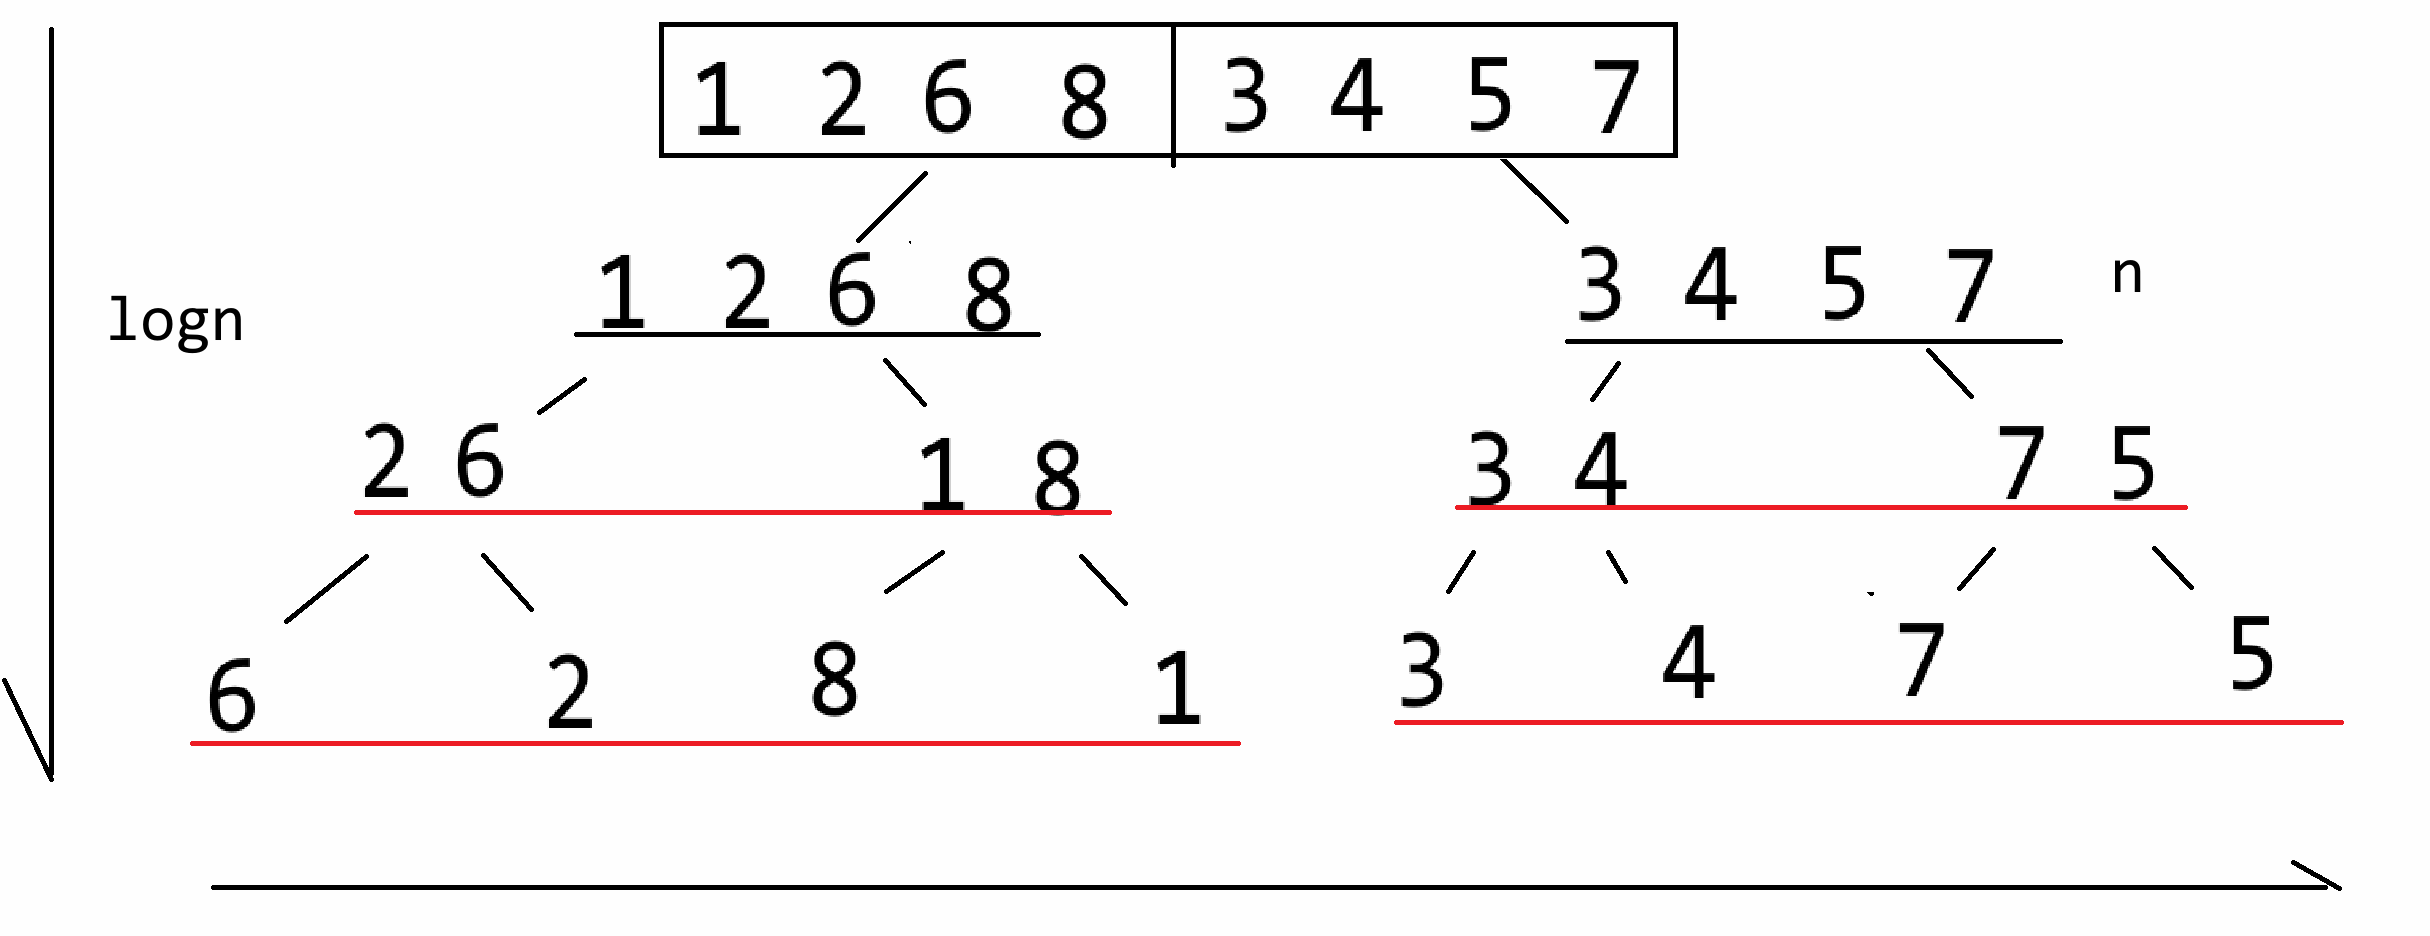
### 20.4 数组划分
**题目描述**
给定一个数组A,将第一个元素$A_0$作为枢纽,并把数组划分成三个区间,第一个区间所有元素$<A_0$,第二个区间所有元素$==A_0$,第三个区间所有元素$>A_0$
例如数组[5,2,9,3,6,8],划分后的结果为[3,2,5,9,6,8],第一个区间[3,2],第二个区间[5],第三个区间[9,6,8]
结果不唯一,只要保证划分后三个区间的元素特性即可,[2,3,5,9,8,6]、[3,2,5,6,8,9]都可作为上述划分的结果
**输入输出描述**
第一行输入数组的长度n,第二行输入n个元素
输出划分后的结果
**示例**
> 输入:
>
> 10
>
> 5 1 9 2 5 7 4 5 3 6
>
> 输出:
>
> 1 2 4 3 5 5 5 9 7 6
```python
# 三路快速排序算法的核心思路 O(n*logn) S(1)
def sovle(arr):
L = 0
R = len(arr) - 1
v = arr[L]
lt = L
gt = R + 1
i = L + 1
while i < gt:
if arr[i] < v:
arr[i],arr[lt + 1] = arr[lt + 1], arr[i]
lt += 1
i += 1
elif arr[i] > v:
gt -= 1
arr[i],arr[gt] = arr[gt], arr[i]
else:
i += 1
arr[L], arr[lt] = arr[lt],arr[L]
arr = [4,1,5,2,3,4,6,7,4,2,3,9,7,4,5,2,4,7,3,8,3,4,9,2]
sovle(arr)
print(arr)
```
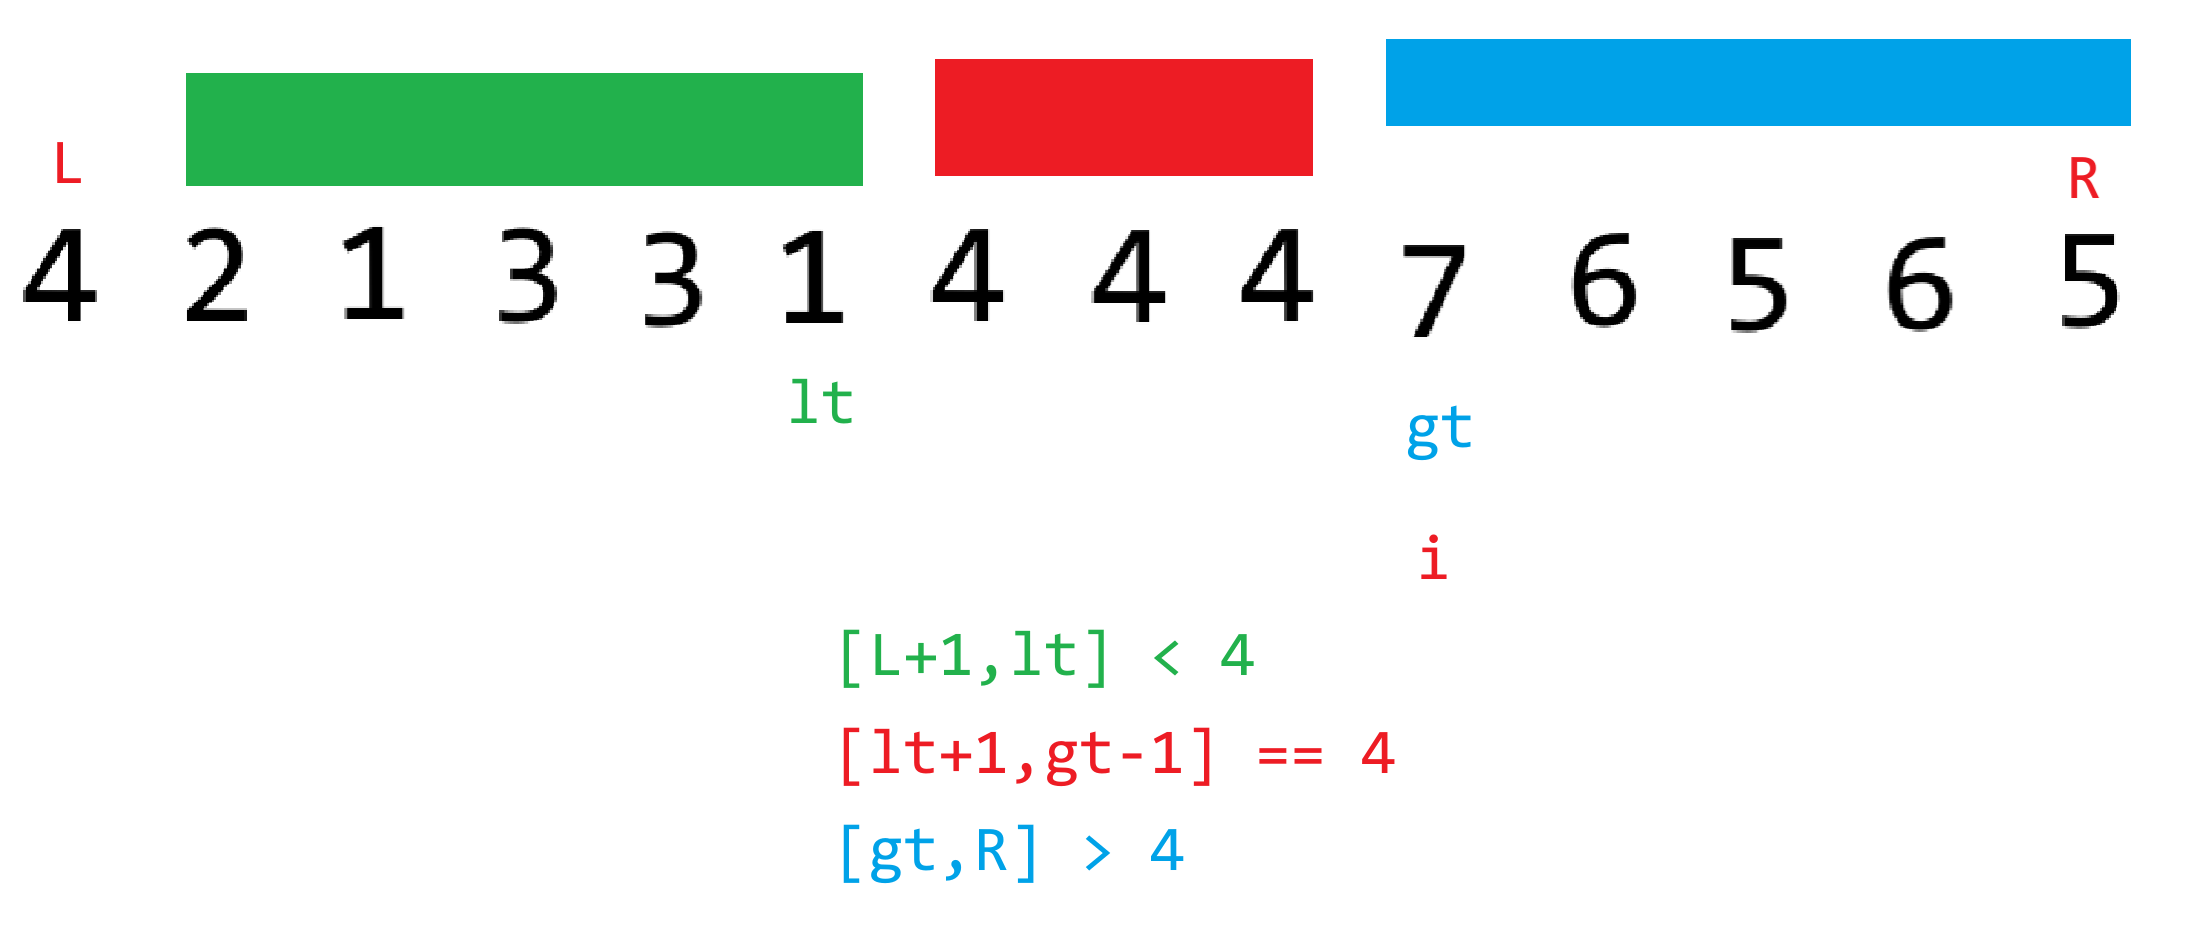
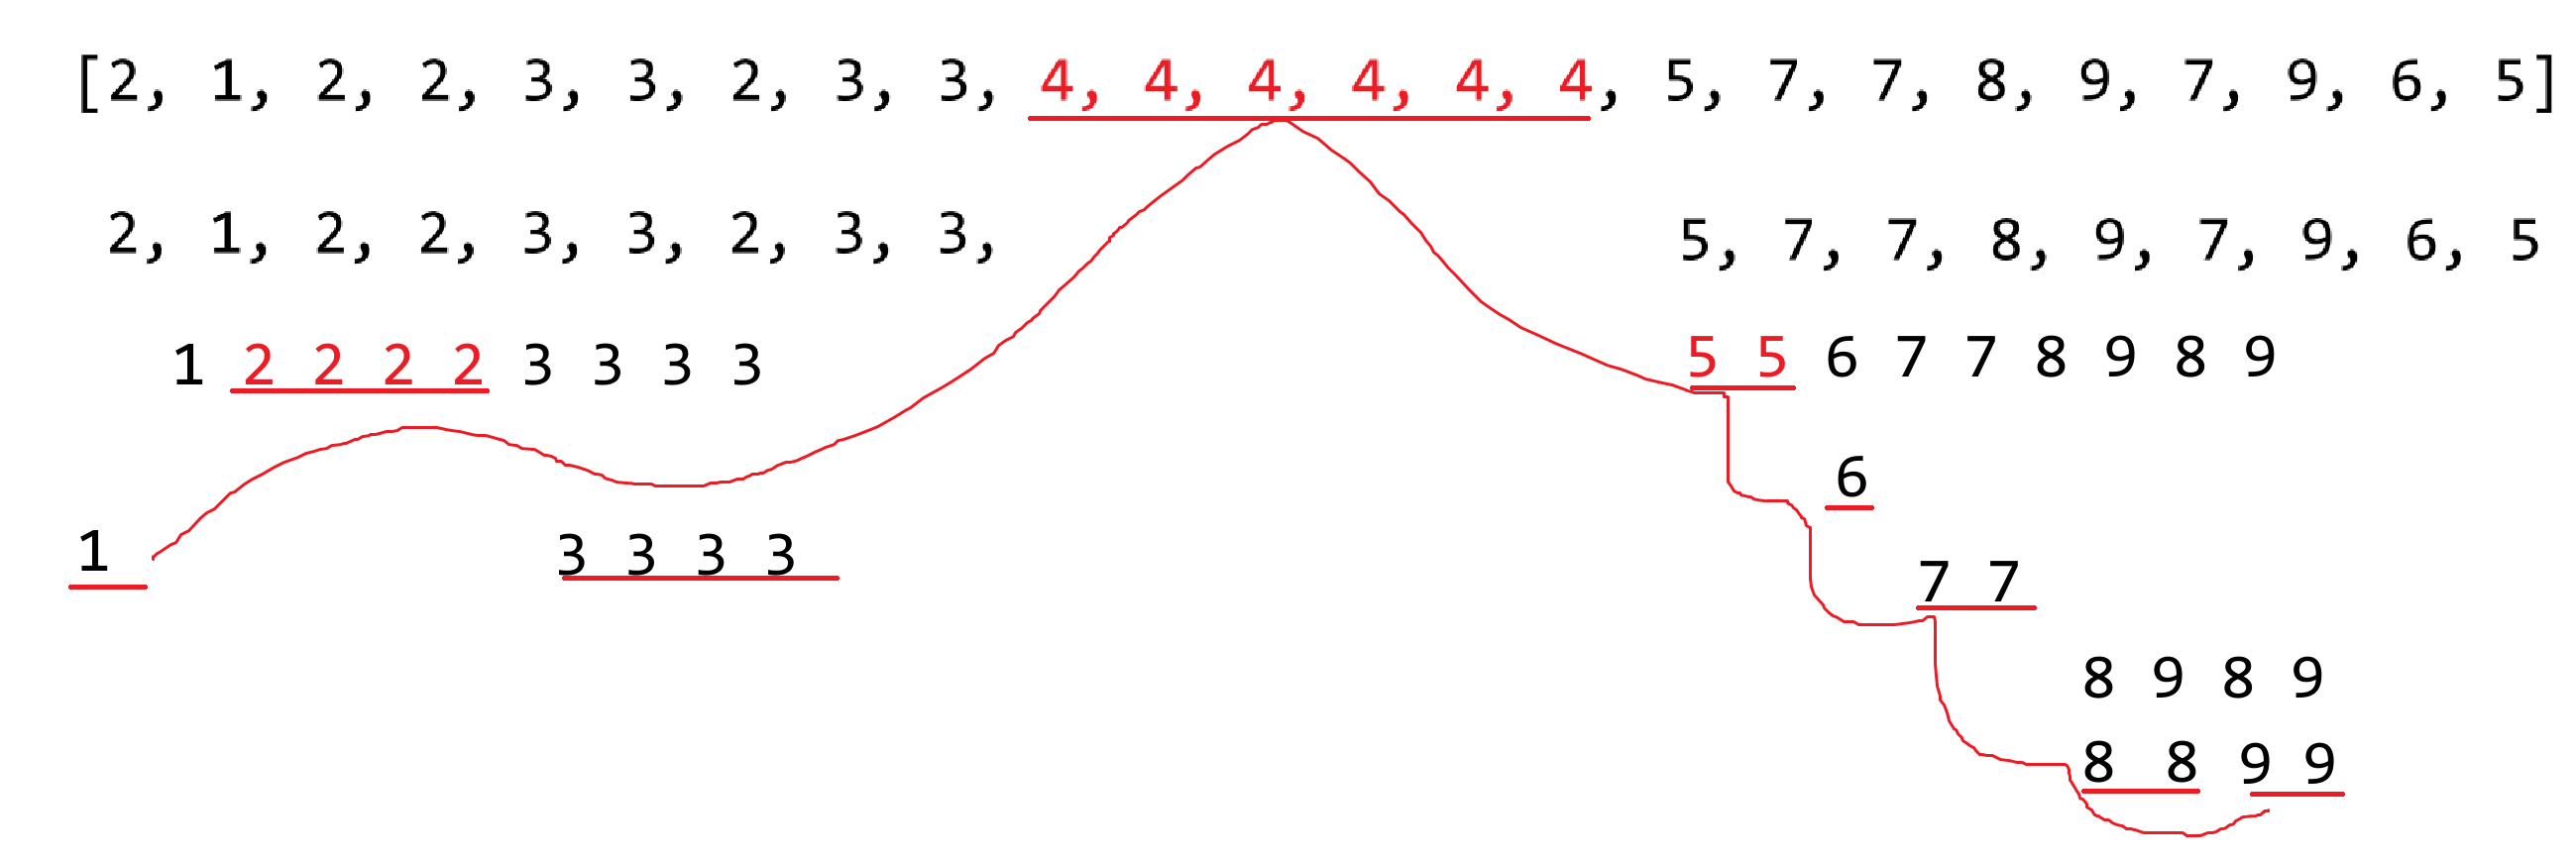
### 20.5 长度最小的子数组
**题目描述**
给定一个含有 n 个**正整数**的数组和一个正整数 target 。
找出该数组中满足其总和大于等于 target 的长度最小的 连续子数组 [numsl, numsl+1, ..., numsr-1, numsr] ,并返回其长度。如果不存在符合条件的子数组,返回 0 。
**输入输出描述**
输入数组长度n和目标值target,接下来输入n个元素
输出最小子数组长度
**示例**
> 输入:
>
> 6 7
>
> 2 3 1 2 4 3
>
> 输出:
>
> 2
>
> 解释:
>
> 子数组 [4,3] 是该条件下的长度最小的子数组
```python
def solve(arr, target):
min_length = len(arr) + 1
l = 0
r = 0
sum_of_arr = arr[l]
while r < len(arr):
if sum_of_arr < target:
r += 1
if r < len(arr):
sum_of_arr += arr[r]
else:
break
else:
min_length = min(min_length, r - l + 1)
sum_of_arr -= arr[l]
l += 1
# 如果条件满足返回0 否则返回 min_length
# 三元表达式
return 0 if min_length == len(arr) + 1 else min_length
arr = [2,3,1,2,4,3]
target = 7
print(solve(arr, target))
```
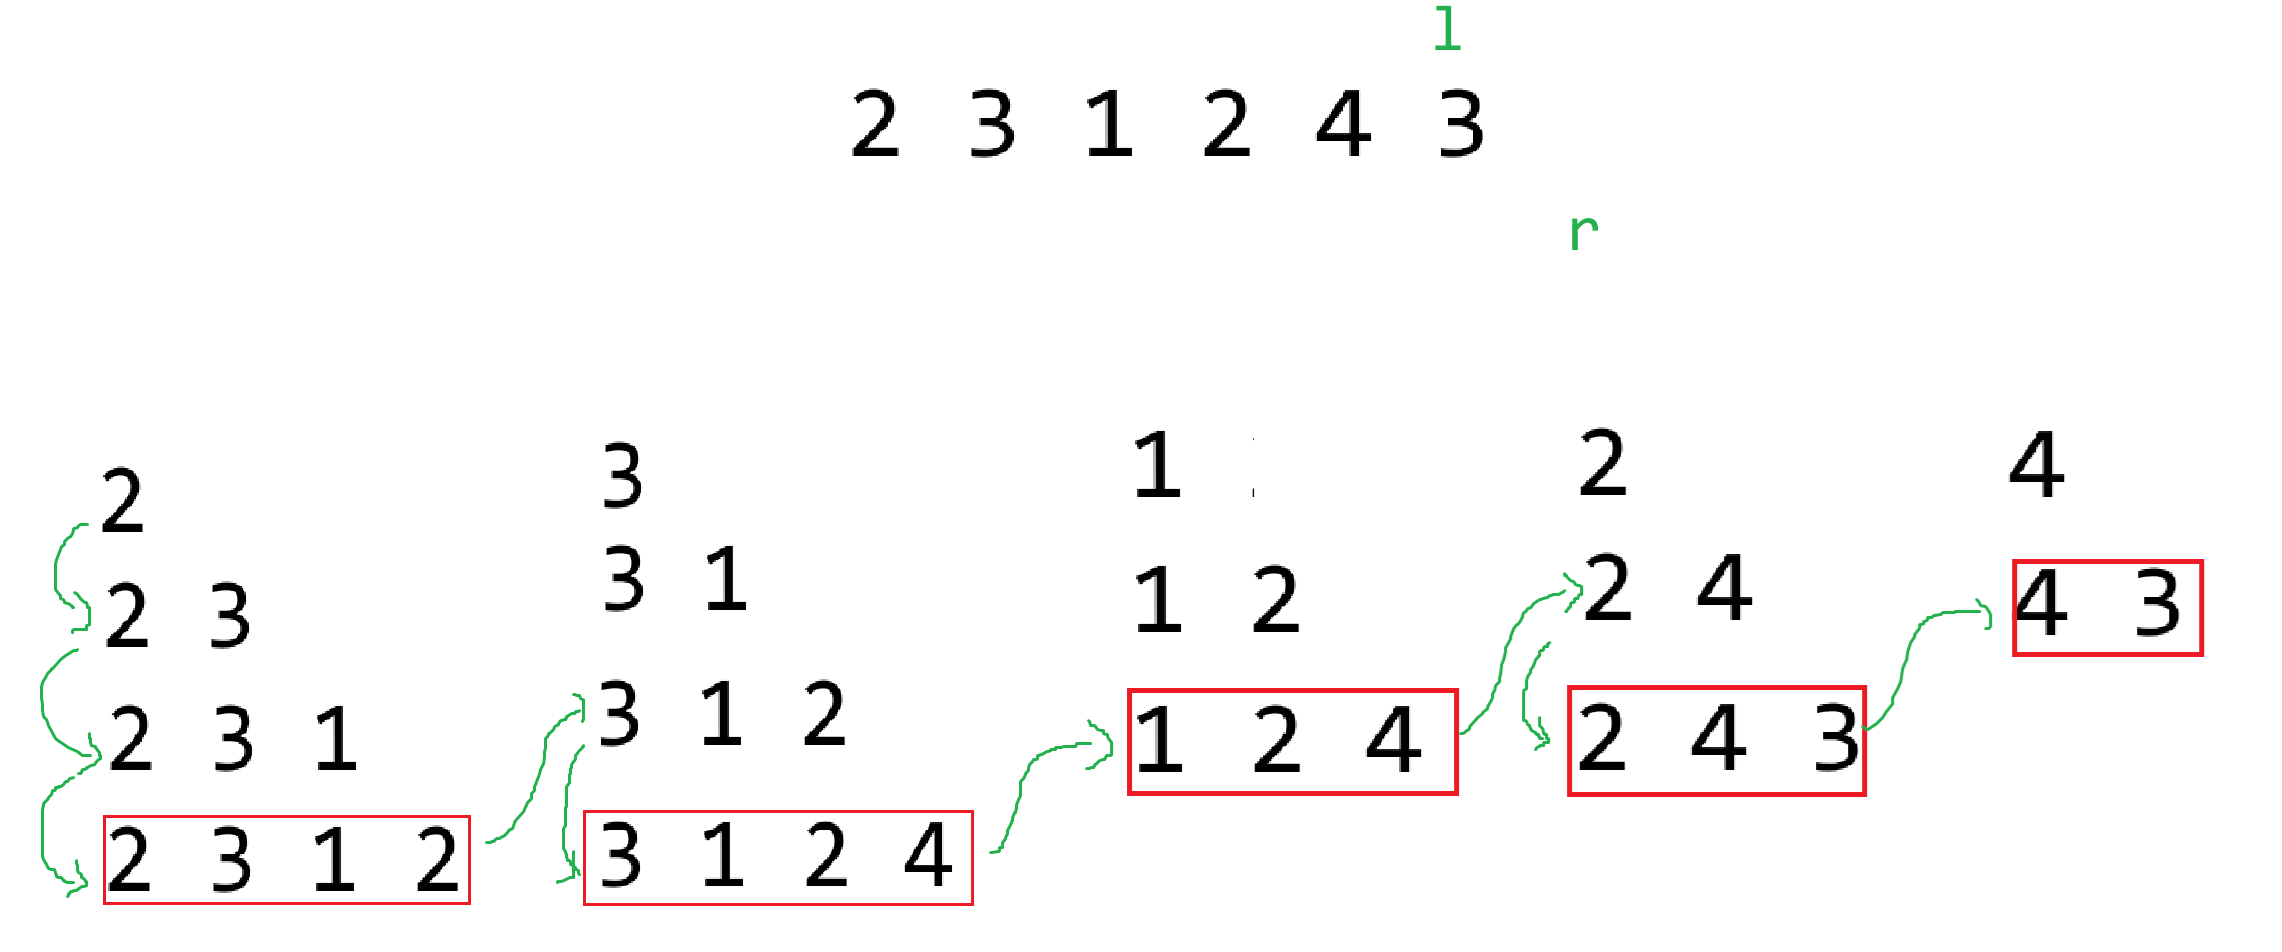
### 20.6 寻找两个正序数组中的中位数
**题目描述**
给定两个大小分别为 m 和 n 的正序(从小到大)数组 nums1 和 nums2。请你找出并返回这两个正序数组的 中位数 。
算法的时间复杂度应该为 O(log (m+n)) 。
**输入输出描述**
输入m和n,然后分别输入m个元素和n个元素
输出中位数
**示例1**
> 输入:
>
> 2 1
>
> 1 3
>
> 2
>
> 输出:
>
> 2.0
>
> 解释:
>
> 合并数组 = [1,2,3] ,中位数2
**示例2**
> 输入:
>
> 2 2
>
> 1 2
>
> 3 4
>
> 输出:
>
> 2.5
```python
# 用于寻找nums1和nums2中的中位数
def sovle(nums1, nums2):
low = 0
high = len(nums1)
total_length = len(nums1) + len(nums2)
while low <= high:
curA = (low + high) // 2
curB = (total_length + 1) // 2 - curA
L1 = -9999 if curA == 0 else nums1[curA - 1]
R1 = 9999 if curA == len(nums1) else nums1[curA]
L2 = -9999 if curB == 0 else nums2[curB - 1]
R2 = 9999 if curB == len(nums2) else nums2[curB]
if L1 > R2:
high = curA - 1
elif L2 > R1:
low = curA + 1
else:
if total_length % 2 == 1:
return max(L1, L2)
else:
return (max(L1, L2) + min(R1,R2)) / 2
nums1 = []
nums2 = []
print(sovle(nums1, nums2))
```
总长度为偶数个情况:
<img src="https://zh-1258460726.cos.ap-nanjing.myqcloud.com//typora-pic/image-20250719100321228.png" alt="image-20250719100321228" style="zoom:25%;" />
总长度为奇数个情况:
<img src="https://zh-1258460726.cos.ap-nanjing.myqcloud.com//typora-pic/image-20250719100402341.png" alt="image-20250719100402341" style="zoom:25%;" />
### 20.7 盛最多水的容器
**题目描述**
给定一个长度为 n 的整数数组 height 。有 n 条垂线,第 i 条线的两个端点是 (i, 0) 和 (i, height[i]) 。
找出其中的两条线,使得它们与 x 轴共同构成的容器可以容纳最多的水。
返回容器可以储存的最大水量。
**输入输出描述**
输入数组长度n,接下来输入n个元素
输出最大水量
**示例1**
> 输入:
>
> 9
>
> 1 8 6 2 5 4 8 3 7
>
> 输出:
>
> 49
>
> 解释:
>
> <img src="https://zh-1258460726.cos.ap-nanjing.myqcloud.com//typora-pic/image-20230927170546416.png" alt="image-20230927170546416" style="zoom:50%;" />
>
> 图中垂直线代表输入数组 [1,8,6,2,5,4,8,3,7]。在此情况下,容器能够容纳水(表示为蓝色部分)的最大值为 49
```python
import random
import time
# O(1) < O(logn) < O(n) < O(nlogn) < O(n^2) < O(n^3) < O(n!) < O(2^n)
# 思路一 枚举法
# O(n^2)
def sovle_A(height):
start_time = time.time()
volume = 0
for i in range(len(height) - 1):
for j in range(i + 1, len(height)):
area = min(height[i], height[j]) * (j - i)
if area > volume:
volume = area
end_time = time.time()
print(f"sovle_A使用了{(end_time - start_time) *1000:.2f}毫秒")
return volume
# 思路二 对向双指针
# O(n)
def solve_B(height):
start_time = time.time()
left = 0
right = len(height) - 1
volume = 0
while left < right:
area = min(height[left], height[right]) * (right - left)
volume = max(area, volume)
if height[left] <= height[right]:
left += 1
else:
right -= 1
end_time = time.time()
print(f"sovle_B使用了{(end_time - start_time) * 1000:.2f}毫秒")
return volume
height = []
for i in range(10000):
height.append(random.randint(1, 10000))
print(solve_B(height))
print(sovle_A(height))
```
### 20.8 豆机器
**题目描述**
豆机器,也称为梅花或高尔顿盒子,它是一个统计实验的设备,它是由一个三角形直立板和均匀分布的钉子构成,如下图所示:
<img src="https://zh-1258460726.cos.ap-nanjing.myqcloud.com//typora-pic/image-20230925114402767.png" alt="image-20230925114402767" style="zoom:50%;" />
小球从板子的开口处落下,每次小球碰到钉子,它就是50%的可能掉到左边或者右边,最终小球就堆积在板子底部的槽内
编程程序模拟豆机器,提示用户输入小球的个数以及机器的槽数,打印每个球的路径模拟它的下落,然后打印每个槽子中小球的个数
**输入输出描述**
输入两个数据,分别表示小球个数和槽子的个数
输出每个小球经过的路径,和最终每个槽子里小球的个数(因为牵扯随机数,程序结果不唯一,示例仅用于表明题意)
**示例**
> 输入:
>
> 5 8
>
> 输出:
>
> LRLRLRR
>
> RRLLLRR
>
> LLRLLRR
>
> RRLLLLL
>
> LRLRRLR
>
> 0 0 1 1 3 0 0 0
<img src="https://zh-1258460726.cos.ap-nanjing.myqcloud.com//typora-pic/image-20250719115247772.png" alt="image-20250719115247772" style="zoom:25%;" />
```python
import random
def solve(balls_number, slots_number):
# 槽子 存储小球 -> 数量
slots = [0] * slots_number
# 循环计算路径 10个球10个路径
for i in range(balls_number):
path = []
# 计算当前path路径 8个槽子-路径长度为7
for j in range(slots_number - 1):
random_num = random.randint(0, 1)
if random_num == 0:
path.append('L')
else:
path.append('R')
s = ""
for p in path:
s += p
print(s)
slots[path.count('R')] += 1
print(slots)
balls_number = 200 # 200个球
slots_number = 30 # 30个槽子 -> 路径长度为29
solve(balls_number, slots_number)
```
### 20.9 四个连续的相同数字
**题目描述**
给定一个二维数组,判断其中是否有四个连续的相同数字,不管这四个数字是在水平方向、垂直方向还是斜线方向
**输入输出描述**
输入矩阵的行列n和m
输出YES表示存在,NO不存在
**示例**
> 输入:
>
> 5 5
>
> 5 6 2 1 6
>
> 6 5 6 6 1
>
> 1 3 6 1 4
>
> 3 6 3 3 4
>
> 0 6 2 3 2
>
> 输出:
>
> YES
<img src="https://zh-1258460726.cos.ap-nanjing.myqcloud.com//typora-pic/image-20250719143520631.png" alt="image-20250719143520631" />
```python
def sovle(matrix):
for x in range(row):
for y in range(col):
# 向右
if y < col - 3:
if matrix[x][y] == matrix[x][y + 1] == matrix[x][y + 2] == matrix[x][y + 3]:
return "YES"
# 向下
if x < row - 3:
if matrix[x][y] == matrix[x + 1][y] == matrix[x + 2][y] == matrix[x + 3][y]:
return "YES"
# 右下
if x < row - 3 and y < col - 3:
if matrix[x][y] == matrix[x + 1][y + 1] == matrix[x + 2][y + 2] == matrix[x + 3][y + 3]:
return "YES"
# 右上
if x > 2 and y < col - 3:
if matrix[x][y] == matrix[x - 1][y + 1] == matrix[x - 2][y + 2] == matrix[x - 3][y + 3]:
return "YES"
return "NO"
row, col = map(int, input().split(" "))
matrix = []
for i in range(row):
line = [int(x) for x in input().split(" ")]
matrix.append(line)
print(sovle(matrix))
```
### 20.10 探索二维矩阵 I
**题目描述**
给你一个满足下述两条属性的 m x n 整数矩阵:
- 每行中的整数从左到右按非递减顺序排列。
- 每行的第一个整数大于前一行的最后一个整数。
给你一个整数 target ,如果 target 在矩阵中,返回 true ;否则,返回 false 。
**输入输出描述**
输入矩阵的行row和列col,和目标值target
接下来输入row行,每行col个元素
输出是否存在
**示例**
> 输入:
>
> 3 4 3
>
> 1 3 5 7
>
> 10 11 16 20
>
> 23 30 34 60
>
> 输出:
>
> true
```python
# 思路一 每一行进行二分查找
# O(row*logcol)
def binary_search(arr, target):
if target < arr[0]:
return False # 小于当前行最小值 不存在
low = 0
high = len(arr) - 1
mid = (low + high) // 2
while arr[mid] != target:
if arr[mid] < target:
low = mid + 1
else:
high = mid - 1
if low > high:
return False # 在当前行范围内 但不存在
mid = (low + high) // 2
return True
def solve_A(matrix, target):
for row in matrix:
if target <= row[-1]:
# 在当前行进行二分查找
return binary_search(row, target)
return False # 大于最大值 不存在
# 思路二 将整个二维列表看成一个一维列表进行操作 坐标转换
# O(log(row * col))
def solve_B(matrix, target):
low = 0
high = row * col - 1
while True:
mid = (low + high) // 2
x = mid // col
y = mid % col
if matrix[x][y] == target:
return True
if matrix[x][y] < target:
low = mid + 1
else:
high = mid - 1
if low > high:
return False
row, col, target = map(int, input().split(" "))
matrix = []
for i in range(row):
matrix.append([int(x) for x in input().split(" ")])
print(solve_A(matrix, target))
print(solve_B(matrix, target))
"""
3 4 30
1 3 5 7
10 11 16 20
23 30 34 60
"""
```
<img src="https://zh-1258460726.cos.ap-nanjing.myqcloud.com//typora-pic/image-20250719153953110.png" alt="image-20250719153953110" style="zoom:25%;" />
### 20.11 拉丁方阵
拉丁方阵是指一个含有n个不同拉丁字母的 n × n 的方阵,每个字母在方阵的每一行和每一列都只出现一次。编写一个程序,程序提示用户输入方阵的大小 n,然后输入一个方阵,检测是否为拉丁方阵。方阵的字母是从A开始的n个字母。
**示例1**
> 输入:
>
> 4
>
> A B C D
>
> B A D C
>
> C D B A
>
> D C A B
>
> 输出:
>
> 是拉丁方阵
**示例2**
> 输入:
>
> 3
>
> A B C
>
> C A B
>
> A C B
>
> 输出:
>
> 不是拉丁方阵
**示例3**
> 输入:
>
> 3
>
> A F H
>
> 输出:
>
> 因为 n = 3,所以字母只能是A、B、C
```python
def sovle():
# 逐行遍历
for i in range(n):
t = set(matrix[i]) # 将列表转集合(新建集合)
if len(s - t) > 0:
print("不是拉丁方阵")
return
# 逐列遍历
for j in range(n):
t = set()
for i in range(n):
t.add(matrix[i][j])
if len(s - t) > 0:
print("不是拉丁方阵")
return
print("是拉丁方针")
# return
n = int(input())
s = set([chr(x) for x in range(65, 65 + n)]) # 将列表转集合(新建集合)
matrix = []
for i in range(n):
matrix.append(input().split(" "))
sovle()
"""
3
A B C
C B A
J K L
"""
```
### 20.12 螺旋矩阵
**题目描述**
给你一个 m 行 n 列的矩阵 matrix ,请按照 顺时针螺旋顺序 ,返回矩阵中的所有元素。
**输入输出描述**
输入矩阵的行列row和col,接下来有row行输入,每行col个数字
输出遍历后的结果
**示例**
> 输入:
>
> 3 4
>
> 1 2 3 4
>
> 5 6 7 8
>
> 9 10 11 12
>
> 输出:
>
> 1 2 3 4 8 12 11 10 9 5 6 7
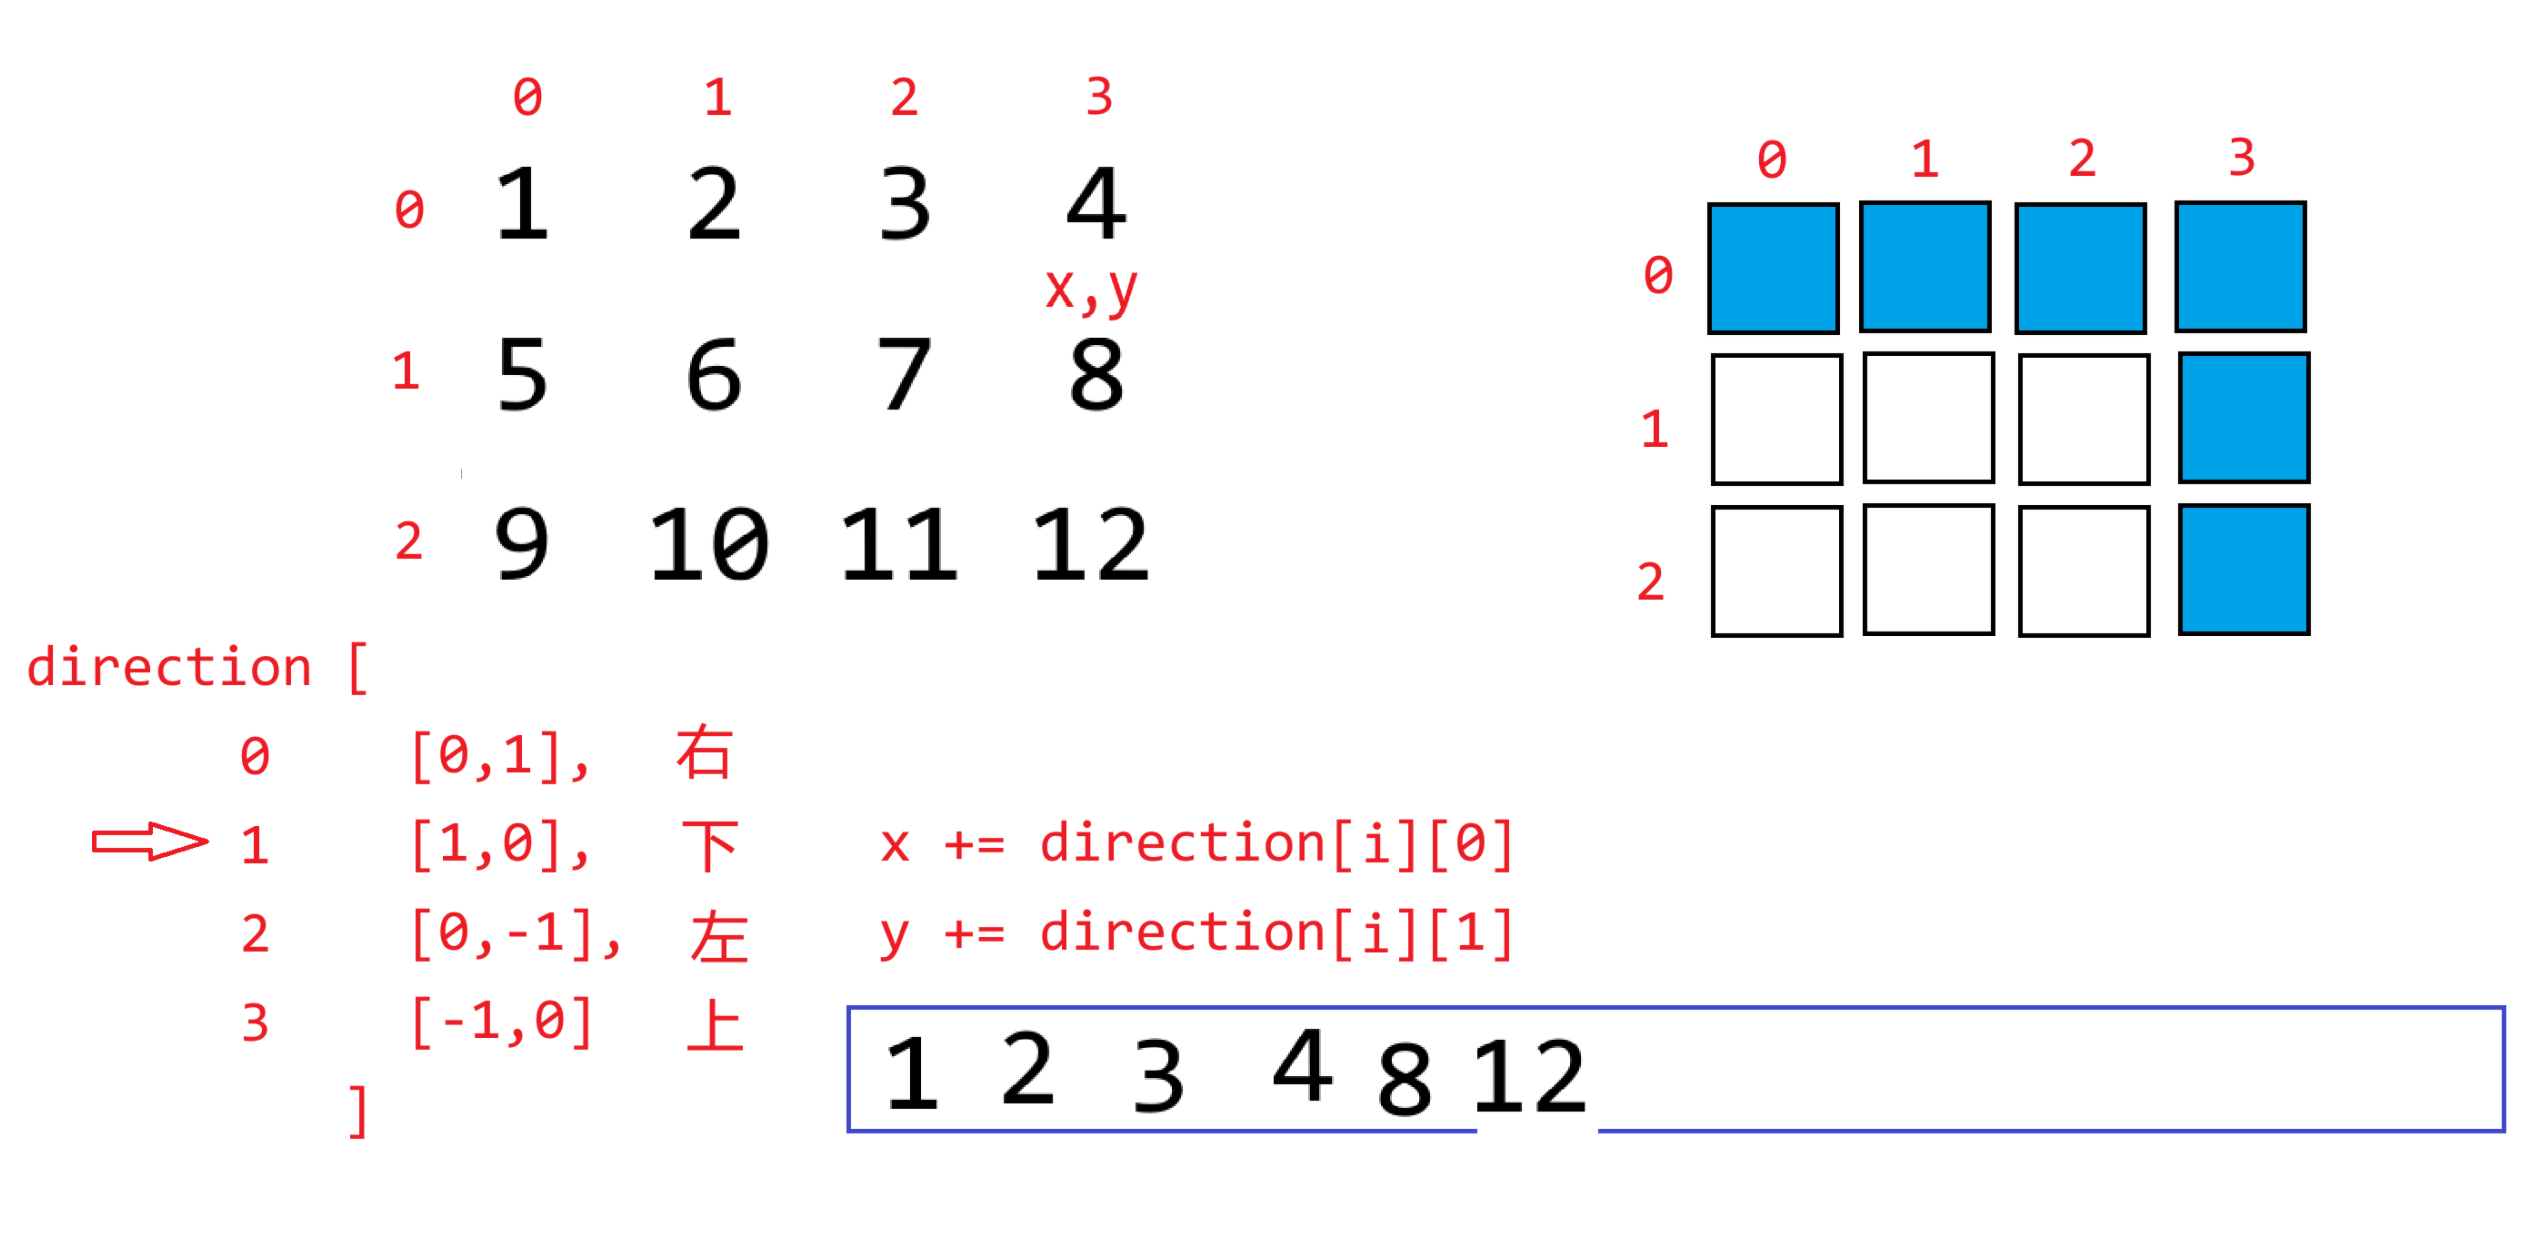
```python
def solve(matrix):
lst = []
direction = [[0,1],[1,0],[0,-1],[-1,0]]
direct = 0 # 默认先向右
x = 0
y = 0
visited = []
for i in range(row):
visited.append([False] * col)
while len(lst) < row * col:
if 0 <= x < row and 0 <= y < col and not visited[x][y]:
lst.append(matrix[x][y])
visited[x][y] = True
x += direction[direct][0]
y += direction[direct][1]
else: # 出界 或者 被访问
# 更新位置
if direct == 0:
x += 1
y -= 1
elif direct == 1:
x -= 1
y -= 1
elif direct == 2:
x -= 1
y += 1
else:
x += 1
y += 1
# 更新方向
direct = (direct + 1) % 4
return lst
row, col = map(int, input().split(" "))
matrix = []
for i in range(row):
matrix.append([int(x) for x in input().split(" ")])
print(solve(matrix))
"""
8 8
1 2 3 4 5 6 7 8
1 2 3 4 5 6 7 8
1 2 3 4 5 6 7 8
1 2 3 4 5 6 7 8
8 7 6 5 4 3 2 1
8 7 6 5 4 3 2 1
8 7 6 5 4 3 2 1
8 7 6 5 4 3 2 1
"""
```
### 20.13 五子棋游戏
五子棋是一种双人对弈的棋类游戏,双方分别使用黑白两色棋子,在棋盘上交替落子。游戏目标为在棋盘的横向、纵向或斜向任一方向上,使自己的五个同色棋子连成一线。通常先手执黑子,后手执白子,轮流在棋盘的交叉点上放置棋子,先达成五连珠的玩家获胜。
棋盘由纵横各 15 条线交叉组成,形成 225 个交叉点。棋子分为黑、白两色,黑子 113 枚,白子 112 枚。
提示用户每次下棋的坐标即可。
```python
player = 0
N = 15
def create_board(N):
board = []
for i in range(N):
board.append(['+'] * N)
return board
def print_board(board):
print(" ", end="")
for i in range(1, 16):
print(f"{i:<3}", end="")
print()
for i in range(len(board)):
print(f"{i + 1:2}", end=" ")
for j in range(len(board[i])):
print(board[i][j], end=" ")
print()
# 下棋的逻辑
def chess_board(chess, board):
global player
x, y = map(int, input(">>>请输入坐标:").split(" "))
x -= 1
y -= 1
if board[x][y] == "+":
board[x][y] = chess
print_board(board)
else:
print(">>>此处已有棋子,请重新下棋!")
player -= 1
# 判断五子连珠情况
def is_game_over(board):
for x in range(len(board)):
for y in range(len(board[x])):
if board[x][y] == "+":
continue
# 右
if y < N - 4:
if board[x][y] == board[x][y+1] == board[x][y+2] == board[x][y+3] == board[x][y+4]:
return True
# 下
if x < N - 4:
if board[x][y] == board[x+1][y] == board[x+2][y] == board[x+3][y] == board[x+4][y]:
return True
# 右下
if y < N - 4 and x < N - 4:
if board[x][y] == board[x+1][y+1] == board[x+2][y+2] == board[x+3][y+3] == board[x+4][y+4]:
return True
# 右上
if x > 3 and y < N - 4:
if board[x][y] == board[x-1][y+1] == board[x-2][y+2] == board[x-3][y+3] == board[x-4][y+4]:
return True
return False
def start_game(board):
global player
while True:
if player % 2 == 0:
print(">>>请黑方下棋")
chess_board("●", board)
else:
print(">>>请白方下棋")
chess_board("○", board)
player += 1
# 判断是有游戏结束
# 和棋结束
if player == N ** 2:
print(">>>和棋!游戏结束!")
return
# 五子连珠结束
if is_game_over(board):
if player % 2 == 1:
print(">>>黑方胜!游戏结束!")
else:
print(">>>白方胜!游戏结束!")
return
# 以下的代码理解为主函数
if __name__ == "__main__":
# 创建一个棋盘
board = create_board(N)
# 打印棋盘
print_board(board)
# 游戏逻辑
start_game(board)
```
## 第21节课 字符串
### 21.1 字符串定义与创建
在Python中,字符串就是一组由若干个字符组成的一个不可变序列
- 序列:线性结构,支持序列的通用操作:索引、切片、拼接、重复、最值、成员资格检查、长度
- 不可变:字符串一旦创建,其长度和内容不能修改(不能增、删、修)
当然,字符串对象本身也提供了很多类似于列表对象函数的一些功能,字符串对象函数,`字符串对象.XXX()`,在这些对象函数中,确实有一些是改变字符串内容的,但是注意并不会改变字符串本身,而是**新建一个字符串**出来。
字符串的创建有这么几种方式:
```python
# 单行字符串模式
'abc'
"abc"
# 多行字符串模式 允许在字符串中进行换行
"""
abc
def
"""
'''
abc
def
'''
# 原生字符串模式 在字符串之前加一个r标记
s = "abc\nabc\tdef"
print(s)
# 原生字符串 当中不会再包含任何特殊的转义字符 一般在正则表达式当中用的比较多
s = r"abc\nabc\tdef"
print(s)
# 字节字符串 就是在字符串之前加一个b 该字符串的内容其实表示的是每个字符的字节编码
s = "123我abc"
b = s.encode('utf-8')
print(b)
# b'123\xe6\x88\x91abc'
```
### 21.2 大小写转换方法
```python
s = "One two thREE 123"
# upper() 将字符串中所有的字母转为大写
print(s.upper()) # ONE TWO THREE 123
# lower() 将字符串中所有的字母转为小写
print(s.lower()) # one two three 123
# capitalize() 将字符串中第一个字符转为大写,其余转小写 英文短句
print(s.capitalize()) # One two three 123
# title() 将字符串中每个单词的首字母转大写,其余转小写
print(s.title()) # One Two Three 123
# swapcase() 将字符串中的大写字母转小写,小写字母转大写
print(s.swapcase()) # oNE TWO THree 123
```
### 21.3 查找与替换方法
```python
s = "apple orange banana computer software"
# find(sub, start, end) 在字符串中查找子串sub第一次出现(从左到右)的索引位置,如果未找到则返回-1
# start 从哪开始 end 到哪结束
print(s.find("o")) # 6
print(s.find("orange")) # 6
print(s.find("oppo")) # -1
print(s.find("o", 10)) # 21
# rfind() 从右到左的find()
print(s.rfind('computer')) # 20
print(s.rfind('e')) #36
# index(sub, start, end) 与find类似 但是未找到的话 则报错
print(s.index("orange")) # 6
# print(s.index('oppo')) # ValueError: substring not found
# rindex() 反向index()
# count(sub, start, end) 统计sub子串在字符串中出现的次数 不存在返回 0
print(s.count("o")) # 3
print(s.count("orange"))# 1
print(s.count("vivo"))# 0
# repalce(old,new,count) 将字符串中的所有old字符串替换为new字符串;count指定替换的次数 从左到右
print(s.replace("o", 'O')) # apple Orange banana cOmputer sOftware
print(s.replace('a','A',3)) # Apple orAnge bAnana computer software
print("orange" in s)
```
### 21.4 去除空白字符方法
```python
s = " \n 123 456 789 \t 999 \t \n"
print(s)
# lstrip(chars) 删除左边的指定字符 默认为空白字符
print(f"[{s.lstrip()}]")
# rstrip(chars) 删除右边的指定字符 默认为空白字符
print(f"[{s.rstrip()}]")
# strip(chars) 删除左右的指定字符 默认为空白字符
print(f'[{s.strip()}]')
s = "#####123#####"
print(s.strip("#"))
```
### 21.5 分割和连接方法
```python
s = "apple \n orange banana computer \tsoftware"
# split(sep, maxsplit) 以sep为分隔符进行分割(sep默认空白字符),生成一个列表;maxsplit指定最大分割次数
print(s.split())
print(s.split(" "))
s = "apple orange banana computer software"
print(s.split(" ", maxsplit=2))
# splitlines(keepends) 根据字符串的换行进行分割 生成一个列表,keepends 表示是否保留换行符 布尔类型
s = "abc def ghi"
print(s.splitlines())
s = "abc\ndef\nghi\n"
print(s.splitlines())
s = """abc
def
ghi
"""
print(s.splitlines(keepends=True))
# join(iterable) 将可迭代对象中的元素(必须是字符串类型)进行拼接,用调用者字符串作为分隔符
arr = ['apple', 'orange', 'banana', 'computer', 'software']
print("+".join(arr))
arr = [1, 2, 3, 4, 5, 6, 7, 8, 9]
# print("=".join(arr)) # TypeError: sequence item 0: expected str instance, int found
print("=".join([str(x) for x in arr]))
print('='.join(map(str, arr)))
```
### 21.6 检查判断方法
```python
s = "迪丽热巴.avi"
# startswith(prefix) 判断是否以prefix开头
print(s.startswith("迪丽热巴"))
print(s.startswith('古力娜扎'))
# endswith(suffix) 判断是否以suffix结尾
print(s.endswith('.avi'))
print(s.endswith(".mp3"))
# isalnum() 判断是否都是字母/中文或数字
print("123".isalnum())
print("abc".isalnum())
print("123abc".isalnum())
print("我爱迪丽热巴".isalnum())
print("!&^@$#%%^$@#^123".isalnum())
# isalpha() 是否都是字母
# isdigit() 是否都是数字
# isspace() 是否都是空白字符(空格 回车 制表符)
# islower() 是否都是小写字母
# isupper() 是否都是大写字母
```
### 21.7 对齐与填充
```python
# ljust(width,fillchar) 将字符串左对齐,width总占比字符位,fillchar填充字符
print("python".ljust(20))
print("python".ljust(20,"#"))
# rjust(width,fillchar) 将字符串右对齐,width总占比字符位,fillchar填充字符
# center(width,fillchar)将字符串居中对齐,width总占比字符位,fillchar填充字符
print('python'.center(30,'!'))
# fillchar填充字符 默认空格
```
### 21.8 Unicode编码与字符串大小比较
Unicode是一套字符编码标准(字符集),它为世界上几乎所有的字符分配了唯一的数字编号(**统一**),目的解决传统编码只能表示有限字符且不兼容的问题。**字符 -> 唯一编号**
- chr():通过Unicode编码查看字符
- ord(char):查看字符的Unicode编码
```python
print(ord("a"))
print(ord("A"))
print(ord('0'))
print(ord("我"))
"""
Unicode编码
97
65
48
25105
"""
# print(ord("Python")) # TypeError: ord() expected a character, but string of length 6 found
print(chr(25105))
```
编码表,主要负责具体字符的**存储**与**传输**用的 **字符 -> 唯一编号 -> 存储的字节**
- ASCII只包含数字、英文字母和标点符号,不包含中文,韩文、日文...
- GBK 包含中文(国内GB2312)
- UTF-8 包含大部分文字(国外)
编码过程:**字符串 -> 编码表 -> 字节**
```python
s = "123我爱你python!@#ЩШОНЛㅙㅘㄹㅞくちにせ"
# 字符串编码 str -> bytes
# encoding 以什么码表进行编码 默认UTF-8
bs = s.encode()
print(bs)
"""
原本ASCII中的字符 单字节存储
其他字符 中文 有可能多个字节存储
\xe6\x88\x91\xe7\x88\xb1\xe4\xbd\xa0 一个中文3个字节 UTF-8
"""
# bs = s.encode('gbk')
# print(bs)
"""
UnicodeEncodeError: 'gbk' codec can't encode character '\u3159' in position 20: illegal multibyte sequence
encoding with 'gbk' codec failed
"""
s = "123我爱你python"
bs = s.encode("gbk")
print(bs)
"""
\xce\xd2\xb0\xae\xc4\xe3 一个中文2个字节 GBK
"""
# s = "123我爱你python"
# bs = s.encode("ASCII")
# print(bs)
"""
UnicodeEncodeError: 'ascii' codec can't encode characters in position 3-5: ordinal not in range(128)
"""
```
解码过程:**字节 -> 码表 -> 字符串**
```python
s = "你好"
bs = s.encode("utf-8")
print(bs)
ns = bs.decode("UTF-8")
print(ns)
ns = bs.decode("GBK")
print(ns)
"""
原因
你好->两个字->UTF-8一个汉字三个字节->编码->六个字节
六个字节->解码->GBK一个汉字两个字节->三个字->浣犲ソ
"""
s = "123python"
bs = s.encode("utf-8")
print(bs.decode("gbk"))
"""
utf-8和gbk共用ASCII码表
"""
```
字符串之间的大小比较,比的是Unicode编码大小,编码越小则越靠前,也就意味着当前字符越小
```python
print("a" < "c")
```
如果字符串中有多个字符,则依次比较字符编码
```python
print("abc" < "abd") # True
"""
a = a
b = b
c < d
"""
print("dfg" < "ahjasdad") # False
"""
d > a
"""
print("abc" < "abcde") #True
"""
a = a
b = b
c = c
None = d ×
比长度 len("abc") < len("abcde")
"""
```
## 第22节课 字符串编程练习题
### 22.1 回文字符串
输入一个字符串,判断其是否是回文字符串。
```python
"""
上海自来水来自海上
l r
"""
def is_palindrome_string(s):
# return s == s[::-1]
l = 0
r = len(s) - 1
while l < r:
if s[l] != s[r]:
return False
l += 1
r -= 1
return True
s = input()
print(is_palindrome_string(s))
```
### 22.2 十进制转二进制
**题目描述**
输入一个十进制正整数,输出其二进制形式
**输入输出描述**
输入一个十进制正整数
输出二进制字符串
**示例**
> 输入:
>
> 9
>
> 输出:
>
> 1001
```python
"""
23 / 2 = 11 ~ 1 1
11 / 2 = 5 ~ 1 11
5 / 2 = 2 ~ 1 111
2 / 2 = 1 ~ 0 0111
1 / 2 = 0 ~ 1 10111
10111
"""
def decimal_to_binary(num):
bs = ""
while num != 0:
bs = str(num % 2) + bs
num //= 2
return bs
print(decimal_to_binary(23))
```
### 22.3 二进制转十进制
**题目描述**
输入一个二进制字符串,输出其对应的十进制数字
**输入输出描述**
输入一个二进制字符串
输出十进制数字
**示例**
> 输入:
>
> 1001
>
> 输出:
>
> 9
```python
"""
1110101
0123456
1 * 2**0 + 0 * 2**1 + 1 * 1**2
"""
def binary_to_decimal(bs):
decimal = 0
bs = bs[::-1]
for i in range(len(bs)):
decimal += int(bs[i]) * 2 ** i
return decimal
print(binary_to_decimal("1110101"))
print(int("1110101", 2))
```
### 22.4 十进制转十六进制
**题目描述**
输入一个十进制正整数,输出其十六进制形式
**输入输出描述**
输入一个十进制正整数
输出十六进制字符串
**示例**
> 输入:
>
> 1233321
>
> 输出:
>
> 1e1b9
```python
"""
int("3f2c9a", 16) 4140186
4140186 / 16 = 258761 ~ 10-A
258761 / 16 = 16172 ~ 9
16172 / 16 = 1010 ~ 12->C
1010 / 16 = 63 ~ 2
63 / 16 = 3 ~ 15->F
3 / 16 = 0 ~ 3
"""
def decimal_to_hex(num):
hex = ""
while num != 0:
y = num % 16
if y < 10:
hex = str(y)+ hex
else:
hex = chr(55 + y) + hex
num //= 16
return hex
print(decimal_to_hex(4140186).lower())
```
### 22.5 最长公共前缀
**题目描述**
给定两个字符串 s1 和 s2 ,求两个字符串最长的公共前缀串,字符区分大小写
**输入输出描述**
输入两行,分别表示s1和s2
输出前缀串
**示例**
> 输入:
>
> abcdefg
>
> abcdhko
>
> 输出:
>
> abcd
```python
def solve(s1, s2):
if len(s1) > len(s2):
s1, s2 = s2, s1
p1 = 0
p2 = 0
while p1 < len(s1):
if s1[p1] == s2[p2]:
p1 += 1
p2 += 1
else:
break
return s1[0:p1]
s1 = input()
s2 = input()
prefix = solve(s1, s2)
print(prefix)
```
### 22.6 相似词
**题目描述**
输入两个英文单词,判断其是否为相似词,所谓相似词是指两个单词包含相同的字母
**输入输出描述**
输入两行,分别表示两个单词
输出结果,为相似词输出YES,否则输出NO
**示例**
> 输入:
>
> listen
>
> silent
>
> 输出:
>
> YES
```python
def solve(s1, s2):
if len(s1) != len(s2):
return "NO"
for i in range(len(s1)):
letter = s1[i]
if s1.count(letter) != s2.count(letter):
return "NO"
return "YES"
s1 = input()
s2 = input()
print(solve(s1, s2))
```
### 22.7 子串出现的次数
**题目描述**
给定两个字符串 s1 和 s2 ,求 s2 在 s1 中出现的次数,字符区分大小写,已匹配的字符不计入下一次匹配
**输入输出描述**
输入两行字符串,分别为s1和s2,s2的长度小于等于s1
输出s2在s1中出现的次数
**示例1**
> 输入:
>
> ABCsdABsadABCasdhjabcsaABCasd
>
> ABC
>
> 输出:
>
> 3
**示例2**
> 输入:
>
> AAAAAAAA
>
> AAA
>
> 输出:
>
> 2
```python
def solve(s1, s2):
if s1 == "" and s2 == "":
return 1
if s1 == "" and s2 != "" or s1 != "" and s2 == "":
return 0
# 测试用例通过率 30% 60/80
i = 0
count = 0
while i < len(s1):
if s1[i] == s2[0]:
j = i + 1
k = 1
while j < len(s1) and k < len(s2):
if s1[j] == s2[k]:
j += 1
k += 1
else:
i += 1
break
else:
if k == len(s2):
count += 1
i = j
if j == len(s1):
return count # j越界了 i后面就没有必要比较了
else:
i += 1
return count # i越界了 后面没有可以比较的字符了
s1 = input()
s2 = input()
print(solve(s1, s2))
```
### 22.8 最长公共子串
**题目描述**
给定两个字符串 s1 和 s2 ,求 s1 与 s2 之间的最长公共子串,字符区分大小写
**输入输出描述**
输入两行字符串,分别为s1和s2
输出最长公共子串
**示例**
> 输入:
>
> 123ABCDEFG83hsad
>
> iughABCDEFG23uy
>
> 输出:
>
> ABCDEFG
```python
# 思路一 在s2中从左到右寻找所有的可能区间
def sovle_A(s1, s2):
i = 0
j = 0
# [i,j]
max_len = 0
while i < len(s2):
print(f'当前:{s2[i:j + 1]}')
if j < len(s2) and s2[i:j + 1] in s1:
max_len = max(max_len, j - i + 1)
j += 1
else:
if i == j:
i += 1
else:
i = j
j = i
return max_len
# 思路二 从最长的长度开始向下寻找
def sovle_B(s1, s2):
for n in range(len(s2), 0, -1):
left = 0
right = n - 1
while right < len(s2):
print(s2[left:right + 1])
if s2[left:right + 1] in s1:
return right - left + 1
left += 1
right += 1
return 0
s1 = "123456789"
s2 = "abcdefgh"
print(sovle_A(s1, s2))
print(sovle_B(s1, s2))
```
### 22.9 猜单词游戏
**题目描述**
随机产生一个单词,然后提示用户一次猜一个字母,如下示例所示。单词中的每个字母都显示为一个#号,当用户猜测正确时就会显示确切的字母,当用户完成一个单词时,显示失误的次数并询问用户是否继续玩游戏
创建一个数组存储备选单词,然后随机从中抽取进行游戏
**示例**
> Enter a letter in word ####### > p
>
> Enter a letter in word p###### > r
>
> Enter a letter in word pr##r## > p
>
> p is already in the word
>
> Enter a letter in word pr##r## > o
>
> Enter a letter in word pro#r## > g
>
> Enter a letter in word progr## > n
>
> n is not in the word
>
> Enter a letter in word progr## > m
>
> Enter a letter in word progr#m > a
>
> The word is program. You missd 1 time.
>
> Do you want to guess another word? Enter y or n >
```python
import random
# 备选单词
words = ["banana", "apple", "orange", "peach", "tomato", "potato"]
def init_data():
# 随机抽取一个单词
word = words[random.randint(0, len(words) - 1)]
# 创建该单词对应的密文状态
status = [False] * len(word)
# 错误次数
missed = 0
return word, status, missed
def create_pwd(word, status):
# 创建密文字符串
pwd = ""
for i in range(len(word)):
if status[i]:
pwd += word[i]
else:
pwd += "#"
return pwd
def modify_status(word, status, letter):
# 遍历单词 寻找字母的位置
for i in range(len(word)):
if letter == word[i]:
# 判断是否已经修改
if status[i]:
print(f"{letter}已经存在!")
break
else:
# 第一次出现则修改状态
status[i] = True
# 处理一个单词的游戏逻辑
def guess_word():
word, status, missed = init_data()
while False in status: # 只要还有加密状态则继续
pwd = create_pwd(word, status)
letter = input(f"请输入一个字母{pwd}:")
# 字母在单词内
if letter in word:
modify_status(word, status, letter)
else:
print(f"{letter}不在单词当中,猜错了!")
missed += 1
print(f"恭喜你,猜对了,这个单词就是{word},你猜错了{missed}次!")
# 开始逻辑
while True:
guess_word()
choice = input("是否继续?(y/n)")
if choice == 'n':
print("再见!")
break
```
## 第23节课 元组、集合与字典
### 23.1 元组
是一个**有序但不可变的序列**,可以把它简单的理解为一个不可变的列表即可,元组是用`()`括起来的。
- 序列:支持序列的通用操作(索引、切片、最值、长度、成员检测、拼接、重复)
- 不可变:不能修改元组中的元素,元组一旦创建其长度也不能修改,类似于字符串
- 有序:元素的出入顺序是可以预估的。
元组的创建与基本使用:
```python
# 创建元组的方式
t = ()
print(t) # 空元组
t = tuple() # 空元组
print(t)
# 将其他序列转为元组
t = tuple([1,2,3,4])
print(t)
t = tuple("abcdefg")
print(t)
# 如果元组只有一个元素的话,得加上一个逗号
t = (1)
print(t)
print(type(t)) # <class 'int'>
t = (1,)
print(t)
print(type(t)) # <class 'int'>
# 也可以不用括号括起来
t = 7,8,9
print(t)
print(type(t))
# 如果输入数据的时候 用逗号分隔
a,b,c = eval("1,2,3") # input() -> 1,2,3
print(a,b,c)
a,b,c = 7,8,9
print(a,b,c)
t = 3,4,5 # 元组
a,b,c = t # 元组的解包
print(a,b,c)
# 函数的多返回值 实际上也是利用了元组的特性
def show():
return 1,2,3
t = show()
print(t)
print(type(t))
a,b,c = show() # 元组的解包
print(a,b,c)
# 元组的对象函数只有两个
print(t.count(1))
print(t.index(3))
```
关于元组不可变性质:
```python
t = (1,2,3)
# 元组中存储的对象地址不能改变!
# t[0] = 6 # TypeError: 'tuple' object does not support item assignment
t = (1,[2,3],4)
# t[1] = [5,6]
t[1][0] = 6
t[1].append(7)
print(t)
# 元组中存储的对象地址不能改变!
# 如果该对象是可变对象,其内容可以修改!
```
<img src="https://zh-1258460726.cos.ap-nanjing.myqcloud.com//typora-pic/image-20250722154321151.png" alt="image-20250722154321151" style="zoom:25%;" />
关于元组的地位:
- 如果在程序中,有一组数据是不需要改变的,那么就可以定义为元组,避免后续误操作改变内容。
- 占用内存更小,且创建时间更短,当处理大规模数据时,一般用的都是元组。
```python
# 内存占用更小
lst = []
for i in range(10000000):
lst.append(i)
tup = tuple(lst)
import sys
print(sys.getsizeof(lst)) # 89095160
print(sys.getsizeof(tup)) # 80000040
# 创建时间比较短
import timeit
# 让stmt代码执行number次 得到运行时间
time1 = timeit.timeit(stmt="[1,2,3,4,5,6,7,8,9,10]", number=100000)
time2 = timeit.timeit(stmt="(1,2,3,4,5,6,7,8,9,10)", number=100000)
print(time1) #0.0029
print(time2) #0.0004
```
<img src="https://zh-1258460726.cos.ap-nanjing.myqcloud.com//typora-pic/image-20250722160613859.png" alt="image-20250722160613859" style="zoom:25%;" />
验证扩容的过程:
```python
import sys
lst = [1,2,3,4,5,6,7,8,9,10]
print(sys.getsizeof(lst)) # 136满了
lst.append(11)
print(sys.getsizeof(lst)) # 136满了 存不下 扩容 -> 184
lst.append(12)
print(sys.getsizeof(lst)) # 184 没满 能存
lst.append(13)
print(sys.getsizeof(lst)) # 184 没满 能存
lst.append(14)
print(sys.getsizeof(lst)) # 184 没满 能存
lst.append(15)
print(sys.getsizeof(lst)) # 184 没满 能存
lst.append(16)
print(sys.getsizeof(lst)) # 184 没满 能存
lst.append(17)
print(sys.getsizeof(lst)) # 184 满了 扩容 -> 248
```
列表长度大于元组:列表存在预留空间,还有一些其他的记录信息
反过来说:元组没有预留空间,没有多余的记录信息,所以内存占用小
```python
tup = (1,2,3,4) # 底层变量空间就只有四个分别存1,2,3,4 开始就是一个满状态的列表
```
### 23.2 集合
集合是一个无序的、不包含重复元素的集合体,使用花括号`{}`来表示集合,注意集合不是序列!
> 需要注意的是:集合里面只能存储**不可变数据对象**或者**能够被哈希的数据对象**
- 无序:集合中的元素没有固定顺序,每次打印集合时,可能元素顺序是不一样的
- 不包含重复元素:元组在集合中是唯一存在的!
- 不是序列:序列的通用操作只有少部分适合集合
主要的主要使用场景:
- 关于数学中的集合运算:并集、交集、差集、子集、超集
- 用于去重操作
集合的基本创建方式:
```python
s = {} # 空集合
print(s)
s = set() # 空集合
print(s)
s = {3,1,2,2,3,1,1,3,2}
print(s) # {1,2,3} 感觉有序 但是是特殊情况 并不代表集合会对元素进行排序操作
s = {'bob','anny','cat','dog','freind'}
print(s)
s = set([1,2,3,1,2,3,1,2,3])
print(s)
s = set("hello")
print(s)
```
关于集合的通用操作:
```python
s = {1,2,3}
# print(s[0]) # 不支持索引/切片
print(max(s)) # 支持最值
print(len(s)) # 支持获取长度
print(4 in s) # 支持成员存在性
# print(s + s) # 不支持拼接操作
# print(s * 3) # 不支持重复操作
# add() 向集合中添加一个元素
s.add(4)
print(s)
# remove() 删除一个指定的元素,如果元素不存在则报错
s.remove(3)
print(s)
# s.remove(6) # KeyError: 6
# discard() 删除一个指定的元素,如果元素不存在则不报错
s.discard(6)
# update() 添加多个元素进入到集合,列表、元组、其他集合等可迭代的数据
s.update([1,2,3,4,5,6,7,8])
print(s)
s.update("hello")
print(s)
# pop() 随机(元素无序,在删除时跟定义顺序是不一样的)删除一个元素
s = {'dilireba','gulinazha','maerzhaha','lakesi','jinkesi','jiakesi','sailasi','diaosi'}
print(s)
print(s.pop())
print(s.pop())
# clear() 清空
```
关于集合的数学操作:
```python
s1 = {1, 2, 3}
s2 = {3, 4, 5}
# 并集 合并且去重
print(s1 | s2)
print(s1.union(s2))
print(s2.union(s1))
# 交集 取相同且去重
print(s1 & s2)
print(s1.intersection(s2))
print(s2.intersection(s1))
# 差集 在前者中存在但不在后者中存在的元素
print(s1 - s2)
print(s2 - s1)
print(s1.difference(s2))
print(s2.difference(s1))
# 对称差集 获取两个集合中不共同的元素 并集 中去掉 交集
print(s1 ^ s2)
print(s2 ^ s1)
print(s1.symmetric_difference(s2))
print(s2.symmetric_difference(s1))
# 子集与超集问题
s1 = {1, 2}
s2 = {1, 2, 3}
print(s1 < s2) # True s1 是 s2 的真子集
print(s1 <= s2) # True s1 是 s2 的子集
print(s2.issubset(s2)) # s1 是否是 s2 的子集
print(s1.issuperset(s2)) # s1 是否是 s2 的超集
print(s1 == s2) # 判断两个集合内容是否一致
print({3,6,5,4,1,2} == {3,3,6,6,4,4,5,5,2,2,1,1})
s1 = set("aabbcc")
s2 = set('cccbbaa')
print(s1 == s2)
print(s1)
print(s2)
```
关于集合底层数据结构的实现:
> 集合底层数据结构本质上也是一个数组,只不过该数组不同于列表,不支持通过角标来操作元素,支持动态扩容 -> **哈希表**/散列表
>
> 工作流程:
>
> 将要添加进集合的数据进行一个哈希运算 -> 哈希值(数据指纹)
>
> 通过哈希值对数组长度进行取模运算(%) -> 存储位置(数组当中的角标)
>
> 不同的元素它们的哈希值大概率是不一样的,同时计算出来的存储位置大概率会一样
>
> 存储位置如果一样的话 这种情况叫做 **哈希冲突**,如何解决:
>
> - 开放地址法:向后寻找空位置(线性探测、二次探测......)
> - 链地址法:数组空间不再指向数据对象,而是指向一个**链表结构**结构对象
>
> 如果存储位置一样且元素内容也一样的话,不进行存储!
>
> 如果存储位置一样但元素内容不一样,就需要进行**解决**哈希冲突。
>
> **元素的哈希值,是由元素本身的存储内容来决定的!其次是不同的元素类型有不同的哈希策略**
>
> - 整数的哈希值就是整数本身 **不可变数据**
>
> ```python
> >>> hash(1)
> 1
> >>> hash(2)
> 2
> >>> hash(101)
> 101
> ```
>
> - 小数的哈希值由小数本身+哈希策略来决定的 **不可变数据**
>
> ```python
> >>> hash(3.14)
> 322818021289917443
> >>> hash(2.666666666)
> 1537228671271900162
> ```
>
> - 布尔类型的哈希值就两个 True 1 False 0 **不可变数据**
>
> ```python
> >>> hash(True)
> 1
> >>> hash(False)
> 0
> ```
>
> - 字符串类型的哈希值由字符串存储的内容+哈希策略来决定 **不可变数据**
>
> ```python
> >>> hash("123")
> 6355651335908192413
> >>> hash("abc")
> -8842809876873683013
> ```
>
> - 不包含其他可变类型的元组是可以被哈希的 **元组本身不可变数据**
> - 列表、集合、字典、包含列表的元组都不可以被哈希,这些数据都是 **可变数据**。因为这些数据内部存储的元素是可变的,就会导致哈希值在变化,哈希不一致性。
>
> ```python
> >>> hash([1,2,3])
> Traceback (most recent call last):
> File "<stdin>", line 1, in <module>
> TypeError: unhashable type: 'list'
> >>> hash((1,2,3))
> 529344067295497451
> >>> hash((1,2,3,[1,2,3]))
> Traceback (most recent call last):
> File "<stdin>", line 1, in <module>
> TypeError: unhashable type: 'list'
> >>> hash({1,2,3})
> Traceback (most recent call last):
> File "<stdin>", line 1, in <module>
> TypeError: unhashable type: 'set'
> ```
>
> 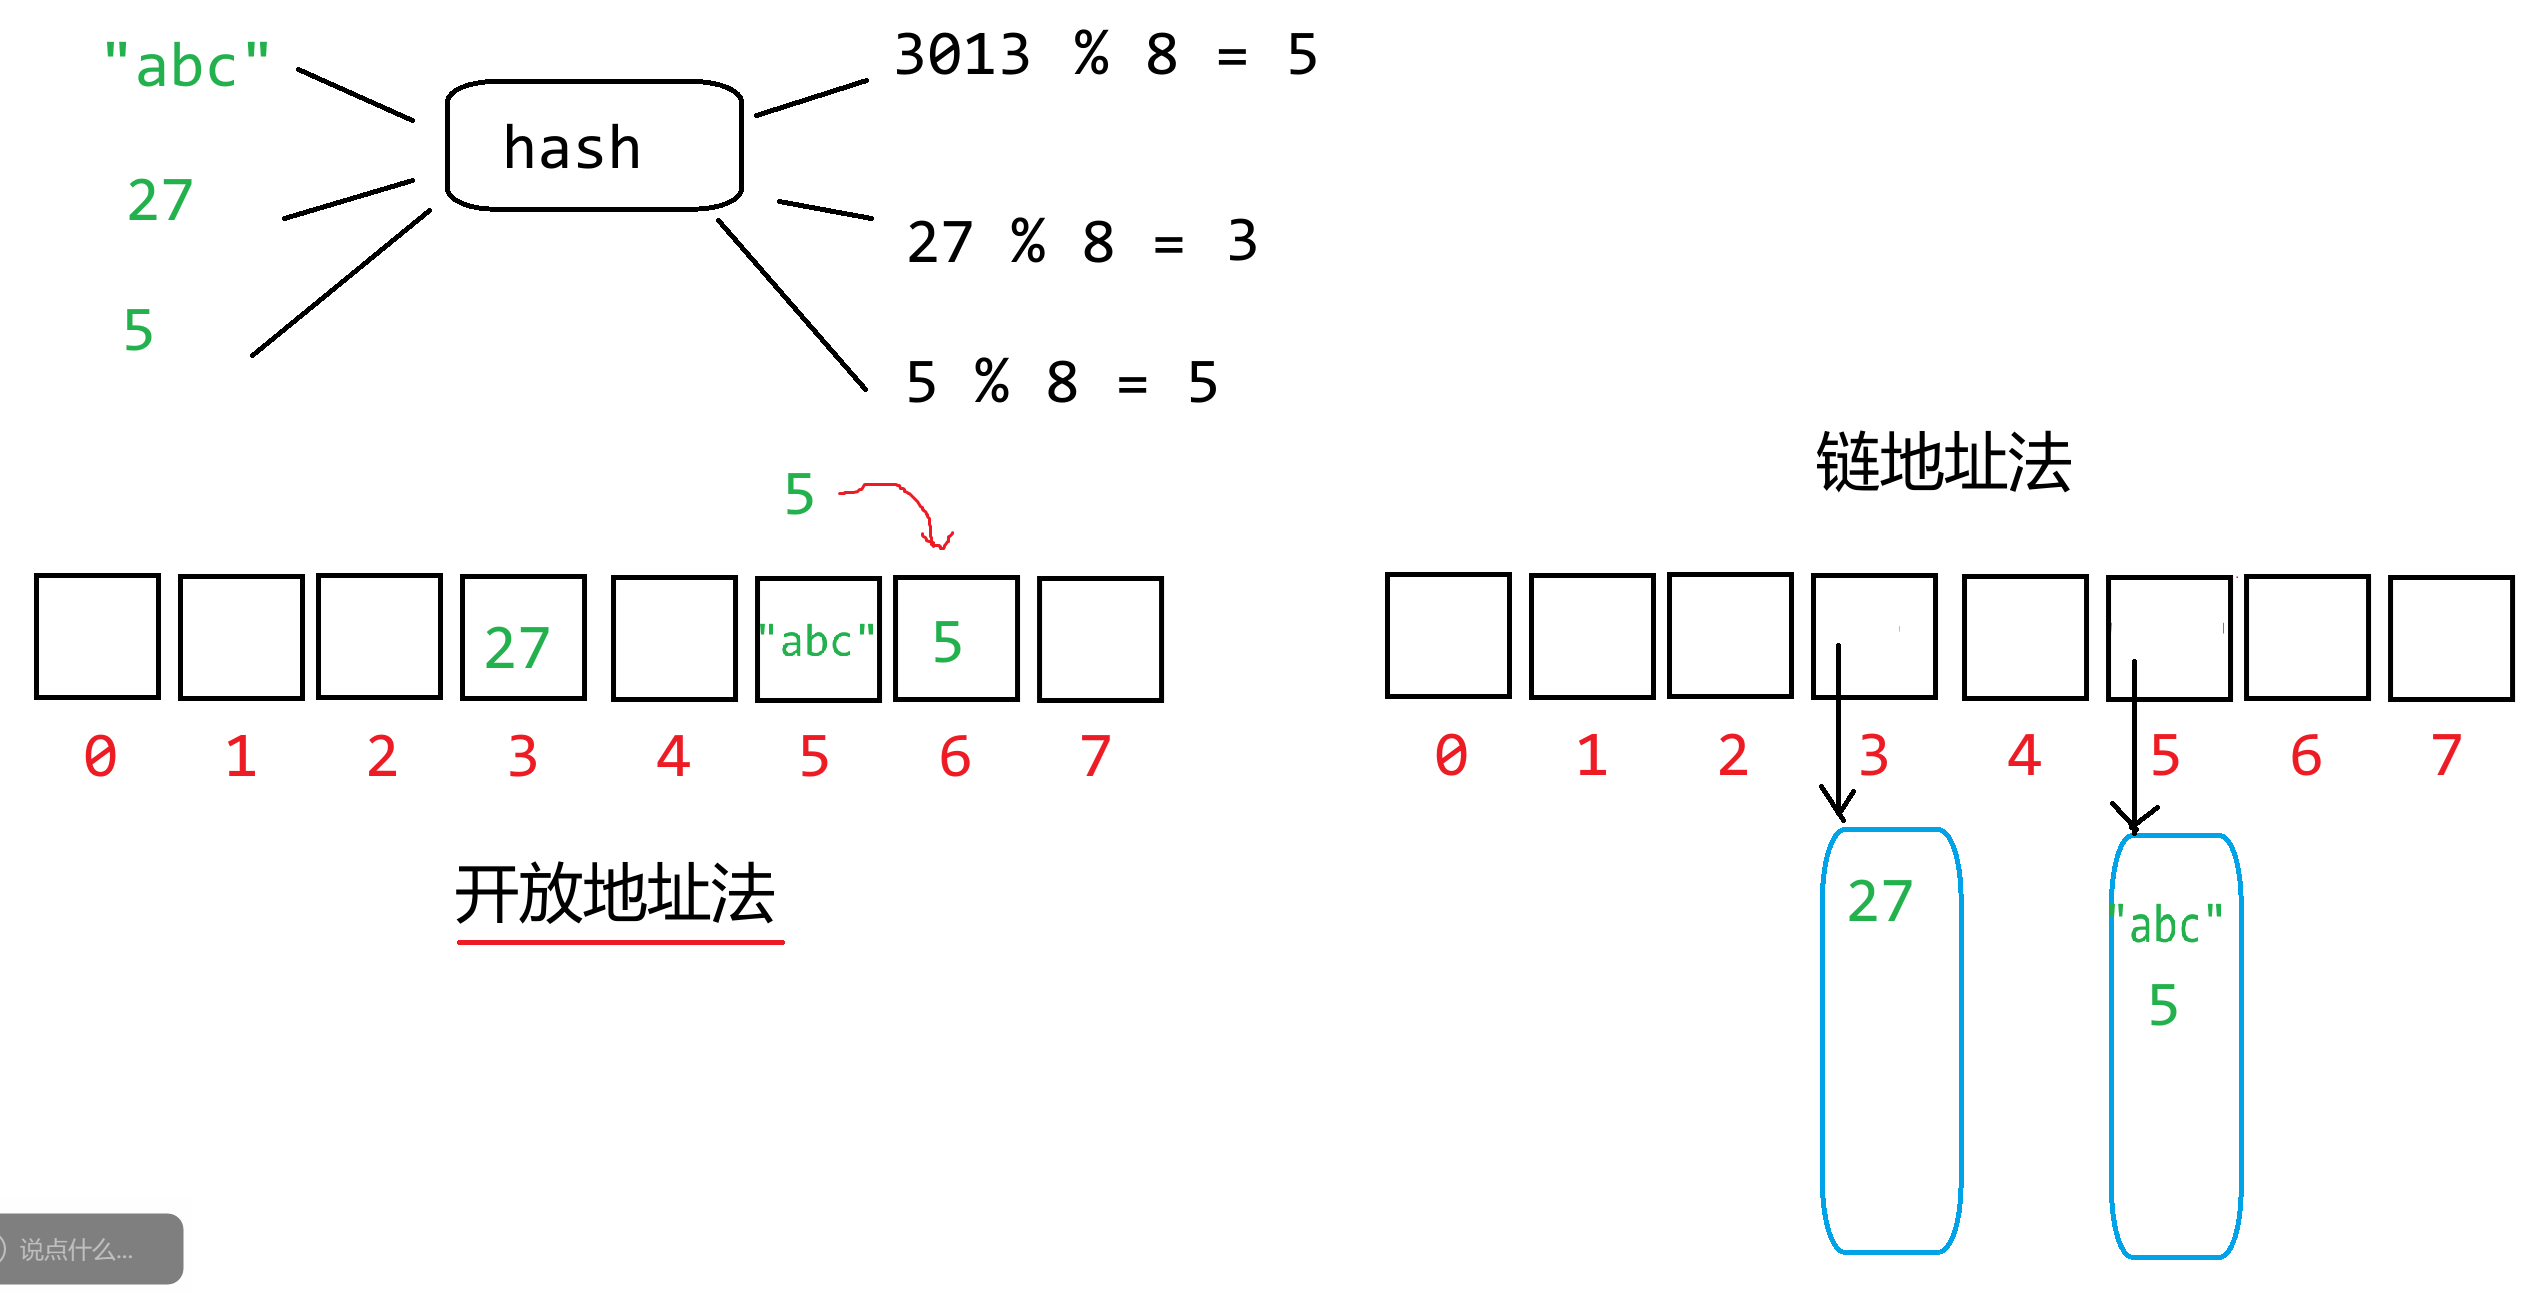
### 23.3 字典
字典是一个**无序**的**键值对**的**集合**,每个键值对之间用逗号`,`分隔,键和值之间用冒号`:`分隔,总体使用花括号`{}`来表示字典。之前讲的集合就是第一个特殊的字典而已。**键在字典中必须是唯一的,值是可以重复的**。所有的键组合起来就是一个set,所有的值组合起来就是一个list。
```python
dic = {"name":"张三","age":12}
dic['name']
dic['age']
```
列表也是一种特殊的字典,一个角标对应一个值,大胆的将键理解为索引/角标即可
```python
lst = [1,2,3]
lst[0] # 1
lst[1] # 2
lst[2] # 3
dic = {0:1, 1:2,2:3}
dic[0] # 1
dic[1] # 2
dic[2] # 3
dic = {5:1, 8:2,666:3} # 键是可以自定义的
dic[5] # 1
dic[8] # 2
dic[666] # 3
```
关于字典的创建方式:
```python
dic = {}
print(type(dic))
print(dic)
dic = {"name": "张三", "age": 12}
print(dic)
# 以变量名的形式定义键
dic = dict(name="李四", age=30)
# 打印的时候将键变为字符串
print(dic)
# 通过存储元组的列表来创建字典
lst = [("name", "王五"), ("age", 40), ("height", 1.8)]
dic = dict(lst)
print(dic)
# 获取字典中指定键对应的值
print(dic['age'])
print(dic.get('age'))
```
关于字典添加键值对和修改键值对
```python
dic = {"name": "张三", "age": 12}
dic['name'] = "李四" # 修改name 键对应的值为 李四
print(dic)
dic['sex'] = '男' # 新建一个键值对 sex='男'
print(dic)
"""
如果键已经存在 则为修改;否则为 新建
"""
```
关于删除元素:
```python
dic = {"name": "张三", "age": 12,'sex': '男'}
# 删除指定键的键值对 并返回值
print(dic.pop('name'))
print(dic)
# 随机删除一个键值对,返回的是一个元组包含了键和值
item = dic.popitem()
print(item)
print(item[0])
print(item[1])
print(dic)
```
关于遍历字典内容:
```python
s = {1,2,3,4,5,6} # 集合
for num in s:
print(num)
dic = {"name": "张三", "age": 12,'sex': '男'}
# 获取所有键
keys = dic.keys()
print(keys)
print(type(keys)) # <class 'dict_keys'> 字典的内置数据类型 表示所有键的set
# 可以把键的集合 转为 set list tuple
print(list(keys))
print(set(keys)) # 一般推荐转集合
print(tuple(keys))
# 获取所有值
values = dic.values()
print(values)
print(type(values)) # <class 'dict_values'> 字典的内置数据类型 表示所有值的list
print(list(values)) # 推荐转list tuple
print(tuple(values))
print(set(values)) # 不推荐 集合会自动去重
# 获取所有的键值对
items = dic.items()
print(items)
print(type(items)) # <class 'dict_items'> 字典的内置数据类型 表示所有键值对的set
print(list(items))
print(tuple(items))
print(set(items))
for key in keys: # 迭代器
print(key)
for value in values: # 迭代器
print(value)
for item in items: # 迭代器
print(item[0], item[1])
# print(keys[0]) # TypeError: 'dict_keys' object is not subscriptable
# print(values[0]) # TypeError: 'dict_keys' object is not subscriptable
# print(items[0]) # TypeError: 'dict_items' object is not subscriptable
# 因为迭代器问题
```
### 23.4 内置容器总结
列表:可变对象,有序,可以存储任意数据类型,通过角标操作元素,可以增删改查,底层数据结构为动态数组
字符串:不可变对象,有序,只能存储字符数据,通过角标访问元素,字符串本身不能增删改(如果要改则新建),底层数据结构字节序列
元组:不可变对象,有序,可以存储任意数据类型,通过角标访问元素,元组内的数据不能修改(除非该数据是可变对象,该可变对象的内容可以修改),底层数据结构为满状态的数组,不会有多余的预留空间和信息
集合:可变对象,无序,只能存储不可变数据或能够被哈希的数据,不支持角标操作,可以增删,底层数据结构为哈希表/散列表(开放地址法)
字典:可变对象,无序,键只能是不可变/能够被哈希的数据,值随意存,不支持角标操作,可以增删查改,底层数据结构为哈希表/散列表(开放地址法)
## 第24节课 元组、集合与字典编程练习题
### 24.1 密码强度检测
在设计密码强度检测系统时,需要检查密码是否包含不同类型的字符,如大写字母、小写字母、数字和特殊字符。
给定一个密码字符串 `password`,编写一个函数,检查密码中是否同时包含大写字母、小写字母、数字和特殊字符(假设特殊字符为 `!@#$%^&*`)。如果包含所有类型的字符,返回 `True`,否则返回 `False`。
```python
# 思路一 统计每个类型字符出现的次数
def sovle_A(password):
pw_dic = {'upper': 0, 'lower': 0, 'number': 0, 'special': 0}
for letter in password:
if letter.isupper():
pw_dic['upper'] += 1
elif letter.islower():
pw_dic['lower'] += 1
elif letter.isdigit():
pw_dic['number'] += 1
elif letter in "!@#$%^&*":
pw_dic['special'] += 1
else:
print(f"出现非法字符:{letter}")
return False
for value in pw_dic.values():
if value == 0:
print("缺少指定类型")
return False
return True
# 思路二 通过集合运算思路
def sovle_B(password):
password = set(password)
upper = set("ABCDEFGHIJKLMNOPQRSTUVWXYZ")
lower = set('abcdefghijklmnopqrstuvwxyz')
digit = set('0123456789')
special = set("!@#$%^&*")
if len(password - (upper | lower | digit | special)) > 0:
print("存在非法字符")
return False
return len(password & upper) > 0 and len(password & lower) > 0 and len(password & digit) > 0 and len(password & special) > 0
password = input()
print(sovle_A(password))
print(sovle_B(password))
```
### 24.2 统计关键字的个数
创建一个字符串变量,内容为某一篇Python源代码,用`re.findall(r'\b[a-zA-Z]+\b', sources)`解析出所有的英文单词,统计关键字的个数。
```python
sources = """
# 获取month月的英文单词
def get_month_english(month):
months = ["January", "February", "March", "April", "May", "June",
"July", "August", "September", "October", "November", "December"]
return months[month - 1]
# 打印month月的表头
def print_month_title(month):
print(f"{get_month_english(month):^32}")
print("-" * 33)
print("Mon Tue Wed Thu Fri Sat Sun")
# 返回year年month月1日 是周几
def get_month_begin(year, m, q):
if m == 1 or m == 2:
m += 12
year -= 1
k = year % 100
j = year // 100
h = (q + 26 * (m + 1) // 10 + k + k // 4 + j // 4 + 5 * j) % 7
if h >= 2:
return h - 1
else:
return h + 6
# 获取year年month月的天数
def get_month_days(year, month):
if month in [1,3,5,7,8,10,12]:
return 31
elif month in [4,6,9,11]:
return 30
elif year % 4 == 0 and year % 100 != 0 or year % 400 == 0:
return 29
else:
return 28
# 打印year年month月的日期内容
def print_month_body(year, month):
begin = get_month_begin(year, month, 1)
count = 0 # 记录打印单位的次数
# 打印前面的占位
for i in range(1, begin):
print(" " * 5, end="")
count += 1
# 再去打印日期
for i in range(1, get_month_days(year, month) + 1):
print(f"{i:^5}", end="")
count += 1
if count % 7 == 0:
print()
print()
# 打印year年第month月的日历
def print_month(year, month):
# 先打印表头信息
print_month_title(month)
# 再打印具体的日期内容
print_month_body(year, month)
# 打印year年的日历
def print_calendar(year):
for month in range(1, 13):
print_month(year, month)
year = 2025
print_calendar(year)
"""
import re
import keyword
kwords = keyword.kwlist
# 把所有符合模式的单词提取出来 生成一个列表
words = re.findall(r'\b[a-zA-Z]+\b', sources)
kw_dic = {} # 记录每一个关键字出现的次数 关键字为键 次数为值
for word in words: # 遍历所有解析提出出来的单词
if word in kwords: # 判断该单词是否属于关键字
if word in kw_dic:
# 已存在 则加一
kw_dic[word] += 1
else:
# 不存在 则创建 默认1次
kw_dic[word] = 1
print(kw_dic)
```
### 24.3 统计单词的个数
创建一个字符串变量,内容为某一篇英文文章,用`re.findall(r'\b[a-zA-Z]+\b', sources)`解析出所有的英文单词,统计每个英文单词出现的次数。
```python
sources = """
Beneath the concrete skyscrapers and bustling streets of modern cities, a quiet transformation is taking root. Urban gardening—once a niche hobby for green-thumbed enthusiasts—has evolved into a global movement, reshaping neighborhoods, fostering community, and redefining our relationship with food.
In cities like Detroit, where vacant lots once symbolized decline, urban gardens now bloom as symbols of resilience. What was once an overgrown lot on the corner of 14th and Main is now The Rust Belt Harvest, a community garden where residents grow tomatoes, kale, and herbs. “It’s not just about food,” says Maria Gonzalez, a local teacher who tends to the garden weekly. “It’s about watching a seed turn into something we can share. That builds hope.” Here, neighbors swap planting tips over rows of lettuce, and children learn where carrots come from—not just the grocery store, but the soil beneath their feet.
Urban gardens also address pressing environmental challenges. In Tokyo, rooftop gardens atop office buildings reduce the “heat island” effect, lowering temperatures by up to 5°C in summer. In Berlin, community plots filter rainwater, reducing strain on overburdened sewer systems. These green spaces act as mini ecosystems, attracting bees and butterflies, and even improving air quality by absorbing carbon dioxide.
"""
import re
words = re.findall(r'\b[a-zA-Z]+\b', sources)
wd_dic = {}
for word in words:
lower_word = word.lower()
if lower_word in wd_dic:
wd_dic[lower_word] += 1
else:
wd_dic[lower_word] = 1
print(wd_dic)
for word, count in wd_dic.items():
print(f"{word}出现{count}次")
```
### 24.4 升序显示不重复的单词
创建一个字符串变量,内容为某一篇英文文章,用`re.findall(r'\b[a-zA-Z]+\b', sources)`解析出所有的英文单词,按升序显示所有不重复的单词。
```python
sources = """
Beneath the concrete skyscrapers and bustling streets of modern cities, a quiet transformation is taking root. Urban gardening—once a niche hobby for green-thumbed enthusiasts—has evolved into a global movement, reshaping neighborhoods, fostering community, and redefining our relationship with food.
In cities like Detroit, where vacant lots once symbolized decline, urban gardens now bloom as symbols of resilience. What was once an overgrown lot on the corner of 14th and Main is now The Rust Belt Harvest, a community garden where residents grow tomatoes, kale, and herbs. “It’s not just about food,” says Maria Gonzalez, a local teacher who tends to the garden weekly. “It’s about watching a seed turn into something we can share. That builds hope.” Here, neighbors swap planting tips over rows of lettuce, and children learn where carrots come from—not just the grocery store, but the soil beneath their feet.
Urban gardens also address pressing environmental challenges. In Tokyo, rooftop gardens atop office buildings reduce the “heat island” effect, lowering temperatures by up to 5°C in summer. In Berlin, community plots filter rainwater, reducing strain on overburdened sewer systems. These green spaces act as mini ecosystems, attracting bees and butterflies, and even improving air quality by absorbing carbon dioxide.
"""
import re
words = re.findall(r'\b[a-zA-Z]+\b', sources) # 列表 原生单词
words = [word.lower() for word in words] # 列表 转小写
words = set(words) # 集合 已经去重了
words = list(words)# 列表 为了排序
words.sort()
print(words)
```
### 24.5 唯一摩尔斯密码词
**题目描述**
国际摩尔斯密码定义一种标准编码方式,将每个字母对应于一个由一系列点和短线组成的字符串, 比如:
- 'a' 对应 `".-"`
- 'b' 对应 `"-..."`
- 'c' 对应 `"-.-."`以此类推
为了方便,所有26个英文字母的摩尔斯密码表如下:
```
[".-","-...","-.-.","-..",".","..-.","--.","....","..",".---","-.-",".-..","--","-.","---",".--.","--.-",".-.","...","-","..-","...-",".--","-..-","-.--","--.."]
```
给你一个字符串数组 words ,每个单词可以写成每个字母对应摩尔斯密码的组合。
例如,"cab" 可以写成 `"-.-..--..."` ,(即 `"-.-."` + `".-"` + `"-..."` 字符串的结合)。我们将这样一个连接过程称作 单词翻译
对 words 中所有单词进行单词翻译,返回不同 单词翻译 的数量
**输入输出描述**
输入一组单词
输出不一样的翻译数量
**示例**
> 输入:
>
> gin zen gig msg
>
> 输出:
>
> 2
>
> 解释:
>
> 各单词翻译如下:
> "gin" -> "--...-."
> "zen" -> "--...-."
> "gig" -> "--...--."
> "msg" -> "--...--."
>
> 共有 2 种不同翻译, "--...-." 和 "--...--.".
```python
morses = [".-","-...","-.-.","-..",".","..-.","--.","....","..",".---","-.-",".-..","--","-.","---",".--.","--.-",".-.","...","-","..-","...-",".--","-..-","-.--","--.."]
def get_morses(word):
# "abc"
morses_word = ""
for letter in word:
morses_word += morses[ord(letter) - 97]
print(morses_word)
return morses_word
def sovle(words):
s = set()
for word in words:
morses_word = get_morses(word)
s.add(morses_word)
print(s)
return len(s)
words = input().split(" ")
print(sovle(words))
```
### 24.6 前K个高频元素
**题目描述**
给你一个整数数组 nums 和一个整数 k ,请你返回其中出现频率前 k 高的元素。你可以按 任意顺序 返回答案。
**输入输出描述**
输入数组长度n和k,接下来输入n个元素
输出前k个高频元素
**示例**
> 输入:
>
> 6 2
>
> 1 1 1 2 2 3
>
> 输出:
>
> 1 2
```python
# 思路一 根据次数排序 同时排序键的顺序
def sovle_A(arr, k):
dic = dict()
for num in arr:
if num in dic:
dic[num] += 1
else:
dic[num] = 1
keys = list(dic.keys())
values = list(dic.values())
for i in range(1, len(values)):
j = i
while j > 0 and values[j - 1] < values[j]:
values[j - 1] , values[j] = values[j], values[j - 1]
keys[j - 1], keys[j] = keys[j], keys[j - 1]
j -= 1
return keys[:k]
# 思路二 最大堆/最小堆 -> 优先队列 -> 最擅长处理的就是前k个数据的问题
def solve_B(arr,k):
from queue import PriorityQueue
pq = PriorityQueue()
dic = dict()
for num in arr:
if num in dic:
dic[num] += 1
else:
dic[num] = 1
ret = []
for num, count in dic.items():
pq.put((-count, num))
for i in range(k):
priority, num = pq.get()
ret.append(num)
return ret
arr = [1,2,3,1,2,3,1,2,1,2,1,3,1,3,1,2,3,1,2,3,3,3,2,3,1,1,1,1,2,2,2,3,3,3,3,3,1,1,1,1,1]
print(sovle_A(arr,2))
print(solve_B(arr,2))
"""
优先队列
数据的进入顺序不在满足普通队列的要求 队列:先进先出 后进后出
而是看数据的优先级 谁的优先级越高/低 谁先出队 而不是看入队顺序
"""
# 导入Python自带的优先队列对象
# 底层是最小堆实现,优先级越小,越靠上,越先走
"""
from queue import PriorityQueue
pq = PriorityQueue() # 创建一个优先队列
pq.put((3,"task1")) # 插入一个元素
pq.put((1,"task2"))
pq.put((2,"task3"))
print(pq.get()) # 获取一个元素 拿出来了
print(pq.get())
print(pq.get())
print(pq.empty())
"""
```
### 24.7 根据字符出现频率排序
**题目描述**
给定一个字符串 s ,根据字符出现的 频率 对其进行 降序排序 。一个字符出现的 频率 是它出现在字符串中的次数。
返回 已排序的字符串 。如果有多个答案,返回其中任何一个。
**输入输出描述**
输入一个字符串
输出排序后的字符串
**示例1**
> 输入:
>
> tree
>
> 输出:
>
> eert
>
> 解释:
>
> 'e'出现两次,'r'和't'都只出现一次。
> 因此'e'必须出现在'r'和't'之前。此外,"eetr"也是一个有效的答案。
**示例2**
> 输入:
>
> cccaaa
>
> 输出:
>
> cccaaa
>
> 解释:
>
> 'c'和'a'都出现三次。此外,"aaaccc"也是有效的答案。
> 注意"cacaca"是不正确的,因为相同的字母必须放在一起。
```python
"""
text = abacabacc
i
for letter in text:
print(letter)
text.count(letter)
s = {a,b,c}
"""
from queue import PriorityQueue
def solve(text):
# 记录每个字母出现的次数
s = set(text)
dic = {}
for letter in s:
dic[letter] = text.count(letter)
# 创建优先队列 记录字母以及频率 最小堆
pq = PriorityQueue()
for letter, count in dic.items():
pq.put((-count,letter))
res = []
while not pq.empty():
priority, element = pq.get()
res.append(element * (- priority))
return "".join(res)
text = input()
print(solve(text))
```
### 24.8 Z字形变换
**题目描述**
将一个给定字符串 s 根据给定的行数 numRows ,以从上往下、从左到右进行 Z 字形排列。
比如输入字符串为 "PAYPALISHIRING" 行数为 3 时,排列如下:
```
P A H N
A P L S I I G
Y I R
```
之后,你的输出需要从左往右逐行读取,产生出一个新的字符串,比如:"PAHNAPLSIIGYIR"。
**输入输出描述**
输入s和numRows
输出变换后的顺序
**示例1**
> 输入:
>
> PAYPALISHIRING 3
>
> 输出:
>
> PAHNAPLSIIGYIR
**示例2**
> 输入:
>
> PAYPALISHIRING 4
>
> 输出:
>
> PINALSIGYAHRPI
```python
def sovle_A(text, row):
dic = {}
for i in range(row):
dic[i] = []
index = 0
direction = True # 默认向下
for letter in text:
dic[index].append(letter)
if direction:
index += 1
if index == row:
direction = not direction
index -= 2
else:
index -= 1
if index == -1:
direction = not direction
index += 2
res = []
for i in range(row):
res.extend(dic[i])
return "".join(res)
def sovle_B(text, row):
dic = {}
for i in range(row):
dic[i] = []
direction = [i for i in range(row)] + [i for i in range(row - 2, 0, -1)]
# [0,1,2,1] 3
# [0,1,2,3,2,1] 4
# [0,1,2,3,4,3,2,1] 5
index = 0
for letter in text:
dic[direction[index % len(direction)]].append(letter)
index += 1
res = []
for i in range(row):
res.extend(dic[i])
return "".join(res)
text, row = input().split(" ")
row = int(row)
print(sovle_A(text, row))
print(sovle_B(text, row))
```
### 24.9 杨辉三角
**题目描述**
给定一个非负整数 numRows,生成「杨辉三角」的前 numRows 行。
**输入输出描述**
输入行数numRows
输出对应杨慧三角
**示例1**
> 输入:
>
> 5
>
> 输出:
>
> ```
> 1
> 1 1
> 1 2 1
> 1 3 3 1
> 1 4 6 4 1
> ```
<img src="https://zh-1258460726.cos.ap-nanjing.myqcloud.com//typora-pic/image-20250725111423383.png" alt="image-20250725111423383" style="zoom:25%;" />
```python
def solve(row):
lines = [] # 记录所有的行
for i in range(row):
line = [1] * (i + 1)
lines.append(line)
for j in range(1, i):
line[j] = lines[i - 1][j] + lines[i - 1][j - 1]
for line in lines:
print(" ".join([str(num) for num in line]))
row = int(input())
solve(row)
```
## 第25节课 常用内置函数
Python中已经定义好的一些功能函数,调用的时候直接写函数名即可,无需导入其他的包。
回顾一下,我们之前讲过的或者用过的内置函数都有哪些呢?
print()、input()、eval()、map()、int()、float()、bool()、str()、complex()、list()、tuple()、set()、dict()、bin()、oct()、hex()、ord()、chr()、max()、min()、len()、sum()、pow()、abs()、id()、type()、exit()、hash()
### 25.1 dir()
主要用于查看对象的所有属性和方法
```python
lst = [1,2,3]
# 返回的是一个列表 包含了lst所属类型列表的所有属性和方法
print(dir(lst))
"""
['__add__', '__class__', '__class_getitem__', '__contains__',
'__delattr__', '__delitem__', '__dir__', '__doc__',
'__eq__', '__format__', '__ge__', '__getattribute__',
'__getitem__', '__getstate__', '__gt__', '__hash__',
'__iadd__', '__imul__', '__init__', '__init_subclass__',
'__iter__', '__le__', '__len__', '__lt__', '__mul__', '__ne__',
'__new__', '__reduce__', '__reduce_ex__', '__repr__',
'__reversed__', '__rmul__', '__setattr__', '__setitem__',
'__sizeof__', '__str__', '__subclasshook__',
'append', 'clear', 'copy', 'count', 'extend',
'index', 'insert', 'pop', 'remove', 'reverse', 'sort']
"""
print(lst.__len__())
print(len(lst)) # len() 其实调用的就是该对象的 __len__()函数
# print(len(3))
s = {1,2,3}
print(dir(s))
# 如果不传入任何数据对象时 则默认将当前环境的属性和方法列出
def show():
return 1
numA = 10
numB = 20
print(dir())
"""
每一个.py文件都会包含的内容 __xxx__
['__annotations__', '__builtins__', '__cached__',
'__doc__', '__file__', '__loader__', '__name__',
'__package__', '__spec__',
'lst', 'numA', 'numB', 's', 'show']
"""
print(__builtins__) # 内置函数的模块
print(dir(__builtins__))
count = 0
for item in dir(__builtins__):
print(item, end=" ")
count += 1
if count % 10 == 0:
print()
"""
所有的内置函数如下所示:
abs aiter all anext any ascii bin
bool breakpoint bytearray bytes callable chr classmethod compile complex copyright
credits delattr dict dir divmod enumerate eval exec exit filter
float format frozenset getattr globals hasattr hash help hex id
input int isinstance issubclass iter len license list locals map
max memoryview min next object oct open ord pow print
property quit range repr reversed round set setattr slice sorted
staticmethod str sum super tuple type vars zip
"""
```
### 25.2 round()
四舍五入数学计算函数
```python
print(round(3.4)) # 3
print(round(3.8)) # 4
# 对于小数以5结尾,用的是银行家舍入算法 近似到最近的一个偶数
print(round(3.5)) # 4
print(round(4.5)) # 4
print(round(5.5)) # 6
print(round(6.5)) # 6
# ndigits参数 用于指定保留小数位的
print(round(3.1415926, 3))
print(round(3.1414926, 3))
print(round(3.1418926, 3))
# 如果为负数 用于将整数部分进行四舍五入
print(round(12345,-3))
print(round(12545,-3))
```
### 25.3 all()
用于判断可迭代对象中的所有元素是否都为真
```python
arr = [1,"abc",True,[1,2,3],{1,2,3}]
print(all(arr)) # True
arr = [0,"abc",True,[1,2,3],{1,2,3}]
print(all(arr)) # False
arr = [1,"",True,[1,2,3],{1,2,3}]
print(all(arr)) # False
arr = [1,"abc",True,[],{1,2,3}]
print(all(arr)) # False
if [1,2,3]: # 非零值 True
print("haha") # 打印了
```
- 数字的零值:0、0.0
- 布尔类型的零值:False
- 字符串的零值:""
- 列表、元组、集合、字典的零值:空容器
- 零值为False,非零值则为True
### 25.4 any()
用于判断可迭代对象中的所有元素至少包含一个元素为真
```python
arr = [1,"abc",True,[1,2,3],{1,2,3}]
print(any(arr)) # True
arr = [0,"abc",True,[1,2,3],{1,2,3}]
print(any(arr)) # True
arr = [1,"",True,[1,2,3],{1,2,3}]
print(any(arr)) # True
arr = [1,"abc",True,[],{1,2,3}]
print(any(arr)) # True
arr = [0,"",False,[],{}] # False
print(any(arr))
```
### 25.5 filter()
用于过滤可迭代对象中的元素,返回的是一个**迭代器**
- 迭代器,它不会立即将所有的元素进行遍历或列出,而是在需要时逐个去生成每一个满足条件/要求的元素。如果想一次性将所有元素取出,就可以利用list()、tuple()和set()之类的方法将元素全部取出。
```python
arr = [1, 2, 3, 4, 5, 6, 7, 8, 9, 10]
lst = [x for x in arr if x % 2 == 0]
print(lst)
# filter 传入两个参数(过滤函数,可迭代对象) 返回值应该是布尔类型
def is_even(number):
return number % 2 == 0
# 此时返回的是迭代器,相当于一个遍历的规则 其实并没有将所有元素列出
f = filter(is_even, arr) # [is_even(number) for number in arr]
# 用循环去遍历迭代器,迭代器就会按照预定的规则进行元素的获取
for num in f:
print(num)
# 通过list之类的函数,一次性将元素全部列出
lst = list(filter(is_even, arr))
print(lst)
# 迭代器的好处在于,内存效率更高,在处理大批量数据时,不会直接把所有的元素生成,而是根据需求自动运行来取出元素
# 如果不传入过滤函数时,则默认过滤假值
arr = [0, 1, "", "abc", [], [1, 2, 3]]
for item in filter(None, arr):
print(item)
```
### 25.6 next()
主要就是用于获取迭代器中的下一个元素
```python
arr = [1, 2, 3, 4, 5, 6, 7, 8, 9, 10]
def is_even(number):
return number % 2 == 0
iterator = filter(is_even, arr)
# 迭代器的元素是一个一个往外"蹦" 一个一个计算的 而不是全部计算出来
print(next(iterator))
print(next(iterator))
print(next(iterator))
print(next(iterator))
print(next(iterator))
# print(next(iterator)) # StopIteration
# 当一个迭代器被next用完时,则迭代器失效,因为已经计算完成
# 如果还想遍历元素,那么就只能重新创建新的迭代器
# 此时的iterator已经没有元素可以计算了!
iterator = filter(is_even, arr)
# next(iterator, default)
# default 当迭代器被耗尽时,则返回这个默认值,作为一个结束的标记来使用
# 不能赋值迭代器包含的元素 如果存在 则中断循环的计算
while True:
num = next(iterator, 2)
if num == 2:
break
print(num)
# 后续依旧可以继续迭代元素,直到迭代器耗尽为止
print(next(iterator))
arr = [1,2,3]
arr = [x for x in range(10)] # 列表推导式
# print(next(arr))
# print(next(arr)) # TypeError: 'list' object is not an iterator
arr = (x for x in range(10)) # 列表解析式 -> 迭代器
while True:
num = next(arr, -1)
if num == -1:
break
print(num)
arr = [(x for x in range(10))] # [迭代器对象]
print(arr)
arr = list((x for x in range(10)))
print(arr)
```
### 25.7 iter()
获取某一个可迭代对象的迭代器
```python
arr = [1, 2, 3]
iterator = iter(arr)
# 将一组元素 转为 迭代器
print(next(iterator))
s = {3, 1, 2}
print(s)
iterator = iter(s)
print(next(iterator))
dic = {"name": "张三", "age": 18, "height": 180}
print(dic.keys())
# 将所有键的集合封装为一个迭代器
iterator = iter(dic.keys())
print(next(iterator))
print(dic.values())
# 将所有值的集合封装为一个迭代器
iterator = iter(dic.values())
print(next(iterator))
for key in dic.keys(): # 实质上也是先将dic.keys()转迭代器再进行遍历 一个一个计算
print(key)
keys = set(dic.keys())
print(keys)
# 传入一个自定义的迭代函数
num = 1
def get_number():
global num
result = num
num += 1
return result
# for i in range(10):
# print(get_number())
# source 指的就是迭代函数 sentinel 指的是迭代上限
iterator = iter(get_number, 100)
for item in iterator:
print(item)
print("此时的num", num)
num = 1
iterator = iter(get_number, 10)
lst = list(iterator)
print(lst)
```
### 25.8 map()
用于可迭代对象中的每一个元素应用指定的函数,并返回一个**迭代器**
```python
arr = ['A', 'B', 'C', 'D', 'E']
def to_lower(letter):
return letter.lower()
iterator = map(to_lower, arr)
while True:
letter = next(iterator, -1)
if letter == -1:
break
print(letter)
arr = list(map(to_lower, arr))
print(arr)
arr1 = [1, 2, 3, 4]
arr2 = [5, 6, 7]
def add(x, y):
return x + y
arr3 = list(map(add, arr1, arr2))
# 结果以arr1和arr2长度最短的为主
print(arr3)
```
### 25.9 reversed()
反转,返回的是一个迭代器,用于逆序遍历,不对原数据进行改变
```python
arr = [1,2,3,4,5,6,7,8,9,10]
arr.reverse() # 列表对象函数 反转 修改原列表
print(arr)
arr = [1,2,3,4,5,6,7,8,9,10]
lst = list(reversed(arr)) # 内置函数 反转 新建反转后的列表 不影响原列表
print(lst)
print(arr)
```
### 25.10 zip()
将多个可迭代对象中对应位置的元素打包成一个个元组,然后返回这些元组组成的迭代器
```python
# 将多个序列拼成元组
arr1 = [1,2,3,4,5]
arr2 = ['A','B','C','D','E']
arr3 = ['a','b','c','d','e']
# 同样以最短为主
iterator = zip(arr1,arr2,arr3)
lst = list(iterator)
print(lst)
# 将多个元组解析出多个序列
lst = [(1, 'A', 'a'), (2, 'B', 'b'), (3, 'C', 'c'), (4, 'D', 'd'), (5, 'E', 'e')]
l1,l2,l3 = zip(*lst)
print(l1)
print(l2)
print(l3)
```
### 25.11 其他内置函数
其他暂时还用不到的内置函数,之后或课外学习:
| 函数 | 说明 |
| -------------- | ------------------------------------------------------------ |
| aiter() | 从异步对象中获取对应的异步迭代器 |
| anext() | 从异步迭代器中获取下一个数据 |
| ascii() | 判断参数数据是否一个标准的可打印ascii字符 |
| breakpoint() | 间接调用系统中的钩子函数进行代码调试 |
| bytearray() | Python中用来创建字节数组的函数 |
| bytes() | 构建字节序列的,类似bytearray、 |
| callable() | 判断参数数据是否可以被执行,经常用于编写后门木马时探测目标数据 |
| classmethod | 面向对象中-用于声明类方法的装饰器函数 |
| compile() | 用于将字符串数据编译成可执行脚本,提供给exec()或者eval()函数调用执行 |
| complex() | 数据处理中用于复数处理的类型 |
| copyright() | python内置的 版本信息 内置函数 |
| credits() | python内置的 贡献者信息 内置函数 |
| delattr() | 面向对象中-用于删除对象属性的函数 |
| divmod() | 用于直接查询整除数据和取余数据的函数 |
| exec() | 类似eval(),也可以将字符串转化成表达式进行执行 |
| format() | 用于数据格式化的函数 |
| frozenset() | 用于将序列数据进行乱序处理的函数 |
| getattr() | 面向对象中-用于获取对象中的属性的函数 |
| globals() | 用于获取当前作用域中所有全局变量的函数 |
| locals() | 用于获取当前作用域中所有局部变量的函数,类似vars() |
| vars() | 用于获取当前作用域中所有局部变量的函数,类似vars() |
| hasattr() | 面向对象中-用于判断对象中是否包含某个属性的函数 |
| hash() | 用于获取参数数据的hash值的函数,底层函数 |
| isinstance() | 面向对象中-身份运算符,判断某个对象是否属于某种类型,如张三是个人吗? |
| issubclass() | 面向对象中-身份运算符,判断某个小类型是否属于某个大类型,如男人是人吗? |
| license() | python中的版本信息 |
| memoryview() | 用于获取参数数据的内存数据 |
| object() | python中的顶级对象类型 |
| open() | 内置的用于打开并操作系统文件的函数 |
| property() | 面向对象-用于对象属性封装 |
| repr() | 面向对象-用于输出对象 |
| setattr() | 面向对象-用于给对象设置属性的函数 |
| slice() | 用于阶段拆分字符串的内置函数 |
| staticmethod() | 面向对象-用于声明静态方法的装饰器函数 |
| super() | 面向对象-用于表示继承关系中父类型的关键字 |
## 第26节课 自定义模块与包
### 26.1 自定义模块
其实也都是属于Python中关于代码封装的表现形式
- 代码具有重复性且具有规律,用循环解决
- 代码具有重复性且代码具有独立功能性,用函数解决
- 模块:将一组解决**特殊领域问题**的代码进行封装(变量、函数、类),一个模块就是一个`.py`文件,以便于外界调用。**就相当于一个大一点的函数**。
**创建模块**
```python
# my_math.py
def add(x, y):
return x + y
def substract(x, y):
return x - y
def multiply(x, y):
return x * y
def divide(x, y):
return x / y
```
**导入自定义模块**
```python
# main.py
# 直接导入模块名称
from 测试数据 import my_math
print(my_math.add(1, 2))
print(my_math.substract(3, 4))
```
```python
# main.py
# 导入模块时给一个别名
import my_math as mm
print(mm.multiply(3,4))
print(mm.divide(10,2))
```
```python
# main.py
# 直接导入模块中指定的内容
from my_math import add,substract,multiply,divide
print(add(1,2))
print(substract(3,4))
# 这种情况一般在大项目中不推荐使用的
# 可能会与当前模块自定义的内容冲突
def add(x,y):
return 666
print(add(3,4))
```
```python
# main.py
# 直接导入模块中所有的内容
from my_math import *
print(add(1,2))
print(substract(3,4))
# 同理也会和当前模块的内容冲突 不推荐
```
**关于`__name__`**属性
- 每一个Python模块(`.py`文件)都有一个`__name__`的属性。当模块直接被运行时,该属性值为`__main__`;当模块被导入时,该属性为模块名称。
- 所谓的导入模块,说白了,就是先让导入的模块运行一下!
```python
# my_math.py
def add(x, y):
return x + y
def substract(x, y):
return x - y
def multiply(x, y):
return x * y
def divide(x, y):
return x / y
# 无论是在当前模块运行 还是模块被导入时 都会执行
print(__name__)
# 只有在当前模块运行时 才执行下面的代码
if __name__ == "__main__":
print("haha")
print('xixi')
if __name__ == "my_math":
# 被导入 可以做一些初始化的操作
```
```python
# main.py
# 直接导入模块中所有的内容
from my_math import * #先 执行my_math.py模块中的代码
print(add(1,2))
print(substract(3,4))
# 同理也会和当前模块的内容冲突 不推荐
```
- 只需要导入另一个模块的定义代码,不需要执行另一个模块的运行代码
### 26.2 自定义包
包就是一种管理模块的方式,实际上就是一个文件夹里面有多个`.py`的模块,再加一个`__init__.py`的文件,该文件主要用于标记所属文件节夹是一个Python包还是一个普通目录。
**创建包**
```python
my_package
__init__.py
modelA.py
modelB.py
```
```python
# modelA.py
def show_model_A():
print("show_model_A ... run")
```
```python
# modelB.py
def show_model_B():
print("show_model_B ... run")
```
**如何导入包中的内容**
同包内导入模块:
```python
# modelA.py
def show_model_A():
print("show_model_A ... run")
show_model_A()
```
```python
# modelB.py
import modelA
# from . import modelA
def show_model_B():
print("show_model_B ... run")
modelA.show_model_A()
show_model_B()
```
运行modelB.py
```python
show_model_A ... run # 导入modelA时 运行的modelA当中的代码
show_model_B ... run # 函数调用执行
show_model_A ... run # 函数中调用modelA中的show_model_A()函数
```
如果此时在modelA中再去导入modelB则报错:
```python
# modelA.py
import modelB
def show_model_A():
print("show_model_A ... run")
modelB.show_model_B()
show_model_A()
"""报错了
AttributeError: partially initialized module 'modelB' has no attribute 'show_model_B' (most likely due to a circular import)
"""
```
**禁止两个模块之间相互导入!否则出现环形导入的错误!**
导入模块或者导入包必须是单向的!
包外如何导入模块:
先在`__init__.py`中定义需要被导入的模块
```python
# __init__.py
from . import modelA
from . import modelB
# 从当前包中导入modelA modelB
```
```python
# main.py
import my_package
测试数据.my_package.modelA.show_model_A()
测试数据.my_package.modelB.show_model_B()
```
```python
# main.py
import my_package as mp # 给包别名
测试数据.my_package.modelA.show_model_A()
测试数据.my_package.modelB.show_model_B()
```
```python
# main.py
# 导入包中指定的模块
from 测试数据.my_package import modelB, modelA
modelA.show_model_A()
modelB.show_model_B()
```
```python
# main.py
from my_package import *
modelA.show_model_A()
modelB.show_model_B()
```
**关于`__init__.py`文件中`__all__`变量**
用于指定当前 `from 包 import *`时需要导入的模块
```python
# __init__.py
__all__ = ['modelA','modelB']
```
一般建议两者做结合:
```python
from . import modelA
from . import modelB
# 从当前包中导入modelA modelB
__all__ = ['modelA','modelB']
```
## 第27节课 内置模块:日期与时间处理
### 27.1 time模块
`time` 模块提供了与时间相关的函数,可用于获取当前时间、延迟程序执行、进行时间格式转换等操作。
**(1)获取时间戳和时间格式转换**
```python
import time
# 时间戳 获取从1970年1月1日0时至今经过的所有的秒数
current_time = time.time()
print("时间戳", current_time)
# localtime函数可以将时间戳转换为本地时间的结构化时间对象
# 如果不传入时间戳 则默认以当前时间为准
local_time = time.localtime(100000)
print(local_time)
local_time = time.localtime()
print(local_time)
print(local_time.tm_year)
print(local_time.tm_mon)
print(local_time.tm_mday)
# 更多的属性 通过local_time.xxx来取查看
# strftime f=format函数可以将结构化时间对象转换为指定格式的字符串 "2025-7-26 9:32:31"
sft = time.strftime("%Y-%m-%d %H:%M:%S", local_time)
print(sft)
sft = time.strftime("%H:%M:%S %d/%m/%Y", local_time)
print(sft)
# strptime p=parse函数可以将格式化的时间字符串转换为结构化时间对象
time_string = "2008-8-8 20:08:08"
struct_time = time.strptime(time_string, "%Y-%m-%d %H:%M:%S")
print(struct_time)
print(struct_time.tm_year)
```
**(2)暂停程序运行**
`time.sleep(seconds)`,让我们的程序暂停seconds秒,时间一到则继续运行,一般用于模拟一些计数操作,设定定时任务。
```python
import time
# 做一个简单的倒计时程序
for second in range(3, 0, -1):
print(second)
time.sleep(1) # 暂停1秒
```
**(3)计算程序的执行时间的**
```python
import time
import random
def selection_sort(arr):
start_time = time.time()
for i in range(len(arr) - 1):
for j in range(i + 1, len(arr)):
if arr[i] > arr[j]:
arr[i],arr[j] = arr[j],arr[i]
end_time = time.time()
print(end_time - start_time)
arr = []
for i in range(10000):
arr.append(random.randint(1,10000))
selection_sort(arr)
print(arr)
```
### 27.2 datetime模块
`datetime` 模块是 Python 标准库中用于处理日期和时间的重要模块,它提供了多种类和函数来帮助开发者进行日期和时间的计算、格式化、解析等操作。
**(1)date**
专门用于表示日期,包含年、月和日的信息
```python
import datetime
# 返回当前本地日期对象
today = datetime.date.today()
print(today)
print(today.year)
print(today.month)
print(today.day)
# 从ISO格式化字符串创建日期对象
date_str = "2024-04-28"
new_date = datetime.date.fromisoformat(date_str)
print(new_date)
print(new_date.year)
print(new_date.month)
# 获取星期几
print(today.weekday()) # 5 5-周六 6-周日 0-周一
print(today.isoweekday()) # 6 周六 ISO日期时间标准 6-周六 0-周日 1-周一
```
**(2)time类**
专门用于表示时间,包含时、分和秒的信息
```python
import datetime
# 创建时间对象时 必须指定时分秒等信息
time_obj = datetime.time(10,6,32)
print(time_obj) # datetime.time的时间对象
print(time_obj.hour)
print(time_obj.minute)
print(time_obj.second)
# 不指定的话全是0
# time_obj = datetime.time()
# print(time_obj)
# 将时间对象转换为ISO标准的字符串
iso_time = time_obj.isoformat()
print(iso_time) # 字符串
```
**(3)datetime类**
结合了上述time和date的功能,用于表示时间和日期
```python
import datetime
# 获取当前UTC时间和日期对象 格林威治时间
utc_now = datetime.datetime.now(datetime.UTC)
print(utc_now)
# 获取当前本地时间和日期对象 东八区 时间比UTC快8小时
now = datetime.datetime.now()
print(now)
print(now.year)
print(now.hour)
# 从ISO格式字符串创建datetime对象
datetime_str = "2023-12-12 09:09:09"
new_datetime = datetime.datetime.fromisoformat(datetime_str)
print(new_datetime)
# 将当前datetime转字符串
s = now.strftime("%Y/%m/%d %H:%M:%S")
print(s)
# 将字符串转datetime对象
d = datetime.datetime.strptime("2025/07/26 10:18:02","%Y/%m/%d %H:%M:%S")
print(d)
```
**(4)timedelta类**
表示两个日期或时间之间的差值
```python
import datetime
delta = datetime.timedelta(days=5, hours=3,)
print(delta)
now = datetime.datetime.now()
# 当前now时间5天3小时后
future = now + delta
print(future) # datetime对象
# 当前now时间5天3小时前
print(now - delta)
time_diff = future - now # datetime - datetime = timedelta
print(time_diff) # 时间差
```
### 27.3 calendar模块
`calendar` 模块提供了与日历相关的功能,可用于生成日历、处理日期和星期等。
```python
import calendar
# 获取指定年份和月份的日历
cal = calendar.month(2025,7)
print(cal)
# 判断某一年是否是润年
print(calendar.isleap(2025))
# 获取指定年份和月份的周数
weeks = calendar.monthcalendar(2025,7)
for week in weeks:
print(week)
# 获取指定日期是星期几
print(calendar.weekday(2025,7,26))
# 打印全年日历
calendar.prcal(2025,m=6)
```
## 第28节课 内置模块:数学与科学计算
### 28.1 math模块
`math` 模块提供了大量用于数学运算的函数。
```python
import math
# 三角函数 sin() cos() tan() asin() acos() atan()
# 传入的是弧度值而不是角度值
print(math.sin(math.pi / 6))
print(math.tan(math.pi / 4))
# 角度与弧度之间转换的问题
print(math.degrees(math.pi / 4)) # 将弧度转角度
print(math.radians(45) * 4) # 将角度转弧度
# 幂运算与开根号
print(math.pow(2,3)) # 求x^y
print(math.sqrt(9)) # 开根号x
# 取整
# ceil 返回大于或者等于x的最小整数 向上取整
print(math.ceil(3.14))
print(math.ceil(3.99))
print(math.ceil(-3.14))
# floor 返回小于或者等于x的最小整数 向下取整
print(math.floor(3.14))
print(math.floor(3.99))
print(math.floor(-3.14))
# trunc 返回整数部分 截断小数部分
print(math.trunc(3.12387891273))
# modf 返回小数部分和整数部分,结果为一个元组
print(math.modf(12.3456))
# 其他
print(math.factorial(3)) # 求x的阶乘
print(math.gcd(15,25,30)) # 求多个数字的最大公约数
print(math.fabs(-3.14)) # 取绝对值
print(math.prod([1,2,3,4,], start=2)) # 求一个可迭代对象的元素乘积,start为初始值
# 常量
print(math.pi) # 圆周率
print(math.e) # 自然常数
```
### 28.2 random模块
`random` 模块是 Python 标准库中用于生成随机数的模块,它提供了多种生成随机数的函数,可以用于模拟、游戏、加密等多个领域。
```python
import random
# 设置随机种子
# 所谓的种子 用于衡量和计算随机值的 如果不指定 则默认使用当前系统时间
# 由于当前系统时间是不一样的 动态变化 种子也就在变化 随机的结果也在变化\
# 现在设置了一个固定的种子值 666 之后的代码在随机时 都是以666来衡量和计算的
# 也就意味着 每次运行随机的结果都一样
random.seed(888) # 一般在机器学习中/数据分析中使用 用于固定随机结果 来判断算法优良性
# 复现同一个结果
# 返回一个在[0, 1) 之间的一个小数
print(random.random())
# 返回一个在[a, b] 之间的一个小数
print(random.uniform(2.5, 3.5))
# 返回一个在[a, b] 之间的一个整数
print(random.randint(1, 10))
# 从range(start, stop, step)所表示的序列中随机选择一个整数 start默认0 step默认1
print(random.randrange(0, 8, 2))
arr = [1, 2, 3, 4, 5]
# 从序列中随机选择一个元素
print(random.choice(arr))
# 从序列中进行 有放回 的随机抽样 返回的是一个列表
# weights 指定每个元素的权重值 被抽到的概率
# k 抽取几个 k可以大于序列的长度
print(random.choices(arr)) # 所有元素权重一样 且k=1 等效于choice
print(random.choices(arr, weights=[5, 1, 1, 1, 2], k=10))
# 从序列中进行 无放回的等概率随机抽样 可以指定k(不能超过序列长度) 返回的是一个列表
print(random.sample(arr, k=3))
# 随机将序列进行打乱
random.shuffle(arr)
print(arr)
```
### 28.3 hashlib模块
提供了常见的**哈希算法**的实现,如 MD5、SHA-1、SHA-256 等。哈希算法可将任意长度的输入数据转换为固定长度的哈希值,这些哈希值通常用于数据完整性验证、密码存储等场景。
关于数据加密问题:就是将数据通过一定的数学算法,转换成无序杂乱的数据,达到保护数据的目的。一般情况下,数据加密方式有两种:
- 对称加密:加密和解密用的是同一套秘钥,压缩包有密码
- 非对称加密:加密和解密用的不是同一套秘钥,而是存在公钥/私钥,加密-公钥,解密-私钥,网络当中https协议传输数据时使用非对称加密。
按照加密业务流程,有分为两种:
- 单向加密:数据只加密,不解密,例如存储用户的相关密码
- 双向加密:对于明文数据既可以加密,也可以解密(对称/非对称)。
`hashlib` 支持多种哈希算法,常见的有:
- MD5:生成 128 位(16 字节)的哈希值,不过因其安全性问题,如今在密码存储等安全敏感场景中已不推荐使用。
- SHA-1:生成 160 位(20 字节)的哈希值,同样存在安全隐患,不适合用于高安全性要求的场景。
- SHA-256:属于 SHA-2 系列算法,生成 256 位(32 字节)的哈希值,安全性较高,应用广泛。
- SHA-512:也是 SHA-2 系列算法,生成 512 位(64 字节)的哈希值,安全性更强。
使用 `hashlib` 进行哈希计算的基本步骤如下:
1. **创建哈希对象**:调用 `hashlib` 模块中的相应函数来创建哈希对象。
2. **更新数据**:使用哈希对象的 `update()` 方法添加要计算哈希值的数据。
3. **获取哈希值**:使用哈希对象的 `hexdigest()` 方法获取十六进制表示的哈希值。
```python
import hashlib
data = "123456"
hash_obj = hashlib.sha512()
hash_obj.update(data.encode("utf-8"))
pwd = hash_obj.hexdigest()
print(pwd)
# 模拟一个简单的暴力破解
pwd = "ba3253876aed6bc22d4a6ff53d8406c6ad864195ed144ab5c87621b6c233b548baeae6956df346ec8c17f5ea10f35ee3cbc514797ed7ddd3145464e2a0bab413"
for num in range(100000, 1000000):
s = str(num)
hash_obj = hashlib.sha512()
hash_obj.update(s.encode("utf-8"))
cur_pwd = hash_obj.hexdigest()
if cur_pwd == pwd:
print(num)
break
# 密码最短11位 62^11
# 混淆加密 就是给源数据加密后的结果再次添加盐值,添加后再加密......
data = "123456"
salt = "我爱迪丽热巴IQGHS*DT*!@G*&ET!@*#FG*!@&^R&!@*#"
hash_obj = hashlib.sha512()
# 对源数据加密
hash_obj.update(data.encode("utf-8"))
# 添加盐值
hash_obj.update(salt.encode("utf-8"))
pwd = hash_obj.hexdigest()
print(pwd)
pwd = "2b5face9b24258eebd90a1cfe1736dcf909291a66b9d270c581dfc04b25bc6db1afb9b2a2c479bf96a8b20f0e87117f54eb6078a51cf3461c4dffa2bb1e87341"
for num in range(100000, 1000000):
s = str(num)
hash_obj = hashlib.sha512()
hash_obj.update(s.encode("utf-8"))
cur_pwd = hash_obj.hexdigest()
if cur_pwd == pwd:
print(num)
break
```
### 28.4 更多其他相关模块
- `cryptography` :是一个功能强大且安全的加密库,它支持对称加密和非对称加密。
- `pycryptodome` :是一个自包含的 Python 包,包含了各种加密算法的实现。
- `statistics`:用于计算统计数据,如均值、中位数、方差等。
- `cmath`:用于处理复数的数学运算,包含了针对复数的三角函数、指数函数等。
- `numpy`:它是 Python 科学计算的基础库,提供了强大的多维数组对象和各种数学函数,可高效地进行数值计算。
- `scipy` :构建于 numpy 之上,提供了许多高级的科学计算功能,像优化、积分、插值、信号处理等。
- `sympy` :用于符号数学运算,能进行代数运算、微积分、方程求解等。
## 第29节课 内置模块:系统与目录管理
### 32.1 sys模块
sys模块是Python标准库中的一个重要模块,它提供了与Python解释器及其环境交互的多种功能。
**(1)命令行参数**
在控制台运行一个Python脚本`python 脚本名称.py`
主要利用 `sys.argv` 来接受传入的命令行参数
```python
import sys
# 参数列表
# 命令行 python main.py 123 True abc 3.14
# ['main.py', '123', 'True', 'abc', '3.14']
print(sys.argv)
# sys.argv[0] 脚本名称
# sys.argv[1:] 其他参数
if len(sys.argv) < 2:
print("请提供至少一个参数")
sys.exit(0) # 结束程序 附带一个结束码 0
print(f"你提供了{len(sys.argv) - 1} 个参数")
for i, arg in enumerate(sys.argv[1:], start=1):
print(f"参数{i}:{arg}")
```
**(2)系统路径问题**
`sys.path` 是一个列表,它包含了Python解释器查找模块的路径,可以被修改或者添加自定义路径的。
```python
import sys
print("当前系统路径:")
for path in sys.path:
print(path)
# 临时添加一个指定路径
new_path = "C:\\Users\\HENG\\Desktop"
sys.path.append(new_path)
print("添加后的系统路径:")
for path in sys.path:
print(path)
import haha
haha.say_haha()
```
**(3)标准化输入输出**
`sys.stdin`,`sys.stdout`,`sys.stderr`
```python
import sys
print("这是一个标准化的输出,默认输出到控制台中")
original_stdout = sys.stdout # 默认向控制台
file = open("output.txt", mode="w", encoding="utf-8")
sys.stdout = file # 改变输出方向 向output.txt文件中输出
print("这是修改后的输出,输出的内容直接存储到output.txt文件中")
print(1 + 2 + 3)
file.close()
sys.stdout = original_stdout
print("此时的输出就正常了,往控制台打印")
##################################################
sys.stdout.write("请输入一个数字:") # print("xxxxxx")
sys.stdout.flush()
try: # 尝试执行下面的内容
number = int(sys.stdin.readline()) # input()
print(number + 1)
except Exception: # 如果出错了 执行下面的内容
print("无效输入", file=sys.stderr)
print("后续执行的代码")
```
**(4)系统信息查询**
```python
import sys
print("Python版本", sys.version)
print("版本信息", sys.version_info)
print("实现版本", sys.implementation)
print("系统平台", sys.platform)
print("默认编码", sys.getdefaultencoding())
print("文件系统编码", sys.getfilesystemencoding())
print("最大整数值", sys.maxsize)
print("递归深度限制", sys.getrecursionlimit())
# 检查版本信息
if sys.version_info < (3, 13):
print("需要Python3.13或更高版本")
sys.exit(0)
print("正常执行的代码")
```
**(5)内存管理**
```python
import sys
# 引用计数 检查对象数据是否需要被垃圾回收GC
a = [1,2,3,4,5]
print(sys.getrefcount(a)) # 2
b = a
print(sys.getrefcount(a)) # 3
# 查看对象内存大小
print(sys.getsizeof(a))
```
**(6)模块加载判断**
```python
import sys
# 查看已经加载的模块数量
print(sys.modules) # 集合
print(len(sys.modules))
if 'math' in sys.modules:
print("math已存在")
else:
print("math不存在")
import math
if 'math' in sys.modules:
print("math已存在")
else:
print("math不存在")
```
**(7)案例:自定义命令**
```python
"""
判断素数
python main.py prime 3 3
计算最大公约数
python main.py gcd 2 3 4
"""
import sys
def cal_prime():
arr = [int(s) for s in sys.argv[2:]]
if len(arr) == 0:
print("无参数", file=sys.stderr)
print_help()
sys.exit(1)
# arr 求每个数字是否都是素数
def cal_gcd():
arr = [int(s) for s in sys.argv[2:]]
if len(arr) <= 1:
print("参数不够", file=sys.stderr)
print_help()
sys.exit(1)
# arr 求arr当中所有数字的最大公约数
def print_help():
print("用法: python xxx.py [选项] 参数*")
print("选项列表:")
print("\tprime\t计算多个参数都是为素数")
print("\tgcd\t计算多个参数的最大公约数")
print("示例:")
print("\t--示例1 python xxx.py prime 1 2 3")
print("\t--示例2 python xxx.py gcd 1 2 3")
def main():
if len(sys.argv) < 2:
print_help()
sys.exit(0)
choice = sys.argv[1]
if choice.lower() == "prime":
cal_prime()
pass
elif choice.lower() == "gcd":
cal_gcd()
pass
else:
print(f"无效选项{choice}", file=sys.stderr)
print_help()
sys.exit(1)
if __name__ == "__main__":
main()
```
### 32.2 os模块
os模块是Python标准库中用于与操作系统交互的核心模块,提供了丰富的**文件和目录操作**、进程管理、环境变量访问等功能。
**(1)文件目录路径操作**
```python
import os
# 获取当前工作目录
current_dir = os.getcwd()
print("当前目录:", current_dir) # 绝对路径
# 路径拼接(路径不一定存在)
file_path = os.path.join(current_dir, "data", "file.txt")
print("完整路径:", file_path)
# 路径分解
dir_name, file_name = os.path.split(file_path)
print("目录部分:", dir_name)
print("文件部分:", file_name)
# 对文件进行分解
base_name, ext = os.path.splitext(file_name)
print("文件名称:", base_name)
print("后缀名称:", ext)
# 绝对路径
abs_path = os.path.abspath("测试数据/my_package/modelA.py")
print("绝对路径:", abs_path)
# 相对路径
rel_path = os.path.relpath(abs_path, start=os.getcwd())
print("相对路径:", rel_path)
# 检查路径所对应的文件或目录是否存在
print(os.path.exists(file_path))
print(os.path.exists(rel_path))
# 判断类型 文件/目录
print(os.path.isfile(rel_path))
print(os.path.isdir(os.getcwd()))
```
**(2)创建和删除目录**
```python
import os
# 创建单个目录
new_dir = "new_dir"
if not os.path.exists(new_dir):
os.mkdir(new_dir)
print(f"目录{new_dir}已创建")
else:
print(f"目录{new_dir}已存在")
# 创建多级目录
nested_dir = os.path.join("parent","child","grandchild")
os.makedirs(nested_dir, exist_ok=True)
# 删除单个目录
os.rmdir(new_dir)
# 删除多级目录
os.removedirs(nested_dir)
```
遍历目录:
```python
import os
print("当前目录内容:")
for item in os.listdir("."):
print(item)
print("递归遍历目录:")
# os.walk(path) # 广度优先遍历+深度优先结合
for root, dirs, files in os.walk("."):
print("当前目录:", root)
print("当前目录的子目录们:", dirs)
print("当前目录的子文件们:", files)
print("-" * 40)
```
**(3)文件属性和权限**
```python
import os
file_path = "README.md"
# 文件大小
print("文件大小", os.path.getsize(file_path)) # 字节byte
t1 = os.path.getctime(file_path) # 创建时间
t2 = os.path.getmtime(file_path) # 修改时间
t3 = os.path.getatime(file_path) # 最近访问时间
import datetime
print(datetime.datetime.fromtimestamp(t1))
print(datetime.datetime.fromtimestamp(t2))
print(datetime.datetime.fromtimestamp(t3))
# 文件权限
mode = os.stat(file_path).st_mode
print(hex(mode))
```
**(4)案例:文件搜索工具**
```python
# 给定一个目录 取搜索该目录下面所有的.py文件
# directory 目标目录
# extension 指定后缀名
import os
def find_files(directory, extension):
matches = []
for root, dirs, files in os.walk(directory):
for filename in files:
if filename.endswith(extension):
matches.append(os.path.join(root, filename))
return matches
py_files = find_files("E:\\", ".py")
for file in py_files:
print(file)
```
**(5)案例:备份工具**
```python
"""
备份 就是将指定的目录 进行备份 备份时间为当前时间即可
source_dir 被备份的目录
backup_dir 备份目录
"""
import os.path
import sys
from datetime import datetime
import shutil
def create_backup(source_dir, backup_dir):
# 创建备份目录
if not os.path.exists(source_dir):
print("源目录不存在")
sys.exit()
if not os.path.exists(backup_dir):
os.makedirs(backup_dir)
timestamp = datetime.now().strftime("%Y%m%d_%H%M%S")
backup_name = f"backup_{timestamp}"
backup_path = os.path.join(backup_dir, backup_name)
# 递归拷贝
shutil.copytree(source_dir, backup_path)
print(f"备份已创建:{backup_path}")
return backup_path
create_backup("应用案例", "backups")
```
### 32.3 更多其他相关模块
- `shutil`:提供了文件和目录的高级操作,如复制、移动、删除等功能。
- `tempfile`:用于创建临时文件和目录。
- `pathlib`:以面向对象的方式处理文件路径。
- `stat`:用于处理文件的状态信息,例如文件权限、修改时间等。
## 第30节课 第三方模块:NumPy模块
`NumPy`是 Python 中用于科学计算的基础库,它提供了**高性能的多维数组**对象和处理这些数组的工具。
```python
pip install numpy
```
**pip**
`pip` 是 Python 的包管理工具,下面是一些 `pip` 的常用命令:
- 显示pip的版本:`pip --version`
- 查看 pip 命令的帮助信息:`pip --help`
- 查看已安装的包:`pip list`
- 安装最新版本的包:`pip install package_name`
- 安装指定版本的包:`pip install package_name==version_number`
- 升级指定的包到最新版本:`pip install --upgrade package_name`
- 卸载指定的包:`pip uninstall package_name`
- 查看包的详细信息:`pip show package_name`
- 指定镜像源下载:`pip install package_name -i link`
### 30.1 数组创建
`NumPy` 的核心是 `ndarray`(N-dimensional array)对象,也就是**多维数组**。可以通过多种方式创建数组。
```python
import numpy as np
# 从列表创建一维数组
lst = [1,2,3,4,5]
arr = np.array(lst)
print("一维数组:", arr)
# 创建一个二维数组
arr = np.array([[1,2,3,4],[5,6,7,8]])
print("二维数组:", arr)
# 全0矩阵
arr = np.zeros((3,4))
print("全0矩阵:")
print(arr)
# 全1矩阵
arr = np.ones((3,4))
print("全1矩阵:")
print(arr)
# 创建指定的全n矩阵
arr = np.full((3,4,5), 8)
print("全n矩阵:")
print(arr)
# 创建等差数列矩阵
arr = np.arange(0,10,2) # [start,stop) step
print("等差数列矩阵:")
print(arr)
# 创建等间距的矩阵 将从0到1 等分成5份
arr = np.linspace(0,1,5)
print("等间距矩阵:")
print(arr)
# 创建随机的矩阵 随机20个[0,10)之间的整数
# reshape(4,5) 将一个一维数组变为 4×5的矩阵
arr = np.random.randint(10, size=20).reshape(4,5)
print("随机矩阵:")
print(arr)
# 持久化数据 -> 数据进行存储 -> 硬盘
# 文件名称 需要被保存的矩阵
# data.npy -> 纯字节文件
np.save("data", arr)
# 读取持久化数据
arr = np.load("data.npy")
print(arr)
```
### 30.2 数组属性
可以通过数组的属性来获取数组的相关信息。
```python
import numpy as np
arr = np.random.randint(10, size=24).reshape(2,3,4)
# 维度
print(arr.ndim)
# 形状
print(arr.shape)
# 数据总数
print(arr.size)
# 元素类型
print(arr.dtype) #int32 4字节整数
```
### 30.3 数组索引和切片
可以像操作 Python 列表一样对 `NumPy` 数组进行索引和切片操作。
```python
import numpy as np
arr = np.array([1, 2, 3, 4, 5])
# 索引和切片操作基本和列表一致
print(arr[0])
print(arr[-1])
print(arr[1:4])
arr = np.array([[1, 2, 3], [4, 5, 6], [7, 8, 9]])
print(arr[0][0])
print(arr[-1][-1])
# 支持多维切片 目前以二维 arr[row,col] row=行区域 col=列区域
print(arr[0, 0])
print(arr[-1, -1])
print(arr[1, :]) # 整个第2行
print(arr[1, 0:2]) # 第2行的前2个
print(arr[:, 2]) # 整个第3列
"""
1 2 3
4 5 6
7 8 9
取
5 6
8 9
"""
print(arr[1:, 1:])
```
### 30.4 数组运算
`NumPy` 数组支持多种数学运算,包括元素级运算、矩阵运算等。
```python
import numpy as np
arr1 = np.array([[1, 2, 3], [4, 5, 6]])
arr2 = np.array([[1, 2, 3], [4, 5, 6]])
"""
1 2 3
4 5 6
1 2 3
4 5 6
"""
# 元素级操作
print(arr1 + arr2) # 对应位置上的元素做相加
print(arr1 - arr2)
print(arr1 * arr2)
print(arr1 / arr2)
print(arr1 * 3) # 每个元素乘以3
print(arr1 + 3)
# 矩阵乘法
# A×B 乘以 B×C 的矩阵 = A×C
arr3 = np.array([[1,2,3],[4,5,6]])
arr4 = np.array([[1,2,3,1],[4,5,6,4],[7,8,9,7]])
arr5 = np.dot(arr3, arr4)
print(arr5)
```
### 30.5 数学和统计函数
`NumPy` 提供了丰富的数学和统计函数。
```python
import numpy as np
arr = np.array([[1, 2, 3, 4], [1, 2, 3, 4], [1, 2, 3, 4]])
# 计算元素和
print(np.sum(arr))
# 计算平均值
print(np.mean(arr))
# 计算最值
print(np.min(arr))
print(np.max(arr))
# 计算标准差
print(np.std(arr))
"""
1 2 3 4
1 2 3 4
1 2 3 4
"""
# 也可以对矩阵中的某一个区域进行计算
print(arr[:,1:3])
print(np.mean(arr[:,1:3]))
```
### 30.6 数组的变形和拼接
可以对数组进行形状的改变和拼接操作。
```python
import numpy as np
arr = np.array([x for x in range(1, 17)])
print(arr)
arr1 = arr.reshape((4, 4))
print(arr1)
arr2 = arr.reshape((2, 2, 4))
print(arr2)
arr3 = arr.reshape((2, 2, 2, 2))
print(arr3)
arr4 = np.array([[1, 2], [3, 4]])
arr5 = np.array([[5, 6], [7, 8]])
"""
1 2
3 4
5 6
7 8
"""
print(np.hstack((arr4,arr5)))
print(np.vstack((arr4,arr5)))
```
### 30.7 布尔索引
可以使用布尔数组来筛选数组中的元素。
```python
import numpy as np
arr = np.array([x for x in range(1, 17)])
arr1 = arr > 3 # 获取一个布尔类型的数组 每个元素依次对应原数组中每一个数据 是否大于3的结果
print(arr1)
arr2 = arr[arr1] # 用布尔类型数组来做过滤
print(arr2)
arr3 = arr[arr % 2 == 0]
"""
理解如下:
[x for x in arr if x % 2 == 0]
"""
print(arr3)
```
### 30.8 线性代数运算
`NumPy` 提供了线性代数相关的函数,如矩阵的转置、求逆等。
```python
import numpy as np
arr = np.array([[1,2,3,4],[5,6,7,8]])
"""
1 2 3 4
5 6 7 8
"""
arr1 = arr.T # 转置
print(arr1)
# 求逆 前提方阵 (奇异矩阵不能求逆)
arr2 = np.array([[1,2],[3,4]])
print(np.linalg.inv(arr2))
```
### 30.9 案例:股票收益率分析
假设你是一位投资者,想要分析某几只股票在一段时间内的收益率情况。通过计算股票的日收益率、平均收益率和收益率的标准差,你可以评估这些股票的表现和风险程度。标准差越大,说明股票的收益率波动越大,风险也就越高。
```python
import numpy as np
# 假设我们有 3 只股票,在 10 个交易日内的收盘价数据
# 每一行代表一只股票,每一列代表一个交易日
# 计算每只股票的日收益率
# 日收益率:(今日收盘价 - 昨日收盘价) / 昨日收盘价
closing_prices = np.array([
[100, 102, 105, 103, 106, 108, 109, 110, 107, 109],
[200, 202, 205, 203, 206, 208, 209, 210, 207, 209],
[300, 302, 305, 303, 306, 308, 309, 310, 307, 309]
])
daily_returns = (closing_prices[:, 1:] - closing_prices[:, :-1]) / closing_prices[:, :-1]
# print(daily_returns)
# axis=1 按行计算 0按列计算
average = np.mean(daily_returns, axis=1)
std_daily = np.std(daily_returns, axis=1)
for i in range(len(average)):
print(f"股票{i + 1}的平均日收益率:{average[i]:.4f}")
print(f"股票{i + 1}的日收益率标准差:{std_daily[i]:.4f}")
```
## 第31节课 第三方模块:Pandas模块
`Pandas` 是 Python 中用于数据处理和分析的强大库,它提供了高效且灵活的数据结构,如 `Series` 和 `DataFrame`。
```python
pip install pandas
```
### 31.1 数据结构创建
`Series` 是一维带标签的数组,可包含不同类型的数据。
```python
import pandas as pd
# 从列表创建series 不指定标签 标签默认为角标
s = pd.Series([1,True,3.14,"Hello"])
print(s)
# 指定标签
s = pd.Series([1,2,3,4], index=['a','b','c','d'])
print(s)
# 从字典创建series
dic = {'name':"张三", "age":18, "height":1.8}
s = pd.Series(dic)
print(s)
```
`DataFrame` 是二维表格型数据结构。
```python
import pandas as pd
# 从字典创建dataframe
dic = {'Name': ["张三", "李四", "王五"], "Age": [18, 22, 19]}
"""
字典中的键Name -> 标签 -> 列名/字段名
字典中的值 列数据
自动生成标签 -> 行号 数字
按列来
"""
df = pd.DataFrame(dic)
print(df)
# 从一组列表创建
"""
columns 是第一行的列名
data 中 每一个列表则为一行数据
按行来
"""
data = [["张三", 18, 1.6], ["李四", 22, 1.8], ["王五", 27, 1.9]]
columns = ["Name","Age","Height"]
df = pd.DataFrame(data, columns=columns)
print(df)
```
### 31.2 读取和写入数据
`Pandas` 支持多种文件格式的读写操作,如 CSV、Excel、SQL 数据库等。
Excel处理需要第三方库:
```python
pip install openpyxl
```
读取Excel数据:
```python
import pandas as pd
# 读取一个Excel文件,并将Excel中的数据转为df格式
# 文件名 工作表名
df = pd.read_excel("grades.xlsx", sheet_name="Sheet1")
print(df)
```
写入Excel数据:
```python
import pandas as pd
data = [["张三", 18, 1.6], ["李四", 22, 1.8], ["王五", 27, 1.9]]
columns = ["Name","Age","Height"]
df = pd.DataFrame(data, columns=columns)
# index=False 写入文件不输入标签
df.to_excel("output.xlsx", sheet_name="Shee1", index=False)
```
### 31.3 数据查看与基本信息获取
```python
import pandas as pd
df = pd.read_excel("grades.xlsx", sheet_name="Sheet1")
# 查看所有表格信息
df.info()
"""
<class 'pandas.core.frame.DataFrame'> # 对象类型
RangeIndex: 50 entries, 0 to 49 # 数据条目 标签0~49
Data columns (total 3 columns): # 总列数
# Column Non-Null Count Dtype # 数据条目统计
--- ------ -------------- ----- # Column 列名称
0 学生姓名 50 non-null object # Non-Null 非空条目个数
1 学科 50 non-null object # 空条目 非空
2 成绩 50 non-null int64 # Dtype 数据类型
dtypes: int64(1), object(2) # 数据类型个数
memory usage: 1.3+ KB # 文件大小
"""
print(df.shape) # 行 列
print(len(df)) # 行数
print(df.columns) # 所有的列名
print(df.index) # 条目索引
print(df.axes) # 条目索引 + 列名
print(df.dtypes) # 查看每一个列的数据类型
print(df.size) # 3*50 150个单元格(数据项)
print(df.ndim) # 维度2
print(df.nunique()) # 返回每一列的唯一值数量 把每一列len(set())
print(df.describe()) # 查看统计方面的信息 数字
"""
成绩
count 50.000000 # 计数
mean 81.280000 # 均值
std 11.703898 # 标准差
min 60.000000 # 最小值
25% 70.500000 # 四分位数
50% 81.000000 # 二分位数
75% 90.000000
max 100.000000 # 最大值
"""
print(df.head(n = 10)) # 查看前10行
print(df.tail(n = 10)) # 查看后10行
```
### 31.4 数据选择与过滤
```python
import pandas as pd
df = pd.read_excel("grades.xlsx", sheet_name="Sheet1")
# 单列数据
print(df['成绩'])
# 多列数据
print(df[['学生姓名','学科']])
# 行数据选择
print(df.loc[0]) # 单行数据 打印时会对数据进行转置
print(df.loc[0:3]) # loc[a:b] => [a,b] 多行数据 按行显示
print(df.iloc[0:3]) # iloc[a:b] => [a,b)
# 获取某一区域数据
print(df.loc[3:10,['学生姓名','成绩']])
# print(df.loc[3:10,0:2]) loc 列不支持角标获取 仅支持指定列名
print(df.iloc[3:10,0:2])
# print(df.iloc[3:10,['学生姓名','成绩']]) # iloc 列不支持指定列名 支持角标获取
# 跟numpy中布尔过滤一样
print(df['成绩'] >= 90)
print(df[df['成绩'] >= 90])
# 可以结合逻辑运算 & |
# 每一个过滤条件要加上括号
print(df[(df['成绩'] >= 90) & (df['学科'] == "语文")])
# 类似于数据库的查询语句 query()
print(df.query("成绩 >= 90 & 学科 == '语文'"))
```
### 31.5 数据处理与清洗
处理缺失值
```python
import pandas as pd
df = pd.read_excel("students.xlsx", sheet_name="Sheet1")
print(df)
df.info()
# 删除包含缺失值行
df1 = df.dropna()
df1.to_excel("删除缺失值的结果.xlsx", sheet_name="Sheet1", index=False)
# 填充缺失值
df2 = df.fillna({'Name':"未知人士", 'Age':df['Age'].mean(), 'Gender':"沃尔玛购物袋",'Phone':'10086','Address':'中国'})
df2.to_excel("填充缺失值的结果.xlsx", sheet_name="Sheet1", index=False)
```
处理重复值
```python
import pandas as pd
df = pd.read_excel("students.xlsx", sheet_name="Sheet1")
print(df)
# 删除重复值
# subset 指定处理哪些列重复问题
# keep 保留哪些重复的项
df3 = df.drop_duplicates(subset=['Name'], keep='last')
print(df3)
df3.to_excel("删除重复值的结果.xlsx", sheet_name="Sheet1", index=False)
```
### 31.6 数据分组与聚合
```python
import pandas as pd
df = pd.read_excel("grades.xlsx", sheet_name="Sheet1")
grouped = df.groupby('学科')
print(grouped)
print(type(grouped))
for group_name, group_data in grouped:
print(group_name)
print(group_data)
# 分组之后 就可以对每个分组应用聚合函数 -> 统计相关方法
# 按学科分组 计算每组成绩的 平均值
print(df.groupby('学科')['成绩'].mean())
print(df.groupby('学科')['成绩'].count())
```
### 31.7 数据合并与连接
`pd.merge()` 可以根据一个或多个键将不同 DataFrame 的行连接起来
- **内连接(默认)**:仅返回两个 DataFrame 中键匹配的行。
- **左连接**:返回左 DataFrame 的所有行,以及右 DataFrame 中匹配的行,若右表无匹配则用 `NaN` 填充。
- **右连接**:返回右 DataFrame 的所有行,以及左 DataFrame 中匹配的行,若左表无匹配则用 `NaN` 填充。
- **外连接**:返回两个 DataFrame 中所有行,无匹配的位置用 `NaN` 填充。
```python
import pandas as pd
df1 = pd.DataFrame({
'key':['A','B','C','D'],
'value':[1,2,3,4]
})
df2 = pd.DataFrame({
'key':['B','D','E','F'],
'value':[5,6,7,8]
})
"""
key value key value
A 1 B 5
B 2 D 6
C 3 E 7
D 4 F 8
"""
# 内连接 两个表按照key的交集 value连接合并 默认内连接
print(pd.merge(df1,df2, on="key"))
"""
key value_x value_y
0 B 2 5
1 D 4 6
"""
# 左连接 左边与交集的并集
print(pd.merge(df1, df2, on='key', how="left"))
"""
key value_x value_y
0 A 1 NaN
1 B 2 5.0
2 C 3 NaN
3 D 4 6.0
"""
print(pd.merge(df2,df1, on='key', how="left"))
"""
key value_x value_y
0 B 5 2.0
1 D 6 4.0
2 E 7 NaN
3 F 8 NaN
"""
# 右连接 右边与交集的并集
print(pd.merge(df1, df2, on='key', how="right"))
"""
key value_x value_y
0 B 2.0 5
1 D 4.0 6
2 E NaN 7
3 F NaN 8
"""
# 外连接 并集
print(pd.merge(df1, df2, on='key', how="outer"))
"""
key value_x value_y
0 A 1.0 NaN
1 B 2.0 5.0
2 C 3.0 NaN
3 D 4.0 6.0
4 E NaN 7.0
5 F NaN 8.0
"""
```
`DataFrame.join()` 主要用于按**索引**合并两个 DataFrame,默认是左连接。
```python
import pandas as pd
df1 = pd.DataFrame({
"value1":[1,2,3,4]
}, index=['A','B','C','D'])
df2 = pd.DataFrame({
'value2':[5,6,7,8]
}, index= ['B','D','E','F'])
print(df1)
print(df2)
df3 = df1.join(df2)
print(df3)
```
`pd.concat()` 能够沿着指定轴(行或列)将多个 DataFrame 或 Series 进行拼接。
```python
import pandas as pd
df1 = pd.DataFrame({
'key':['A','B','C','D'],
'value':[1,2,3,4]
})
df2 = pd.DataFrame({
'key':['B','D','E','F'],
'value':[5,6,7,8]
})
# 默认按垂直方向拼接-行
print(pd.concat([df1, df2]))
# axis 1 按列拼接 0 按行拼接 默认0
print(pd.concat([df1, df2], axis=1))
```
### 31.8 数据排序
使用 `sort_index()` 方法可以对 DataFrame 或 Series 按索引进行排序。
使用 `sort_values()` 方法可以对 DataFrame 按指定列的值进行排序。
可以同时指定多个列进行排序,每个列可以有不同的排序顺序。
```python
import pandas as pd
# 按索引排序
df1 = pd.DataFrame({
"value1":[3,1,4,2]
}, index=['B','D','A','C'])
print(df1)
print(df1.sort_index())
df2 = pd.DataFrame(
{
'Name': ['Alice','Dili','Bob','Chali','David'],
'Age':[25,25,20,25,30],
'Score':[80,60,80,70,85]
}
)
print(df2)
# 按Age升序
# by 以哪一列排序
# ascending True升序
print(df2.sort_values(by='Age', ascending=True))
# 按Age升序 Age相等时再按Score降序
print(df2.sort_values(by=['Age','Score'], ascending=[True, False]))
```
### 31.9 NumPy与Pandas的区别
| | NumPy | Pandas |
| ---------------- | ------------------------------------------------------------ | ------------------------------------------------------------ |
| **数据结构** | 核心数据结构是 `ndarray`(N-dimensional array),即**多维数组**。`ndarray` 是一个具有相同数据类型(如整数、浮点数等)的多维容器,所有元素在内存中是连续存储的,这使得 `NumPy` 数组在进行数值计算时非常高效。 | 主要提供了两种高级数据结构,即 `Series` 和 `DataFrame`。`Series` 是一维带标签的数组,它可以包含不同类型的数据,并且每个元素都有一个与之对应的标签。`DataFrame` 是二维的**表格型数据**结构,类似于电子表格或 SQL 表,它由多个 `Series` 组成,每一列可以有不同的数据类型,并且有行索引和列索引。 |
| **数据处理能力** | 侧重于**数值计算**,提供了大量的数学和统计函数,如线性代数运算、傅里叶变换、随机数生成等。`NumPy` 数组的元素级操作非常高效,适合处理大规模的数值数据。 | 更擅长**数据处理和分析**,提供了丰富的数据操作功能,如数据清洗(处理缺失值、重复值等)、数据筛选、数据合并、数据分组和聚合等。`Pandas` 可以方便地处理各种类型的数据,包括数值数据、文本数据和日期时间数据。 |
| **索引和标签** | 数组的**索引是基于整数**的,通过整数索引来访问数组中的元素。虽然可以使用布尔索引和花式索引等高级索引方式,但缺乏显式的标签机制。 | `Series` 和 `DataFrame` 都具有显式的标签,即索引。可以使用标签来访问数据,这使得数据的选择和操作更加直观和灵活。例如,可以通过列名和行索引来选择 `DataFrame` 中的特定数据。 |
| **适用场景** | 适用于需要进行高性能数值计算的场景,如科学计算、机器学习算法的实现(如矩阵运算、向量计算等)。当处理的数据主要是数值类型,并且需要进行大量的数学运算时,`NumPy` 是首选。 | 适用场景:适用于数据处理、数据分析和数据探索的场景,如数据清洗、数据预处理、数据可视化等。当处理的数据具有复杂的结构和标签,需要进行灵活的数据操作和分析时,`Pandas` 更为合适。 |
## 第32节课 第三方模块:Matplotlib模块
### 32.1 Matplotlib 简介
Matplotlib 是 Python 中最流行的数据可视化库之一,提供了一套完整的数据可视化工具,能够创建**静态**、动态或交互式的**图表**。它被广泛应用于科学计算、数据分析、机器学习等领域。
**安装**
```java
pip install matplotlib
```
**导入方式**
```python
# 基本导入方式
import matplotlib.pyplot as plt
# 通常与 NumPy 一起使用
import numpy as np
# 设置中文显示的字体(黑体)
plt.rcParams['font.sans-serif'] = ['SimHei']
# 设置负号显示
plt.rcParams['axes.unicode_minus'] = False
```
### 32.2 基础绘制
**(1)创建第一个图表**
<img src="https://zh-1258460726.cos.ap-nanjing.myqcloud.com//typora-pic/image-20250514103838757.png" alt="image-20250514103838757" style="zoom: 33%;" />
```python
# 基本导入方式
import matplotlib.pyplot as plt
# 通常与 NumPy 一起使用
import numpy as np
# 设置中文显示的字体(黑体)
plt.rcParams['font.sans-serif'] = ['SimHei']
# 设置负号显示
plt.rcParams['axes.unicode_minus'] = False
# 准备数据
x = np.linspace(0,10,100)
y = np.sin(x)
# 创建图表
# 设置图表大小,宽8英寸 高4英寸
plt.figure(figsize=(8,4))
# 绘制折线图
plt.plot(x,y)
# 美化图表
# 展示图表
plt.show()
```
**(2)基本元素**
<img src="https://zh-1258460726.cos.ap-nanjing.myqcloud.com//typora-pic/image-20250514104039650.png" alt="image-20250514104039650" style="zoom: 25%;" />
```python
# 基本导入方式
import matplotlib.pyplot as plt
# 通常与 NumPy 一起使用
import numpy as np
# 设置中文显示的字体(黑体)
plt.rcParams['font.sans-serif'] = ['SimHei']
# 设置负号显示
plt.rcParams['axes.unicode_minus'] = False
# 准备数据
x = np.linspace(0, 10, 100)
y = np.sin(x)
# 创建图表
# 设置图表大小,宽8英寸 高4英寸
plt.figure(figsize=(8, 4))
# 绘制折线图
plt.plot(x, y, label="sin(x)",color="red") # label设置图例 但是此时还未显示
# 美化图表
plt.title("图表标题", fontsize=16)
plt.xlabel("X轴", fontsize=12)
plt.ylabel("Y轴", fontsize=12)
plt.xlim(0,5) # 设置x轴范围
plt.ylim(-1.5,1.5) # 设置y轴范围
plt.grid(True, linestyle="dashdot", alpha=0.5) # 背景网格
plt.legend(loc="lower right") # 设置图例的位置并显示
plt.text(1.5, 1.2,"峰值") # 指定坐标添加文本描述
plt.text(4.5, -1.1,"最小值")
# 展示图表
plt.show()
```
### 32.3 常用图表类型
**(1)折线图**
折线图是一种以折线的起伏变化来直观展示数据随时间或其他连续变量变化趋势的图表,它通过将数据点按照一定顺序连接成线,清晰地反映出数据的增减变化、发展趋势以及周期规律等信息。
<img src="https://zh-1258460726.cos.ap-nanjing.myqcloud.com//typora-pic/image-20250514104415116.png" alt="image-20250514104415116" style="zoom:25%;" />
```python
# 基本导入方式
import matplotlib.pyplot as plt
# 通常与 NumPy 一起使用
import numpy as np
# 设置中文显示的字体(黑体)
plt.rcParams['font.sans-serif'] = ['SimHei']
# 设置负号显示
plt.rcParams['axes.unicode_minus'] = False
# 准备数据
x = np.linspace(0, 10, 100)
y1 = np.sin(x)
y2 = np.cos(x)
# 创建图表
# 设置图表大小,宽10英寸 高6英寸
plt.figure(figsize=(10, 6))
# 绘制折线图
plt.plot(x, y1, label="sin(x)",color="blue", linewidth=2, linestyle="-")
plt.plot(x, y2, label="cos(x)",color="#F0F", linewidth=2, linestyle="--")
"""
#RGB Red Green Blue 三原色 三位组成 每一位是一个十六进制
#F00 纯红
#0F0 纯绿
#00F 纯蓝
"""
# 美化图表
plt.title("图表标题", fontsize=16)
plt.xlabel("X轴", fontsize=12)
plt.ylabel("Y轴", fontsize=12)
plt.grid(True, linestyle="--", alpha=0.5) # 背景网格
plt.legend(loc="upper right") # 设置图例的位置并显示
# 展示图表
plt.show()
```
**(2)散点图**
散点图是一种通过在坐标系中分布的点来展示两个变量之间关系的图表,它不强调数据的时间顺序或连续性,而是专注于呈现变量间的相关性、分布规律或异常值
<img src="https://zh-1258460726.cos.ap-nanjing.myqcloud.com//typora-pic/image-20250514104548638.png" alt="image-20250514104548638" style="zoom: 25%;" />
```python
# 基本导入方式
import matplotlib.pyplot as plt
# 通常与 NumPy 一起使用
import numpy as np
# 设置中文显示的字体(黑体)
plt.rcParams['font.sans-serif'] = ['SimHei']
# 设置负号显示
plt.rcParams['axes.unicode_minus'] = False
# 准备数据
np.random.seed(666)
x = np.random.rand(50) # 生成0~1之间的50个小数
y = np.random.rand(50)
sizes = np.random.rand(50) * 1000
colors = np.random.rand(50)
# 创建图表
# 设置图表大小,宽10英寸 高6英寸
plt.figure(figsize=(10, 6))
# 绘制散点图
# s 点的尺寸
# c 颜色的变化
# cmap 配色 颜色渐变
plt.scatter(x,y,s=sizes,alpha=0.5,c=colors,cmap="Reds")
# 美化图表
plt.title("图表标题", fontsize=16)
plt.xlabel("X轴", fontsize=12)
plt.ylabel("Y轴", fontsize=12)
plt.grid(True, linestyle="--", alpha=0.5) # 背景网格
plt.colorbar(label="人口分布")
# 展示图表
plt.show()
```
**(3)柱状图**
柱状图是一种以矩形(柱子)的高度或长度来直观展示不同类别数据大小、对比差异的图表,它通过柱子的物理尺寸差异,让观众快速理解各类别数据的数值高低和分布情况。
<img src="https://zh-1258460726.cos.ap-nanjing.myqcloud.com//typora-pic/image-20250514104647515.png" alt="image-20250514104647515" style="zoom:25%;" />
```python
import matplotlib.pyplot as plt
import numpy as np
plt.rcParams['font.sans-serif'] = ['SimHei']
plt.rcParams['axes.unicode_minus'] = False
# 准备数据
x = ['A','B','C','D','E']
y = [25,40,30,55,35]
# 创建图表
plt.figure(figsize=(10, 6))
# 绘制柱状图
plt.bar(x,y,label="销售数据", color="skyblue", width=0.6)
# 美化图表
plt.title("图表标题", fontsize=16)
plt.xlabel("X轴", fontsize=12)
plt.ylabel("Y轴", fontsize=12)
plt.legend(loc="upper left")
# 展示图表
plt.show()
```
**(4)分组柱状图**
分组柱状图是柱状图的一种重要变形,它通过在同一类别下并列展示多组数据柱子,实现对 “类别 + 组别” 二维数据的对比分析。这种图表既能清晰呈现不同类别的数值差异,又能直观对比同一类别下不同组别的数据关系
<img src="https://zh-1258460726.cos.ap-nanjing.myqcloud.com//typora-pic/image-20250514104732835.png" alt="image-20250514104732835" style="zoom:25%;" />
```python
import matplotlib.pyplot as plt
import numpy as np
plt.rcParams['font.sans-serif'] = ['SimHei']
plt.rcParams['axes.unicode_minus'] = False
# 准备数据
categories = ['A', 'B', 'C', 'D', 'E'] # X轴刻度显示文本
y1 = [25, 40, 30, 55, 35]
y2 = [30, 50, 25, 50, 40]
y3 = [20, 55, 60, 75, 10]
x = np.arange(len(categories))
print(x)
width = 0.2
# 创建图表
plt.figure(figsize=(16, 12))
# 绘制柱状图
plt.bar(x - width, y1, label="销售数据A", color="skyblue", width=width)
plt.bar(x, y2, label="销售数据B", color="red", width=width)
plt.bar(x + width, y3, label="销售数据C", color="yellow", width=width)
# 美化图表
plt.title("图表标题", fontsize=16)
plt.xlabel("X轴", fontsize=12)
plt.ylabel("Y轴", fontsize=12)
plt.legend(loc="upper left")
plt.xticks(x, categories)
# 展示图表
plt.show()
```
**(5)堆叠柱状图**
堆叠柱状图是柱状图的一种变体,它通过将同一类别下的多组数据 “堆叠” 成一根柱子,既能展示整体数值的大小,又能清晰呈现该类别下各组成部分的占比关系。这种图表将 “总量” 与 “细分” 结合,是分析 “整体与部分” 关系的高效可视化工具。
<img src="https://zh-1258460726.cos.ap-nanjing.myqcloud.com//typora-pic/image-20250514104834633.png" alt="image-20250514104834633" style="zoom:25%;" />
```python
import matplotlib.pyplot as plt
import numpy as np
plt.rcParams['font.sans-serif'] = ['SimHei']
plt.rcParams['axes.unicode_minus'] = False
# 准备数据
categories = ['A', 'B', 'C', 'D', 'E'] # X轴刻度显示文本
y1 = [25, 40, 30, 55, 35]
y2 = [30, 50, 25, 50, 40]
y3 = [20, 55, 60, 75, 10]
width = 0.4
# 创建图表
plt.figure(figsize=(12, 6))
# 绘制柱状图
plt.bar(categories, y1, label="销售数据A", color="red", width=width)
# bottom 将第2组数据的底部位置设置为第1组数据的顶部
plt.bar(categories, y2, bottom=y1,label="销售数据B", color="green", width=width)
# 第三层:底部位置设为前两层的总和(data1+data2)
plt.bar(categories, y3, bottom=np.add(y1,y2),label="销售数据C", color="blue", width=width)
# 美化图表
plt.title("图表标题", fontsize=16)
plt.xlabel("X轴", fontsize=12)
plt.ylabel("Y轴", fontsize=12)
plt.legend(loc="upper left")
# 展示图表
plt.show()
```
**(6)水平柱状图**
水平柱状图是柱状图的一种变体,其核心特点是将柱子的方向由垂直改为水平 ——横轴表示数值大小,纵轴表示类别名称,通过柱子的长度直观反映不同类别的数值差异。这种图表特别适合处理类别名称较长或类别数量较多的场景,能避免文字拥挤,提升可读性。
<img src="https://zh-1258460726.cos.ap-nanjing.myqcloud.com//typora-pic/image-20250514104955875.png" alt="image-20250514104955875" style="zoom:25%;" />
```python
import matplotlib.pyplot as plt
import numpy as np
plt.rcParams['font.sans-serif'] = ['SimHei']
plt.rcParams['axes.unicode_minus'] = False
# 准备数据
categories = ['A', 'B', 'C', 'D', 'E'] # X轴刻度显示文本
y1 = [25, 40, 30, 55, 35]
y2 = [30, 50, 25, 50, 40]
y3 = [20, 55, 60, 75, 10]
# 创建图表
plt.figure(figsize=(12, 6))
# 绘制柱状图
plt.barh(categories, y1, label="销售数据A", color="red",height=0.2)
# bottom 将第2组数据的底部位置设置为第1组数据的顶部
plt.barh(categories, y2, left=y1, label="销售数据B", color="green",height=0.2)
# 第三层:左部位置设为前两层的总和(data1+data2)
plt.barh(categories, y3, left=np.add(y1, y2), label="销售数据C", color="blue",height=0.2)
# 美化图表
plt.title("图表标题", fontsize=16)
plt.xlabel("X轴", fontsize=12)
plt.ylabel("Y轴", fontsize=12)
plt.legend(loc="upper right")
# 展示图表
plt.show()
```
**(7)直方图**
直方图是一种用于展示连续数据分布特征的统计图表,通过将数据分组并以矩形(“bins”,即 “区间”)的高度或面积表示每组数据的频数(或频率),直观呈现数据的集中趋势、离散程度和分布形态(如是否对称、是否有峰值等)。
<img src="https://zh-1258460726.cos.ap-nanjing.myqcloud.com//typora-pic/image-20250514105052664.png" alt="image-20250514105052664" style="zoom:25%;" />
```python
import matplotlib.pyplot as plt
import numpy as np
plt.rcParams['font.sans-serif'] = ['SimHei']
plt.rcParams['axes.unicode_minus'] = False
"""
生成1000个符合正态分布的随机数
normal:
loc 均值
scale 标准差
size 需要生成元素的个数
"""
data = np.random.normal(0, 1, 1000)
plt.figure(figsize=(10, 6))
"""
bins 划分区间的个数
"""
plt.hist(data, bins=30, color="yellow",edgecolor="red")
plt.title("直方图")
plt.xlabel("X轴")
plt.ylabel("Y轴")
plt.show()
```
**(8)多组直方图**
多组直方图是直方图的扩展形式,通过在同一图表中展示多组连续数据的分布形态,实现不同组别之间的分布特征对比。它保留了单组直方图对 “连续数据分布” 的展示优势,同时增加了 “组间差异” 的分析维度,是探索多组数据分布规律的高效工具。
<img src="https://zh-1258460726.cos.ap-nanjing.myqcloud.com//typora-pic/image-20250514105205953.png" alt="image-20250514105205953" style="zoom:25%;" />
```python
import matplotlib.pyplot as plt
import numpy as np
plt.rcParams['font.sans-serif'] = ['SimHei']
plt.rcParams['axes.unicode_minus'] = False
"""
生成1000个符合正态分布的随机数
normal:
loc 均值
scale 标准差
size 需要生成元素的个数
"""
data1 = np.random.normal(0, 1, 1000)
data2 = np.random.normal(3, 1.5, 1000)
plt.figure(figsize=(10, 6))
"""
bins 划分区间的个数
"""
plt.hist(data1, bins=30, color="yellow", edgecolor="red", alpha=0.5,label="数据A")
plt.hist(data2, bins=30, color="green", edgecolor="black", alpha=0.5,label="数据B")
plt.title("直方图")
plt.xlabel("X轴")
plt.ylabel("Y轴")
plt.legend()
plt.grid(True)
plt.show()
```
**(9)饼图**
饼图是一种以圆形为基础,通过分割成多个扇形(“切片”)来展示类别数据占比关系的图表。它的核心功能是直观呈现 “整体中各部分的相对比例”,适合展示分类数据的构成情况(如 “市场份额分布”“用户群体占比” 等)。
<img src="https://zh-1258460726.cos.ap-nanjing.myqcloud.com//typora-pic/image-20250514105259679.png" alt="image-20250514105259679" style="zoom:25%;" />
```python
import matplotlib.pyplot as plt
import numpy as np
plt.rcParams['font.sans-serif'] = ['SimHei']
plt.rcParams['axes.unicode_minus'] = False
labels = ['A', 'B', 'C', 'D', 'E']
sizes = [15, 30, 25, 10, 20]
explode = (0.1, 0, 0, 0, 0)
plt.figure(figsize=(10, 6))
"""
explode 用于设置每个扇形向外偏移量
autopct 显示百分比并设置显示内容
shadow 阴影
startangle 以某一个角度开始逆时针绘制
"""
plt.pie(sizes, labels=labels, explode=explode,autopct="%.1f%%",shadow=True,startangle=90)
plt.show()
```
**(10)环形图**
环形图是饼图的一种衍生形式,核心功能是通过空心圆环的扇形分割展示类别数据的占比关系。相比传统饼图,它在保留 “整体与部分” 比例展示能力的同时,视觉上更简洁、聚焦,且能通过中间空心区域传递额外信息
<img src="https://zh-1258460726.cos.ap-nanjing.myqcloud.com//typora-pic/image-20250514105341115.png" alt="image-20250514105341115" style="zoom:25%;" />
```python
import matplotlib.pyplot as plt
import numpy as np
plt.rcParams['font.sans-serif'] = ['SimHei']
plt.rcParams['axes.unicode_minus'] = False
labels = ['A', 'B', 'C', 'D', 'E']
sizes = [15, 30, 25, 10, 20]
explode = (0.1, 0, 0, 0, 0)
plt.figure(figsize=(10, 6))
"""
explode 用于设置每个扇形向外偏移量
autopct 显示百分比并设置显示内容
shadow 阴影
startangle 以某一个角度开始逆时针绘制
wedgeprops 设置环形 以半径的多少比例去扣圆
"""
plt.pie(sizes, labels=labels, explode=explode,autopct="%.1f%%",shadow=True,startangle=90,
wedgeprops=dict(width=0.2))
plt.show()
```
**(11)箱线图**
是一种用于展示数据分布特征的统计图表。它通过绘制数据的分位数、中位数、异常值等关键指标,简洁直观地呈现数据的集中趋势、离散程度、偏态分布等信息
<img src="https://zh-1258460726.cos.ap-nanjing.myqcloud.com//typora-pic/image-20250514105422237.png" alt="image-20250514105422237" style="zoom:25%;" />
```python
import matplotlib.pyplot as plt
import numpy as np
plt.rcParams['font.sans-serif'] = ['SimHei']
plt.rcParams['axes.unicode_minus'] = False
labels = ['A', 'B', 'C', 'D', 'E']
data = [np.random.normal(0, std, 1000) for std in range(1, 6)]
plt.figure(figsize=(10, 6))
plt.boxplot(data, tick_labels=labels)
plt.show()
```
**(12)小提琴图**
是一种用于展示数据分布的统计图表,结合了 箱线图 和 核密度估计 的特点,既能显示数据的整体分布形态(如对称性、峰值、多模态等),又能保留分位数等关键统计量。
<img src="https://zh-1258460726.cos.ap-nanjing.myqcloud.com//typora-pic/image-20250514105525216.png" alt="image-20250514105525216" style="zoom:25%;" />
```python
import matplotlib.pyplot as plt
import numpy as np
plt.rcParams['font.sans-serif'] = ['SimHei']
plt.rcParams['axes.unicode_minus'] = False
labels = ['A', 'B', 'C', 'D', 'E']
data = [np.random.normal(0, std, 1000) for std in range(1, 6)]
plt.figure(figsize=(10, 6))
"""
showmeans 展示平均值
showmedians 展示中间值
"""
plt.violinplot(data,showmeans=True,showmedians=True)
plt.grid(True)
plt.show()
```
**(13)面积图**
是一种以面积为视觉元素展示数据变化趋势的统计图表,通常由折线图和坐标轴围成的区域填充颜色或图案构成。它不仅能清晰反映数据的增减趋势,还能通过面积大小直观展示数据的累积效应或部分与整体的关系
<img src="https://zh-1258460726.cos.ap-nanjing.myqcloud.com//typora-pic/image-20250514105633507.png" alt="image-20250514105633507" style="zoom:25%;" />
```python
import matplotlib.pyplot as plt
import numpy as np
plt.rcParams['font.sans-serif'] = ['SimHei']
plt.rcParams['axes.unicode_minus'] = False
x = np.arange(0, 10, 0.1)
y1 = np.sin(x)
y2 = np.cos(x)
plt.figure(figsize=(10, 6))
plt.fill_between(x, y1, alpha=0.5, color="blue")
plt.fill_between(x, y2, alpha=0.5, color="orange")
plt.show()
```
**(14)堆叠面积图**
是面积图的一种重要变种,核心特点是将多个数据系列层层堆叠在同一坐标系中,通过总面积和各层面积的变化,直观展示总量与分量的关系、各分量的绝对数值变化以及它们对总量的贡献。它尤其适合分析多变量随时间或类别变化的累积效应
<img src="https://zh-1258460726.cos.ap-nanjing.myqcloud.com//typora-pic/image-20250514105726953.png" alt="image-20250514105726953" style="zoom:25%;" />
```python
import matplotlib.pyplot as plt
import numpy as np
plt.rcParams['font.sans-serif'] = ['SimHei']
plt.rcParams['axes.unicode_minus'] = False
x = np.arange(0, 10, 0.1)
y1 = np.abs(np.sin(x))
y2 = np.abs(np.cos(x))
plt.figure(figsize=(10, 6))
plt.fill_between(x, 0, y1, alpha=0.5, color="blue")
plt.fill_between(x, y1, y1 + y2, alpha=0.5, color="orange")
plt.show()
```
**(15)热力图**
是一种通过颜色深浅或明暗变化来直观展示数据分布、密度或相关性的可视化工具。它将数据值映射为颜色矩阵,使复杂的数据模式(如热点区域、异常值、趋势或集群)一目了然
<img src="https://zh-1258460726.cos.ap-nanjing.myqcloud.com//typora-pic/image-20250514105808310.png" alt="image-20250514105808310" style="zoom:25%;" />
```python
import matplotlib.pyplot as plt
import numpy as np
plt.rcParams['font.sans-serif'] = ['SimHei']
plt.rcParams['axes.unicode_minus'] = False
# 创建一个10×10的矩阵 每一个元素取值范围为[0,1)之间的小数
data = np.random.rand(10,10)
plt.figure(figsize=(10, 6))
"""
cmap 颜色映射 渐变
interpolation 颜色插值 默认nearest 高斯模糊 gaussian
"""
plt.imshow(data, cmap="hot", interpolation="gaussian")
# 修改一下刻度
plt.xticks(np.arange(10))
plt.yticks(np.arange(10))
plt.colorbar(label="温度")
plt.show()
```
**(16)等高线图**
是一种用于可视化二维标量场数据的图表,通过绘制一系列等值线(等高线)来展示数据的分布、变化趋势和空间关系。
<img src="https://zh-1258460726.cos.ap-nanjing.myqcloud.com//typora-pic/image-20250514105858397.png" alt="image-20250514105858397" style="zoom:25%;" />
```python
import matplotlib.pyplot as plt
import numpy as np
plt.rcParams['font.sans-serif'] = ['SimHei']
plt.rcParams['axes.unicode_minus'] = False
x = np.linspace(-3, 3, 100)
y = np.linspace(-3, 3, 100)
# 将x-y一维数据组成一个三维中的平面二维数据
X, Y = np.meshgrid(x, y)
# 三维中的高度数据
Z = np.sin(X) * np.sin(Y)
plt.figure(figsize=(10, 6))
# contour 等高线图表对象
contour = plt.contour(X, Y, Z, 20, cmap='hot')
# 设置等高线上的标签
plt.clabel(contour, inline=True, fontsize=8)
plt.colorbar(label="高度")
plt.show()
```
**(17)3D图表**
<img src="https://zh-1258460726.cos.ap-nanjing.myqcloud.com//typora-pic/image-20250514110109511.png" alt="image-20250514110109511" style="zoom:25%;" />
```python
import matplotlib.pyplot as plt
import numpy as np
plt.rcParams['font.sans-serif'] = ['SimHei']
plt.rcParams['axes.unicode_minus'] = False
x = np.linspace(-5, 5, 50)
y = np.linspace(-5, 5, 50)
X, Y = np.meshgrid(x, y)
Z = np.sin(np.cos(X ** 2 + Y ** 2))
# 窗口对象
fig = plt.figure(figsize=(12,8))
# 给窗口对象中添加一个子图
"""
111 nrows=1 ncols=1 index=1
221 nrows=2 ncols=2 index=1 2行2列 将子图放置在第1个格子
projection="3d" 表示该子图为一个3D图形
"""
ax = fig.add_subplot(111, projection="3d")
# 图表对象
surf = ax.plot_surface(X,Y,Z, cmap="hot", edgecolor="none")
# 添加颜色条
"""
shrink 将颜色条进行缩小高度
aspect 设置颜色条宽高比
"""
fig.colorbar(surf, ax=ax, shrink=0.5, aspect=5, label="高度")
ax.set_title("墨西哥草帽")
ax.set_xlabel("X轴")
ax.set_ylabel("Y轴")
ax.set_zlabel("Z轴")
plt.show()
```
**(18)极坐标图**
是一种用极坐标系展示数据的图表类型,适合呈现与角度和 距离(半径)相关的规律,例如周期性变化、方向分布、径向数据对比等。它通过极径(半径)和极角(角度)两个变量来定位数据点,将平面划分为不同角度的扇形区域,用半径长度表示数据大小。
<img src="https://zh-1258460726.cos.ap-nanjing.myqcloud.com//typora-pic/image-20250514110158508.png" alt="image-20250514110158508" style="zoom:25%;" />
```python
import matplotlib.pyplot as plt
import numpy as np
plt.rcParams['font.sans-serif'] = ['SimHei']
plt.rcParams['axes.unicode_minus'] = False
# 极角数据 X轴
theta = np.linspace(0, 2 * np.pi, 500)
# 极径数据 Y轴
r = np.abs(np.sin(5 * theta) * np.cos(2 * theta))
# r = np.sin(theta)
plt.figure(figsize=(8,8))
# polar 标记子图为极坐标系
ax = plt.subplot(111, projection="polar")
ax.plot(theta,r)
plt.show()
```
**(19)雷达图**
雷达图,也叫蜘蛛图、星图,是一种以多维度数据为核心,通过从同一点出发的多条坐标轴(射线)展示数据分布的图表。它能直观呈现 “多个指标在同一对象上的表现” 或 “同一指标在多个对象上的差异”,尤其适合对比分析 “综合能力”“多维度特征” 等场景。
<img src="https://zh-1258460726.cos.ap-nanjing.myqcloud.com//typora-pic/image-20250514112808548.png" alt="image-20250514112808548" style="zoom:25%;" />
```python
import matplotlib.pyplot as plt
import numpy as np
plt.rcParams['font.sans-serif'] = ['SimHei']
plt.rcParams['axes.unicode_minus'] = False
categories = ['A', 'B', 'C', 'D', 'E', 'F']
values = [4, 3, 5, 2, 4, 5]
# 需要按照标签的个数,给每一个标签对应一个弧度值
# endpoint 确保6个类别均匀分布在360度的圆上 每个间隔60度
# 把np数组转为列表list
angles = np.linspace(0, 2 * np.pi, len(categories), endpoint=False).tolist()
# 确保首尾相连 闭合
values += values[:1]
angles += angles[:1]
plt.figure(figsize=(8, 8))
# polar=True 也表示创建极坐标系
ax = plt.subplot(111, polar=True)
ax.plot(angles, values, "o-", linewidth=2)
ax.fill(angles, values, alpha=0.25)
# 修改雷达图-极坐标的刻度
ax.set_thetagrids(np.degrees(angles[:-1]),categories)
ax.set_ylim(0,6)
plt.show()
```
### 32.4 图表美化与样式设置
**(1)线条颜色和样式**
<img src="https://zh-1258460726.cos.ap-nanjing.myqcloud.com//typora-pic/image-20250514110309054.png" alt="image-20250514110309054" style="zoom:25%;" />
```python
import matplotlib.pyplot as plt
import numpy as np
plt.rcParams['font.sans-serif'] = ['SimHei']
plt.rcParams['axes.unicode_minus'] = False
x = np.linspace(0, 10, 100)
y1 = np.sin(x)
y2 = np.cos(x)
y3 = np.sin(x) * np.cos(x)
plt.figure(figsize=(12, 6))
plt.plot(x,y1,label="data1",linewidth=1,marker="o",markevery=10,markersize=8)
plt.plot(x,y2,'bo',label="data2")
plt.plot(x,y3,"r:",label="data3")
plt.legend()
plt.show()
```
**(2)添加图例**
<img src="https://zh-1258460726.cos.ap-nanjing.myqcloud.com//typora-pic/image-20250514110834720.png" alt="image-20250514110834720" style="zoom:25%;" />
```python
import matplotlib.pyplot as plt
import numpy as np
plt.rcParams['font.sans-serif'] = ['SimHei']
plt.rcParams['axes.unicode_minus'] = False
x = np.linspace(0, 10, 100)
y1 = np.sin(x)
y2 = np.cos(x)
y3 = np.sin(x) * np.cos(x)
plt.figure(figsize=(12, 6))
plt.plot(x,y1,label="data1",linewidth=1,marker="o",markevery=10,markersize=8)
plt.plot(x,y2,'bo',label="data2")
plt.plot(x,y3,"r:",label="data3")
# frameon 控制是否显示图例的边框 默认是打开的
# facecolor 图例的背景颜色 前提是有边框
# edgecolor 图例的边框颜色
plt.legend(loc="lower left", fontsize=18, frameon=True, facecolor="#123", edgecolor="red")
plt.show()
```
**(3)自定义刻度**
<img src="https://zh-1258460726.cos.ap-nanjing.myqcloud.com//typora-pic/image-20250514110906917.png" alt="image-20250514110906917" style="zoom:25%;" />
```python
import matplotlib.pyplot as plt
import numpy as np
plt.rcParams['font.sans-serif'] = ['SimHei']
plt.rcParams['axes.unicode_minus'] = False
x = np.linspace(0, 10, 100)
y1 = np.sin(x)
y2 = np.cos(x)
y3 = np.sin(x) * np.cos(x)
plt.figure(figsize=(12, 6))
plt.plot(x,y1,label="data1",linewidth=1,marker="o",markevery=10,markersize=8)
plt.plot(x,y2,'bo',label="data2")
plt.plot(x,y3,"r:",label="data3")
# frameon 控制是否显示图例的边框 默认是打开的
# facecolor 图例的背景颜色 前提是有边框
# edgecolor 图例的边框颜色
plt.legend(loc="lower left", fontsize=18, frameon=True, facecolor="#123", edgecolor="red")
# 修改刻度
# 原本在X轴上的数据点集合 -> 更换为我们指定的标签组
plt.xticks([0, np.pi/2, 3*np.pi/2, 2*np.pi], ['0','π/2',"3π/2","2π"])
plt.yticks([-1,0,1],["最小值","零值","最大值"])
plt.show()
```
**(4)双Y轴图表**
<img src="https://zh-1258460726.cos.ap-nanjing.myqcloud.com//typora-pic/image-20250514110946766.png" alt="image-20250514110946766" style="zoom:25%;" />
```python
import matplotlib.pyplot as plt
import numpy as np
plt.rcParams['font.sans-serif'] = ['SimHei']
plt.rcParams['axes.unicode_minus'] = False
x = np.linspace(0, 10, 100)
y1 = np.sin(x)
y2 = x ** 2
# 创建一个包含一个子图ax1的窗口对象fig 窗口大小10*6
fig, ax1 = plt.subplots(figsize=(10,6))
ax1.plot(x, y1, color="red")
ax1.set_xlabel("X轴")
ax1.set_ylabel("sin(x)")
# 修改y轴的颜色为red
ax1.tick_params(axis="y", labelcolor="red")
ax2 = ax1.twinx() # 创建了与ax1子图共享y轴的次坐标轴
ax2.plot(x, y2, color="blue")
ax2.set_ylabel("x^2")
# 修改y轴的颜色为red
ax2.tick_params(axis="y", labelcolor="blue")
plt.show()
```
### 32.5 多子图与布局
**(1)基本子图**
<img src="https://zh-1258460726.cos.ap-nanjing.myqcloud.com//typora-pic/image-20250514111125171.png" alt="image-20250514111125171" style="zoom:25%;" />
```python
import matplotlib.pyplot as plt
import numpy as np
plt.rcParams['font.sans-serif'] = ['SimHei']
plt.rcParams['axes.unicode_minus'] = False
x = np.linspace(1,10,100)
plt.figure(figsize=(12,8))
"""
把窗口fig 分成一个2×2的网格 在第1位
1 2
3 4
"""
plt.subplot(2,2,1)
plt.plot(x,np.sin(x))
plt.title("子图1")
plt.subplot(2,2,2)
plt.scatter(x,np.random.rand(100),np.random.rand(100))
plt.title("子图2")
plt.subplot(2,2,3)
plt.bar(range(5),np.random.rand(5))
plt.title("子图3")
plt.subplot(2,2,4)
plt.hist(np.random.randn(1000),bins=20)
plt.title("子图4")
plt.show()
```
**(2)使用 plt.subplots**
<img src="https://zh-1258460726.cos.ap-nanjing.myqcloud.com//typora-pic/image-20250514111218115.png" alt="image-20250514111218115" style="zoom:25%;" />
```python
import matplotlib.pyplot as plt
import numpy as np
plt.rcParams['font.sans-serif'] = ['SimHei']
plt.rcParams['axes.unicode_minus'] = False
x = np.linspace(1,10,100)
# 将fig窗口划分为了2*2个格子 返回fig窗口对象 返回axs格子对象
fig, axs = plt.subplots(2,2,figsize=(12,8))
axs[0,0].plot(x,np.sin(x))
axs[0,0].set_title("子图1")
axs[1,0].scatter(x,np.random.rand(100),np.random.rand(100))
axs[1,0].set_title("子图3")
plt.show()
```
**(3)不规则子图布局**
<img src="https://zh-1258460726.cos.ap-nanjing.myqcloud.com//typora-pic/image-20250514111329122.png" alt="image-20250514111329122" style="zoom:25%;" />
```python
import matplotlib.pyplot as plt
import numpy as np
plt.rcParams['font.sans-serif'] = ['SimHei']
plt.rcParams['axes.unicode_minus'] = False
x = np.linspace(1, 10, 100)
plt.figure(figsize=(12, 8))
# 对于子图的合并 需要另外一个包
import matplotlib.gridspec as gridspec
gs = gridspec.GridSpec(3, 3)
ax1 = plt.subplot(gs[0, :]) # 第1行全部
ax2 = plt.subplot(gs[1, :-1]) # 第2行 前2列
ax3 = plt.subplot(gs[1:,-1]) # 第2-3行 最后1列
ax4 = plt.subplot(gs[2,0])
ax5 = plt.subplot(gs[2,1])
ax1.plot(x,np.sin(x))
ax1.set_title("子图1")
ax3.scatter(x,np.random.rand(100),np.random.rand(100))
ax3.set_title("子图3")
plt.show()
```
**(4)子图共享轴**
<img src="https://zh-1258460726.cos.ap-nanjing.myqcloud.com//typora-pic/image-20250514111429157.png" alt="image-20250514111429157" style="zoom:25%;" />
```python
import matplotlib.pyplot as plt
import numpy as np
plt.rcParams['font.sans-serif'] = ['SimHei']
plt.rcParams['axes.unicode_minus'] = False
x = np.linspace(1, 10, 100)
fig, (ax1, ax2) = plt.subplots(2, 1, figsize=(10, 8), sharex=True)
ax1.plot(x,np.sin(x))
ax1.set_title("子图1")
ax2.scatter(x,np.random.rand(100),np.random.rand(100))
ax2.set_title("子图2")
ax2.set_xlabel("X轴")
plt.show()
```
### 32.6 案例:数据分析可视化
```python
import matplotlib.pyplot as plt
import numpy as np
# 设置中文显示
plt.rcParams['font.sans-serif'] = ['SimHei'] # 用来正常显示中文标签
plt.rcParams['axes.unicode_minus'] = False # 用来正常显示负号
# 生成模拟数据
np.random.seed(42)
years = np.arange(2010, 2023)
sales_a = np.random.randint(100, 200, size=len(years)) + np.arange(len(years)) * 5
sales_b = np.random.randint(80, 150, size=len(years)) + np.arange(len(years)) * 3
profit_margin = np.random.uniform(0.1, 0.3, size=len(years))
# 创建多子图
fig, (ax1, ax2, ax3) = plt.subplots(3, 1, figsize=(12, 15), sharex=True)
# 第一个子图:销售额折线图
ax1.plot(years, sales_a, 'o-', color='blue', linewidth=2, label='产品A')
ax1.plot(years, sales_b, 's--', color='red', linewidth=2, label='产品B')
ax1.set_title('年度销售额趋势', fontsize=14)
ax1.set_ylabel('销售额 (万元)', fontsize=12)
ax1.grid(True, linestyle='--', alpha=0.7)
ax1.legend()
# 第二个子图:销售额差异柱状图
ax2.bar(years, sales_a - sales_b, color='purple')
ax2.axhline(y=0, color='black', linestyle='-', alpha=0.3)
ax2.set_title('产品A与产品B销售额差异', fontsize=14)
ax2.set_ylabel('差异 (万元)', fontsize=12)
ax2.grid(True, linestyle='--', alpha=0.7)
# 第三个子图:利润率散点图
scatter = ax3.scatter(years, profit_margin, c=profit_margin, s=profit_margin*500,
cmap='viridis', alpha=0.7)
ax3.set_title('年度利润率', fontsize=14)
ax3.set_xlabel('年份', fontsize=12)
ax3.set_ylabel('利润率', fontsize=12)
ax3.grid(True, linestyle='--', alpha=0.7)
plt.colorbar(scatter, ax=ax3, label='利润率')
plt.tight_layout()
plt.show()
```
### 32.7 案例:股票数据可视化
```python
import matplotlib.pyplot as plt
import numpy as np
# 设置中文显示
plt.rcParams['font.sans-serif'] = ['SimHei'] # 用来正常显示中文标签
plt.rcParams['axes.unicode_minus'] = False # 用来正常显示负号
import matplotlib.dates as mdates
from datetime import datetime, timedelta
# 生成模拟股票数据
np.random.seed(42)
start_date = datetime(2022, 1, 1)
dates = [start_date + timedelta(days=i) for i in range(100)]
price = 100 + np.cumsum(np.random.normal(0, 1, 100))
volume = np.random.randint(1000, 5000, 100)
# 创建图表
fig, (ax1, ax2) = plt.subplots(2, 1, figsize=(12, 8), sharex=True,
gridspec_kw={'height_ratios': [3, 1]})
# 绘制股票价格
ax1.plot(dates, price, 'b-', linewidth=1.5)
ax1.set_title('股票价格与交易量', fontsize=16)
ax1.set_ylabel('价格', fontsize=12)
ax1.grid(True, linestyle='--', alpha=0.7)
# 添加移动平均线
window = 5
ma = np.convolve(price, np.ones(window)/window, mode='valid')
ma_dates = dates[window-1:]
ax1.plot(ma_dates, ma, 'r-', linewidth=1.5, label=f'{window}日移动平均线')
ax1.legend()
# 绘制交易量
ax2.bar(dates, volume, color='g', alpha=0.5)
ax2.set_ylabel('交易量', fontsize=12)
ax2.set_xlabel('日期', fontsize=12)
ax2.grid(True, linestyle='--', alpha=0.7)
# 格式化日期
date_format = mdates.DateFormatter('%Y-%m-%d')
ax2.xaxis.set_major_formatter(date_format)
ax2.xaxis.set_major_locator(mdates.WeekdayLocator(interval=2))
plt.xticks(rotation=45)
plt.tight_layout()
plt.show()
```
### 32.8 案例:科学数据可视化
```java
import matplotlib.pyplot as plt
import numpy as np
plt.rcParams['font.sans-serif'] = ['SimHei']
plt.rcParams['axes.unicode_minus'] = False
# 创建数据
x = np.linspace(-5, 5, 50)
y = np.linspace(-5, 5, 50)
X, Y = np.meshgrid(x, y)
Z1 = np.sin(np.sqrt(X**2 + Y**2))
Z2 = np.cos(np.sqrt(X**2 + Y**2))
# 创建图表
fig = plt.figure(figsize=(15, 10))
# 3D曲面图
ax1 = fig.add_subplot(221, projection='3d')
surf1 = ax1.plot_surface(X, Y, Z1, cmap='viridis', edgecolor='none', alpha=0.8)
ax1.set_title('3D曲面图 - sin(r)')
ax1.set_xlabel('X轴')
ax1.set_ylabel('Y轴')
ax1.set_zlabel('Z轴')
# 等高线图
ax2 = fig.add_subplot(222)
contour = ax2.contourf(X, Y, Z1, 20, cmap='viridis')
plt.colorbar(contour, ax=ax2, label='高度')
ax2.set_title('等高线图 - sin(r)')
ax2.set_xlabel('X轴')
ax2.set_ylabel('Y轴')
# 3D曲面图 - 第二个函数
ax3 = fig.add_subplot(223, projection='3d')
surf2 = ax3.plot_surface(X, Y, Z2, cmap='plasma', edgecolor='none', alpha=0.8)
ax3.set_title('3D曲面图 - cos(r)')
ax3.set_xlabel('X轴')
ax3.set_ylabel('Y轴')
ax3.set_zlabel('Z轴')
# 等高线图 - 第二个函数
ax4 = fig.add_subplot(224)
contour = ax4.contourf(X, Y, Z2, 20, cmap='plasma')
plt.colorbar(contour, ax=ax4, label='高度')
ax4.set_title('等高线图 - cos(r)')
ax4.set_xlabel('X轴')
ax4.set_ylabel('Y轴')
plt.tight_layout()
plt.show()
```
### 32.9 案例:时间序列数据可视化
```python
import matplotlib.pyplot as plt
import numpy as np
# 设置中文显示
plt.rcParams['font.sans-serif'] = ['SimHei'] # 用来正常显示中文标签
plt.rcParams['axes.unicode_minus'] = False # 用来正常显示负号
import matplotlib.dates as mdates
from datetime import datetime, timedelta
# 生成时间序列数据
np.random.seed(42)
start_date = datetime(2022, 1, 1)
dates = [start_date + timedelta(days=i) for i in range(365)]
temp = 20 + 10 * np.sin(np.arange(365) * 2 * np.pi / 365) + np.random.normal(0, 2, 365)
precip = np.random.exponential(5, 365) * (1 + 0.5 * np.sin(np.arange(365) * 2 * np.pi / 365))
# 创建图表
fig, (ax1, ax2) = plt.subplots(2, 1, figsize=(12, 8), sharex=True)
# 绘制温度曲线
ax1.plot(dates, temp, 'r-', linewidth=1, alpha=0.7)
ax1.set_ylabel('温度 (°C)', fontsize=12)
ax1.set_title('全年温度和降水量', fontsize=16)
ax1.grid(True, linestyle='--', alpha=0.7)
# 计算并绘制移动平均线
window = 30
temp_ma = np.convolve(temp, np.ones(window)/window, mode='valid')
ma_dates = dates[window-1:]
ax1.plot(ma_dates, temp_ma, 'b-', linewidth=2, label=f'{window}天移动平均')
ax1.legend()
# 绘制降水量柱状图
ax2.bar(dates, precip, color='skyblue', alpha=0.7, width=1)
ax2.set_ylabel('降水量 (mm)', fontsize=12)
ax2.set_xlabel('日期', fontsize=12)
ax2.grid(True, linestyle='--', alpha=0.7)
# 格式化日期
date_format = mdates.DateFormatter('%Y-%m')
ax2.xaxis.set_major_formatter(date_format)
ax2.xaxis.set_major_locator(mdates.MonthLocator())
plt.tight_layout()
plt.show()
```
# 第三章 高级阶段
## 第33节课 文件IO
在编程中,文件 I(input)/O(output)(输入/输出)允许程序与外部文件进行数据交互。Python 提供了丰富且易用的文件 I/O 操作方法,能让开发者轻松实现文件的读取、写入和修改等操作。
**IO交互方向**
- 从硬盘文件 -> 读取数据 -> 内存(程序): 输入流 Input
- 内存(程序)-> 写入数据 -> 硬盘文件:输出流 Output
**文件类型基础**
任何操作系统中根据文件中内容的组成方式,通常将文件区分为两种类型:
- **字符类文件**:内容数据底层通过字符组成;校验方式-使用记事本打开文件不会出现乱码!
- 任何编程语言编写的源代码、各种文本配置文件、记事本文档、CSV文件、JSON文件、MD格式文件等
- **字节类文件**:内容数据底层通过字节/二进制组成;校验方式-使用记事本打开文件会出现乱码!
- 图片、音频、视频、可执行文件、压缩文件、ppt、word、excel等
> 说到底,在计算机中,所有的文件在硬盘上存储的时候,其实本质上都是字节文件
>
> 所谓的字符文件:字节文件 + 编码表 = 字符文件
- 字符输入流 字符输出流
- 字节输入流 字节输出流
### 33.1 文件打开与关闭
文件操作的第一步是打开文件,最后一步是关闭文件。
**(1)打开文件**
在 Python 中,使用 `open()` 函数来打开文件,其基本语法如下:
```python
file_object = open(file_path, mode, encoding=None)
```
主要参数说明:
- `file_path`:文件的路径,可以是绝对路径或相对路径。
- `mode`:文件的打开模式,常见的模式有:
- `'r'`:只读模式,文件必须存在(默认模式)。【字符输入流】
- `'w'`:写入模式,若文件不存在则创建,若存在则清空原有内容。【字符输出流】
- `'a'`:追加模式,若文件不存在则创建,若存在则在文件末尾追加内容。【字符输出流】
- `'x'`:独占创建模式,若文件已存在则失败。
- `'rb'`:二进制只读模式。【字节输入流】
- `'wb'`:二进制写入模式。【字节输出流】
- `'ab'`:二进制追加模式。
- `'r+'`:读写模式,文件必须存在。
- `'w+'`:读写模式,若文件不存在则创建,若存在则清空原有内容。
- `'a+'`:读写模式,若文件不存在则创建,若存在则在文件末尾追加内容。
- `encoding`:指定文件的编码方式(**针对字符文件**),常见的编码方式有:
- `'utf-8'`:Unicode编码,支持多语言字符(推荐使用)。
- `'gbk'`:中文编码,主要用于简体中文。
- `'ascii'`:ASCII编码,仅支持英文字符。
- `'latin-1'`:西欧语言编码。
在处理文本文件时,建议明确指定编码方式,避免出现编码错误。
**(2)关闭文件**
文件使用完毕后,需要调用 `close()` 方法关闭文件,以释放系统资源。不关闭文件可能导致资源泄漏和数据丢失。示例代码如下:
```python
file = open("README.md","r",encoding="utf-8")
# 文件的操作
file.close()
```
**(3)使用with语句(上下文管理器)**
为了避免忘记关闭文件或异常发生时文件未关闭的情况,推荐使用 `with` 语句(上下文管理器),它会在代码块执行完毕后自动关闭文件,即使发生异常也能确保文件被正确关闭:
```python
with open("README.md","r",encoding="utf-8") as file:
# 文件的操作
pass
```
**(4)同时操作多个文件**
`with`语句也支持同时打开多个文件:
```python
with open("README.md","r",encoding="utf-8") as file1, open("haha.md",'w', encoding="utf-8") as file2:
# 文件的操作
pass
```
### 33.2 文件读取
文件读取是文件操作中最常见的任务之一。Python提供了多种方法来读取文件内容,从整个文件一次性读取到逐行处理,满足不同的需求场景。
**(1)读取整个文件内容**
使用 `read()` 方法可以一次性读取整个文件的内容,适用于处理小型文件:
```python
with open("README.md","r",encoding="utf-8") as file:
# 一次性去读全部内容
text = file.read()
print(text)
```
也可以通过指定参数来读取指定字节/字符数:
```python
with open("测试数据/haha.txt","r",encoding="utf-8") as file:
# 从头开始 读取10个字符
text = file.read(10)
print(text)
# 接着上一个位置 继续读取10个字符
text = file.read(10)
print(text)
# 接着上一个位置 继续读取10个字符
text = file.read(10)
print(text)
# 接着上一个位置 继续读取10个字符
text = file.read(10) # 最后一次不一定满足10个字符
print(text)
# FileNotFoundError: [Errno 2] No such file or directory: '测试数据/xixi.txt'
# with open("测试数据/xixi.txt","r",encoding="utf-8") as file:
file = open("测试数据/haha.txt","r",encoding="utf-8")
print(file.read(10))
print(file.read(10))
print(file.read(10))
print(file.read(10))
print(file.read(10) == "")
# 如果文件已经读取完毕 返回空串""
# 关于二进制文件的读取问题
# UnicodeDecodeError: 'utf-8' codec can't decode byte 0x89 in position 0: invalid start byte
# 不能将一个二进制文件已字符的形式进行读取
# file = open("测试数据/dilireba.png","r", encoding="utf-8")
# print(file.read(10))
file = open("测试数据/dilireba.png","rb")
print(file.read())
# print(file.read(10)) # 从头开始读取10个字节
# print(file.read(10)) # 从头开始读取10个字节
```
**(2)逐行读取文件内容**
可以使用 `readline()` 方法逐行读取文件内容,适用于按行处理字符文件:
```python
file = open("测试数据/haha.txt","r",encoding="utf-8")
# print(file.readline())
# print(file.readline())
# print(file.readline())
line = file.readline()
while line:
print(line)
line = file.readline()
# 另外一种方式
```
也可以使用 `for` 循环逐行读取文件内容,这种方式更简洁且内存效率更高,推荐使用:
```python
file = open("测试数据/haha.txt","r",encoding="utf-8")
for line in file:
print(line)
```
**(3)读取多行内容**
使用 `readlines()` 方法可以将文件的每一行作为一个元素存储在列表中,适用于需要随机访问行的场景:
```python
file = open("测试数据/haha.txt","r",encoding="utf-8")
lines = file.readlines()
print(lines)
print(lines[1])
```
**(4)大文件处理技巧**
处理大文件时,应避免一次性将整个文件读入内存,而应采用逐行或分块读取的方式:
```python
# 一般针对大型字符文件使用 分块-> 行
file = open("测试数据/pride-and-prejudice.txt","r",encoding="utf-8")
lines = iter(file.readlines())
print(lines)
for line in lines:
print(line)
# 一般用作于读取二进制文件使用
# file 被读取的文件
# chunk 指定去取的分块大小
# 由于该函数存在yield关键字 那么该函数为一个迭代器函数 返回一个迭代器
def read_in_chunks(file, chunk):
with open(file, 'rb') as file:
while True:
block = file.read(chunk)
if not block:
break
yield block # 返回block -> 给迭代器
count = 0
for block in read_in_chunks("F:\\系统镜像\\CentOS-7-x86_64-DVD-1810.iso", 1024 * 1024 * 500): #500mb
count += 1
print(f"第{count}次读取")
print(block)
print(count)
```
### 33.3 文件写入
文件写入是程序将数据持久化存储的重要方式。Python提供了多种方法来写入文件,包括覆盖写入、追加写入和按行写入等。
**(1)写入文件**
使用 `write()` 方法可以向文件中写入内容,示例代码如下:
```python
# w 文件不存在则创建 存在则覆盖
file = open("测试数据/xixi.txt",'w',encoding="utf-8")
file.write("Hello")
file.close()
```
**(2)追加写入文件**
使用 `a` 模式打开文件,然后使用 `write()` 方法可以在文件末尾追加内容,示例代码如下:
```python
# a 文件不存在则创建 存在则追加
file = open("测试数据/xixi.txt",'a',encoding="utf-8")
file.write("Hello")
file.close()
```
**(3)写入多行内容**
使用 `writelines()` 方法可以一次性写入多行内容,但需要注意该方法不会自动添加换行符:
```python
# a 文件不存在则创建 存在则追加
file = open("测试数据/xixi.txt",'a',encoding="utf-8")
texts = ['Hello World\n',"Hello Python\n","Hello bro\n"]
file.writelines(texts)
```
**(4)格式化写入**
结合字符串格式化功能,可以更灵活地写入内容:
```python
with open("测试数据/九九乘法表.txt", "w", encoding="utf-8") as file:
for i in range(1, 10):
for j in range(1, i + 1):
file.write(f"{i} × {j} = {i * j}\t")
file.write("\n")
```
**(5)文件写入的实际应用场景**
简易日志记录器:
```python
import datetime
def log_message(message):
timestamp = datetime.datetime.now().strftime("%Y-%m-%d %H:%M:%S")
log_item = f"{timestamp}:{message}\n"
with open("测试数据/log.txt","a",encoding="utf-8") as file:
file.write(log_item)
log_message("原神启动!")
log_message("来两发648")
log_message("抽卡,一个都用不了")
log_message("卸载 拜拜!")
```
### 33.4 二进制文件操作
除了文本文件,Python 还可以处理二进制文件,如图片、音频、视频等。在操作二进制文件时,需要使用二进制模式(`'rb'`、`'wb'`、`'ab'` 等)。二进制模式下,Python不会对数据进行任何转换,而是按原始字节处理。
**(1)读取二进制文件**
读取二进制文件时,返回的是字节对象(bytes),而不是字符串:
**(2)写入二进制文件**
写入二进制文件时,必须提供字节对象,而不是字符串:
```python
# 简单的二进制文件复制
with open("测试数据/dilireba.png", "rb") as file1, open("测试数据/dilireba2.png", "wb") as file2:
file2.write(file1.read())
# 字符文件用字节流操作
with open("测试数据/haha.txt", "rb") as file1, open("测试数据/xixi.txt", "wb") as file2:
bts = file1.read() #读的是字节序列
print(bts)
text = bts.decode("utf-8")
print(text)
# file2.write(text.encode("utf-8"))
file2.write(bts)#写的也必须是字节序列
```
**(3)分块处理大型二进制文件**
处理大型二进制文件时,应避免一次性将整个文件读入内存:
```python
# 复制一个大的二进制文件
def copy_big_binary_file(source, target, chunk):
total = 0
with open(source,'rb') as file1:
with open(target, "wb") as file2:
while True:
block = file1.read(chunk)
if not block:
break
total += len(block)
file2.write(block)
print(f"写入了{total}字节")
source = "F:\\系统镜像\\CentOS-7-x86_64-DVD-1810.iso"
target = "F:\\系统镜像\\CentOS-7-x86_64-DVD-1810_copy.iso"
copy_big_binary_file(source, target, 1024 * 1024 * 500) #500mb
```
### 33.5 文件操作的异常处理
在进行文件操作时,可能会出现各种异常,如文件不存在、权限不足、磁盘空间不足等。为了保证程序的健壮性,需要对这些异常进行适当处理。
**(1)常见的文件操作异常**
- `FileNotFoundError`:尝试打开不存在的文件时抛出
- `PermissionError`:没有足够权限访问文件时抛出
- `IsADirectoryError`:尝试对目录执行文件操作时抛出
- `FileExistsError`:尝试创建已存在的文件时抛出(使用'x'模式)
- `UnicodeDecodeError`:文件编码与指定的编码不匹配时抛出
- `IOError`:输入/输出操作失败时抛出(如磁盘已满)
**(2)使用try-except处理异常**
可以使用 `try-except` 语句来捕获和处理异常,示例代码如下:
**(3)使用finally确保资源释放**
`finally` 子句可以确保无论是否发生异常,某些代码都会执行,通常用于资源清理:
> 最好把操作的文件对象设置为全局
```python
import sys
file = None # 建议将file列为全局
try:
# 写入可能出现问题的代码 尽量准确范围小一些
path = input("请输入路径:") #
file = open(path, "r", encoding="utf-8")
lst = list(map(int,file.read().split(" ")))
print(lst[9])
print(lst[0] / 0)
# file.close() # 执行不到
except FileNotFoundError as e:
print(f"{path}不存在!文件找不到!{e}", file=sys.stderr)
except UnicodeError as e:
print(f"{path}为纯二进制文件,不能读取字节!{e}", file=sys.stderr)
except ValueError as e:
print(f"{path}文件中存在非数字字符!{e}", file=sys.stderr)
except IndexError as e:
print(f"{lst}列表中,角标越界!{e}", file=sys.stderr)
except ZeroDivisionError as e:
print(f"除数不能为0{e}",sys.stderr)
except Exception as e:
print(f"但凡出错,都会执行!{e}")
finally:
print("finally执行了...")
if file is not None:
file.close()
"""
捕捉异常时 是按照except的顺序执行的
Exception捕捉的范围是最大的!如果不需要精确捕捉,则偷懒写这个就可以了!
try中的代码依次执行 -> 直到碰到异常代码 直接跳到 -> except处理 -> finally -> 后续内容
"""
print("后续执行的内容")
"""
数据分析/xixi.txt # 路径不存在
测试数据/dilireba.png # 文件类型不符合
测试数据/haha.txt 1 2 a # a不能int 值错误
"""
```
### 33.6 案例解析
**(1)统计文件中单词的数量**
```python
import re
def count_words(file_path):
file = None
words = dict()
total = 0
try:
file = open(file_path, "r", encoding="utf-8")
# 按行读取
for line in file:
# 按行拆单词
words_line = re.findall(r'\b[a-zA-Z]+\b', line)
words_line = [word.lower() for word in words_line]
total += len(words_line)
# 按行统计
for word in words_line:
if word in words:
words[word] += 1
else:
words[word] = 1
except Exception as e:
print(e)
finally:
if file is not None:
file.close()
return words, total
words, total = count_words("测试数据/pride-and-prejudice.txt")
print(f"一共{total}个单词")
# for key, value in words.items():
# print(f"{key}出现了{value}次")
from queue import PriorityQueue # 优先队列
pq = PriorityQueue()
for word, count in words.items():
pq.put((-count, word))
while not pq.empty():
priority, element = pq.get()
print(f"{element}出现了{-priority}次")
```
**(2)带进度的复制文件**
```python
# 进度条模块
import os.path
from tqdm import tqdm
def copy_file(source, target):
# chunk = 1024 * 1024 # 1mb
chunk = 10 # 10byte
file_size = os.path.getsize(source) # 源文件的大小 byte
copied_size = 0 # 目前拷贝的大小
with open(source, 'rb') as source_file, open(target, "wb") as target_file:
"""
total 进度总大小
unit 进度数据单位
unit_scale 单位缩放 500kb -> 0.5mb
desc 进度条的秒数信息
"""
with tqdm(total=file_size,unit="B", unit_scale=True, desc="当前进度") as progress_bar:
while True:
block = source_file.read(chunk)
if not block:
break
target_file.write(block)
copied_size += len(block)
progress_bar.update(len(block)) # 累加操作
print("复制完成")
source_path = "测试数据/dilireba.png"
target_path = "测试数据/dilireba3.png"
copy_file(source_path, target_path)
```
**(3)文件备份工具**
```python
# 在OS模块中查看
```
### 33.7 序列化操作
序列化是将程序中的数据结构转换为可存储或传输的格式的过程,而反序列化则是将这种格式转换回原始数据结构。在Python中,序列化常用于**数据持久化**、**网络传输**和进程间通信等场景。
将代码中不属于字符、字节的数据,文件IO操作中称为**抽象数据**
Python中针对抽象数据提供了对应的模块,可以实现抽象数据和文件之间的IO操作
- **序列化**:将完整数据,拆分标记后进行保存
- **反序列化**:将拆分标记的数据进行组合
Python提供的内置模块:
- 将抽象数据序列化成**字节**文件:**pickle**(掌握)- 仅适用于Python
- 将抽象数据序列化成**字符**文件:**json**(掌握)- 跨语言通用
- 将抽象数据序列化成**字节**文件:**marshal**(了解)- 主要用于Python内部
- 将抽象数据进行**数据字典**保存:**shelve**(了解)- 提供类似字典的接口
**(1)pickle**
pickle模块是Python特有的序列化模块,可以**将几乎任何Python对象**序列化为字节流,适合用于Python程序间的数据交换和持久化存储。
```python
import pickle
lst = [1,2,3,4,5,6]
s = {1,2,3,4,5,6}
dic = {"name":"张三","age":12,"height":1.85, "sex":True}
# 通过pickle将Python内置数据序列化后 存入一个文件
with open("测试数据/backup.pickle","wb") as file:
pickle.dump(lst, file)
pickle.dump(s, file)
pickle.dump(dic, file)
# 通过pickle将序列化后的文件进行反序列化,将数据读入程序(内存)
with open("测试数据/backup.pickle","rb") as file:
while True:
try:
data = pickle.load(file)
print(type(data),data)
except EOFError:
break
# 另外一种存入方式 将待序列化的数据先进行字典的封装
data = {
"lst":lst,
"set":s,
"dict":dic
}
# 一般推荐如下方式
with open("测试数据/backup_upper.pickle","wb") as file:
pickle.dump(data, file)
with open("测试数据/backup_upper.pickle","rb") as file:
d = pickle.load(file)
print(d['lst'])
print(d['set'])
print(d['dict'])
```
**(2)json**
json模块是Python标准库中用于JSON数据编码和解码的模块,**JSON是一种轻量级的数据交换格式**,可以在不同编程语言之间传递数据(JSON支持的数据类型:字典、数组、数字、布尔类型、字符串(必须用""双引号))。
```python
import json
lst = [1,2,3,4,5,6]
s = {1,2,3,4,5,6}
dic = {"name":"张三","age":12,"height":1.85, "sex":True}
data = {
"lst":lst,
"set":tuple(s), # 元组和列表都会解析为JSON数组
"dict":dic,
"id":10086,
"bool":True
}
# JSON会把Python的数据类型转换为JSON自身的数据类型
with open("测试数据/backup.json", "w",encoding="UTF-8") as file:
json.dump(data, file, indent=4)
with open("测试数据/backup.json",'r', encoding="UTF-8") as file:
# 将JSON自身的数据类型转换为了Python对应的数据类型
data = json.load(file)
print(data, type(data))
print(data['lst'], type(data['lst']))
```
**(3)marshal**
将代码中的抽象数据,序列化存储到字节文件中
```python
import marshal
user_dict = {
"admin": {"username": "admin", "password": 123, "realname": "张三"},
"manager": {"username": "manager", "password": 123, "realname": "李四"}
}
arr = [1, 2, 3, 4, 5, 6, 7, 8, 9, 10]
tup = (1, 2, 3, 4, 5, 6)
data = {
"user_dict": user_dict,
"arr": arr,
"tup": tup,
}
with open('marshal.mar', mode='wb') as file:
marshal.dump(data, file)
```
将字节文件中的数据,反-序列化到代码中
```python
import marshal
with open('marshal.mar', mode='rb') as file:
data = marshal.load( file)
print(data, type(data))
```
**(4)shelve**
唯一一个文件IO操作中,对抽象数据进行存储的高级模块
- 如果需要将抽象数据保存到文件中,优先推荐使用该模块
- shelve模块的操作方式,是所有序列化模块中最简洁、最清晰
将抽象数据,序列化到文件中
```python
import shelve
user_dict = {
"admin": {"username": "admin", "password": 123, "realname": "张三"},
"manager": {"username": "manager", "password": 123, "realname": "李四"}
}
user_set = {"admin": "张三", "manger": "李四"}
user_arr = [1, 2, 3, 4, 5, 6, 7, 8, 9]
"""
.bak 数据备份
.dir 数据的索引
.dat 源数据的字节形式
"""
with shelve.open("my_shevel") as db:
db['user_dict'] = user_dict
db['user_set'] = user_set
db['user_arr'] = user_arr
```
将文件中的数据,反序列化到代码中
```python
import shelve
with shelve.open("my_shevel") as db:
db['user_arr'] = [66,666,6666]
print(db['user_dict'])
print(db['user_set'])
print(db['user_arr'])
```
## 第34节课 正则表达式
### 34.1 正则表达式简介
**(1)什么是正则表达式**
正则表达式(Regular Expression,简称regex)是一种用于描述**字符串匹配模式**的强大工具。它是一种**特殊的字符序列(在Python中用原生字符串表示r字符串)**,可以帮助你方便地检查一个字符串是否与某种模式匹配,或者从字符串中提取满足某种模式的子串。
**(2)正则表达式的应用场景**
- 数据验证 :如邮箱、手机号、身份证号等格式验证
```python
emails = ["user@example.com", "invalid-email", "user.name@company.co.uk"]
```
- 数据提取 :从文本中提取特定格式的信息
```python
text = "联系方式:13812345678,固话:010-12345678,客服:400-123-4567"
```
- 数据替换 :替换文本中的特定内容
```python
text = "这个产品很垃圾,客服态度也很差劲!"
```
- 数据分割 :按照特定模式分割字符串
```python
text = "姓名:张三;年龄:25;职业:工程师"
```
**(3)正则表达式的优势**
- 灵活性 :可以描述各种复杂的字符串模式
- 简洁性 :用简短的表达式描述复杂的匹配规则
- 高效性 :相比于传统的字符串处理方法更加高效
### 34.2 正则表达式语法
**(1)基本字符匹配**
| 字符 | 描述 |
| -------- | ------------------------------ |
| 普通字符 | 匹配自身,如 a 匹配字符"a" |
| . | 匹配除换行符外的任意一个字符 |
| \ | 转义字符,用于匹配特殊字符本身 |
**案例:基本字符匹配**
```python
import re
text = "Hello World Heello world Haallo World"
# 就是查看world是否存在于字符串中
match = re.search(r'world', text)
print(match.group())
# 返回所有 H开头llo结尾中间一个任意字符 的子串列表
arr = re.findall(r'H.llo', text)
print(arr)
# 返回所有 H开头llo结尾中间两个任意字符 的子串列表
arr = re.findall(r'H..llo', text)
print(arr)
text = "The coat is $100.12 $1204 $123123 $abc"
# 以$符号开头紧跟至少一个数字
arr = re.findall(r'\$\d+', text)
print(arr)
text = "The coat is ¥100.12 ¥1204 ¥123123 ¥abc"
arr = re.findall(r'¥\d+', text)
print(arr)
```
**(2)字符类**
| 表达式 | 描述 |
| ----------- | ------------------------------------------------------- |
| [abc] | 匹配方括号内的任意字符 |
| [^abc] | 匹配除了方括号内字符的任意字符 |
| [a-zA-Z0-9] | 匹配指定范围内的任意字符 |
| \d | 匹配任意数字,等价于 [0-9] |
| \D | 匹配任意非数字,等价于 [\^0-9] |
| \w | 匹配任意字母、数字或下划线,等价于 [a-zA-Z0-9_] |
| \W | 匹配任意非字母、数字或下划线,等价于 [\^a-zA-Z0-9_] |
| \s | 匹配任意空白字符(空格、制表符、换行符等)[ \t\n\r\f\v] |
| \S | 匹配任意非空白字符[\^ \t\n\r\f\v] |
**案例:字符类**
```python
import re
text = "The quick brown fox jumps over the lazy dog."
# 匹配出所有的元音字母
arr = re.findall(r'[aeiou]', text.lower())
print(arr)
# 匹配出所有的辅音字母
arr = re.findall(r'[^aeiou\s\.]', text.lower())
print(arr)
# 匹配出所有的数字
arr = re.findall(r'\d',"Phone:15388996655")
print(arr)
# 匹配出所有的单词
arr = re.findall(r'[a-zA-Z]+', text)
print(arr)
```
**(3)边界匹配**
| 表达式 | 描述 |
| ------ | ---------------- |
| ^ | 匹配字符串的开头 |
| $ | 匹配字符串的结尾 |
| \b | 匹配单词边界 |
| \B | 匹配非单词边界 |
**案例:边界匹配**
```python
import re
print(re.search(r'^Python', "Python is cool") != None)
print(re.search(r'^Python', "I love Python") != None)
print(re.search(r'Python$', "Python is cool") != None)
print(re.search(r'Python$', "I love Python") != None)
text = "Python programing is fun. I Love Python"
arr = re.findall(r'\bPython\b', text) # 跟直接找固定子串Python结果一样
print(arr)
text = "word wordaaa wordbbb aaaword abcword abcwordcda banana123 com_puter123 com*123"
arr = re.findall(r'word\w+',text)
print(arr)
arr = re.findall(r'\bword\w+',text)
print(arr)
arr = re.findall(r'\w+word', text)
print(arr)
arr = re.findall(r'\w+word\b', text)
print(arr)
print(re.findall(r'\b\w+\b', text))
```
**(4)数量限定符**
| 量词 | 描述 | 示例 |
| ------- | ---------------------- | ------------------------------------ |
| `*` | 匹配0次或多次 | `ab*` 匹配 "a"、"ab"、"abb" 等 |
| `+` | 匹配1次或多次 | `ab+` 匹配 "ab"、"abb",但不匹配 "a" |
| `?` | 匹配0次或1次 | `ab?` 匹配 "a" 或 "ab" |
| `{n}` | 精确匹配n次 | `a{3}` 匹配 "aaa" |
| `{n,}` | 匹配至少n次 | `a{2,}` 匹配 "aa"、"aaa" 等 |
| `{n,m}` | 匹配n到m次(包含n和m) | `a{2,3}` 匹配 "aa" 或 "aaa" |
**案例:数量限定符**
```python
import re
text = "a ab abb abbb abbbb abbbbb abbbbbb"
print(re.findall(r'ab*', text))
print(re.findall(r'ab+', text))
print(re.findall(r'ab?', text))
print(re.findall(r'ab?\b', text))
print(re.findall(r'ab{3}\b', text))
print(re.findall(r'ab{5,}', text))
print(re.findall(r'ab{3,5}\b', text))
```
**案例:验证邮箱格式**
```python
import re
def is_valid_email(email):
pattern = r'^[\w\.-]+@[\w\.-]+\.[a-zA-Z]{2,}$'
return bool(re.match(pattern, email))
emails = ['user123_123-haha@oupeng.com','admin213-teacher@haha.com','invalid-email','user.name@company.co.uk']
for email in emails:
print(f'{email}:{is_valid_email(email)}')
```
### 34.3 Python中的re模块
**(1)re模块简介**
Python的 re 模块提供了对正则表达式的支持,它包含了许多用于字符串处理的函数和方法。
**(2)re模块的主要函数**
| 函数 | 描述 |
| ------------- | ------------------------------------------------------------ |
| re.match() | 从字符串的起始位置匹配,如果起始位置匹配成功,返回Match对象,否则返回None |
| re.search() | 扫描整个字符串,找到第一个匹配的位置,返回Match对象,否则返回None |
| re.findall() | 返回字符串中所有与模式匹配的子串列表 |
| re.finditer() | 返回一个迭代器,包含所有匹配的Match对象 |
| re.sub() | 替换字符串中与模式匹配的子串 |
| re.split() | 按照模式分割字符串 |
| re.complie() | 编译正则表达式模式,返回一个Pattern对象 |
**(3)Match对象的主要方法**
| 方法 | 描述 |
| ----------- | ------------------------------------------------------------ |
| group() | 返回一个或多个分组匹配的字符串 |
| groups() | 返回一个包含所有分组的元组 |
| groupdict() | 返回一个包含所有命名分组的字典 |
| start() | 返回指定分组匹配的子串的起始位置 |
| end() | 返回指定分组匹配的子串的结束位置 |
| span() | 返回一个元组(start, end),表示指定分组匹配的子串的起始和结束位置 |
**案例:使用re.match和re.search的区别**
```python
import re
text = "Python is awesome, Python is powerful"
# match 是否以某个规则开头
print(re.match(r'Python', text) != None)
print(re.match(r'powerful', text) != None)
print(re.match(r'[a-zA-Z\s,]*', text) != None)
print(re.match(r'.*', text) != None)
# search 判断某个规则是否存在
print(re.search(r'is', text) != None)
print(re.search(r'makabaka', text) != None)
print(re.search(r'.*', text) != None)
```
**案例:使用re.findall和re.finditer**
```python
import re
text = "Python的常用版本有:Python2.7,Python3.6,Python3.8,Python3.12,Java8.8"
print(re.findall(r'\d+\.\d+', text))
for item in re.finditer(r'Python((\d+)\.(\d+))', text):
print(item.groups())
print(item.group()) # 当前整个匹配结果
print(item.group(0))# 当前整个匹配结果
print(item.group(1))# 当前匹配的第1个分组
print(item.group(2))# 当前匹配的第2个分组
print(item.group(3))# 当前匹配的第3个分组
print(item.span()) # 当前整个匹配结果角标范围 [start,end)
print(item.start())
print(item.end())
print("=" * 10)
```
**案例:使用re.sub进行替换**
```python
import re
text = "这个产品CC很AA,AA客户态度很BB很DD!这CC是个DD,CCEE哦!"
sensitive_words = ['AA', 'BB', 'CC', 'DD', 'EE']
for word in sensitive_words:
text = re.sub(word, len(word) * "*", text)
print(text)
def convert(match):
month, day, year = match.groups()
return f'{year}年{month}月{day}日'
text = "今天是07/31/2025,明天08/01/2025"
text = re.sub(r'(\d{2})/(\d{2})/(\d{4})',convert,text)
print(text)
```
**案例:使用re.split分割字符串**
```python
import re
text = "apple,banana cherry|grape:orange"
arr = re.split(r'[\s,|:]', text)
print(arr)
text = "姓名:张三;年龄:18;性别:男;身高:1.8米"
arr = re.split(r'[:;]',text)
print(arr)
keys = arr[::2]
values = arr[1::2]
print(keys)
print(values)
z = zip(keys, values)
# print(list(z)) # 已经把迭代器用了 所以就没有元素了
dic = dict(z)
print(dic)
```
**案例:使用re.compile预编译正则表达式**
```python
import re
import time
pattern_str = r'^[\w\.-]+@[\w\.-]+\.[a-zA-Z]{2,}$'
pattern = re.compile(pattern_str)
emails = []
for i in range(1,10001):
emails.append(f'admin{i}@haha.com')
# 不使用pattern
start_time = time.time()
valid_emails = [email for email in emails if re.match(pattern_str,email)]
end_time = time.time()
print(f"不使用pattern耗时:{end_time - start_time}")
# 使用pattern
start_time = time.time()
valid_emails = [email for email in emails if pattern.match(email)]
end_time = time.time()
end_time = time.time()
print(f"使用pattern耗时:{end_time - start_time}")
"""
运行机制:
re.match(pattern_str, text) -> pattern = re.compile(pattern_str) -> pattern.match(text)
如果是一个正则表达式规则去匹配大量数据的话,建议现将正则表达式先compile编译,得到pattern对象,然后用同一个pattern区匹配大量数据。
"""
```
### 34.4 正则表达式分组和捕获
**(1)基本分组**
使用圆括号`()`可以将正则表达式的一部分括起来形成一个分组。分组的作用:
- 将多个字符视为一个整体,应用量词
- 提取匹配结果中的特定部分
- 允许在正则表达式内部或外部引用分组内容
**案例:基本分组**
```python
import re
text = "今天是2025-08-01 明天是2025-08-02"
pattern = r'(\d{4})-(\d{2})-(\d{2})'
for match in re.finditer(pattern, text):
print("完整的日期", match.group())
print("完整的日期", match.group(0))
print("年份", match.group(1))
print("月份", match.group(2))
print("日期", match.group(3))
print("所有的分组", match.groups())
```
**案例:从文本中提取所有电话号码**
```python
import re
text = "联系方式:15388886666,固话:010-12345678,客服:400-123-4567"
pattern = r'((1)([3-9])(\d{9})|(\d{3,4})-(\d{7,8})|(\d{3,4})-(\d{3,4})-(\d{4}))'
for match in re.finditer(pattern, text):
print(match.group())
print(match.groups())
```
**(2)命名分组**
以通过`(?P<name>...)`语法为分组命名
**案例:命名分组**
```python
import re
log_entry = "[2025-08-01 09:31:32] ERROR: Database connect failed"
pattern = r'\[(?P<date>(?P<year>\d{4})-(?P<month>\d{2})-(?P<day>\d{2})) (?P<time>(?P<hours>\d{2}):(?P<minutes>\d{2}):(?P<seconds>\d{2}))\] (?P<level>\w+): (?P<info>.+)'
for match in re.finditer(pattern, log_entry):
print(match.group())
print(match.groups())
print(match.group('date'))
print(match.group('year'))
print(match.group('month'))
print(match.group('day'))
print(match.group('time'))
print(match.group('hours'))
print(match.group('minutes'))
print(match.group('seconds'))
print(match.group('level'))
print(match.group('info'))
```
**(3)反向引用**
在正则表达式内部,可以使用`\数字`或`\g<name>`引用前面定义的分组
**案例:反向引用**
```python
import re
text = "hello hello world world"
pattern = r'\b(\w+)\s\1\b'
for match in re.finditer(pattern, text):
print(match.group())
print(match.groups())
text = "2025-08-01" # -> 08/01/2025
pattern = r'(?P<year>\d{4})-(?P<month>\d{2})-(?P<day>\d{2})'
text = re.sub(pattern,r'\g<month>/\g<day>/\g<year>', text)
print(text)
log_entry = "[2025-08-01 09:31:32] ERROR: Database connect failed"
pattern = r'\[(?P<date>(?P<year>\d{4})-(?P<month>\d{2})-(?P<day>\d{2})) (?P<time>(?P<hours>\d{2}):(?P<minutes>\d{2}):(?P<seconds>\d{2}))\] (?P<level>\w+): (?P<info>.+)'
log = re.sub(pattern,r'错误信息:\g<info>,错误等级:\g<level>,报错日期:\g<date>', log_entry)
print(log)
```
### 34.5 正则表达式修饰符
**(1)常用修饰符**
| 修饰符 | 描述 |
| ------------------------- | -------------------------------------- |
| `re.I` 或 `re.IGNORECASE` | 忽略大小写 |
| `re.M` 或 `re.MULTILINE` | 多行模式,`^`和`$`匹配每行的开头和结尾 |
| `re.S` 或 `re.DOTALL` | 点号`.`匹配所有字符,包括换行符 |
| `re.X` 或 `re.VERBOSE` | 允许使用注释和空格,使正则表达式更易读 |
**(2)内联修饰符**
可以在正则表达式内部使用 (?imsxau) 语法应用修饰符。
**案例:忽略大小写**
```python
import re
text = "Python python PYTHON pyTHON"
# 不忽略大小写
print(re.findall("python", text))
# 忽略大小写
print(re.findall("python", text, re.IGNORECASE))
print(re.findall("(?i)python", text))
```
**案例:多行模式**
```python
import re
text = """第1行
第2行
第3行
"""
print(text)
# 只匹配第一行
print(re.findall(r'^第\d行', text))
# 匹配多行
# 如果是想要匹配多行的开头或结尾时 加re.MULTILINE
print(re.findall(r'^第\d行', text, re.MULTILINE))
print(re.findall(r'(?m)^第\d行', text))
# 如果不打算匹配开头与结尾,正则针对所有字符串内容
words="""banana orange apple
grape peach watermelon
tomato potato haha
"""
print(re.findall(r"\b\w+\b", words))
```
**案例:点号匹配所有字符**
```python
import re
text = """这是第1行
这是第2行
这是第3行
"""
# .没有匹配上换行
match = re.search(r"第1行.*第3行", text)
print(match != None)
match = re.search(r"第1行.*第3行", text, re.DOTALL)
print(match != None)
print(match.group())
```
### 36.6 贪婪与非贪婪匹配
**(1)贪婪匹配**
默认情况下,量词( * , + , ? , {n,m} )是贪婪的,会尽可能多地匹配字符。
**(2)非贪婪匹配**
在量词后面加上 ? (如 *? , +? , ?? , {n,m}? )使其变成非贪婪模式,会尽可能少地匹配字符。
**案例:贪婪与非贪婪对比**
```python
import re
"""
<div>
haha
<div>
heihei
</div>
</div>
<div>
xixi
<div>
huhu
</div>
</div>
<div>
lala
</div>
"""
html="<div>haha<div>heihei</div></div><div>xixi<div>huhu</div></div><div>lala</div>"
print(re.findall(r'<div>(.*)</div>', html))
print(re.findall(r'<div>(.*?)</div>', html))
```
## 第35节课 JSON数据解析
### 35.1 JSON基础概念
JSON 是一种轻量级的数据交换格式(另一个叫XML),具有简洁、易读的特点,并且在不同编程语言之间能很好地实现数据传递。在 Python 中,json模块能够实现 Python 数据类型与 JSON 数据格式之间的相互转换。
**JSON数据示例**
```json
{
"name": "张三",
"age": 30,
"isStudent": false,
"courses": ["Python", "数据分析", "机器学习"],
"address": {
"city": "北京",
"postcode": "100000"
},
"phoneNumbers": null
}
```
**JSON的语法规则**
- 数据以键值对形式表示: `"name": "张三"`
- 数据由逗号分隔
- 花括号 {} 保存对象
- 方括号 [] 保存数组
- 支持的数据类型:
- 数字(整数或浮点数)
- 字符串(双引号)
- 布尔值(true 或 false)
- 数组(方括号中)
- 对象(花括号中)
- null(None)
| JSON 类型 | Python 类型 |
| --------- | ----------- |
| 对象 | dict |
| 数组 | list/tuple |
| 字符串 | str |
| 数字 | int/float |
| true | True |
| false | False |
| null | None |
**json模块中的主要函数**
| 函数 | 描述 |
| ------------ | ---------------------------------------- |
| json.dumps() | 将Python对象编码成JSON字符串 |
| json.dump() | 将Python对象编码成JSON字符串并写入文件 |
| json.loads() | 将JSON字符串解码为Python对象 |
| json.load() | 从文件中读取JSON字符串并解码为Python对象 |
### 35.2 JSON数据编码(序列化)
在实际开发中,为了让生成的 JSON 字符串更易读,可以使用indent参数进行缩进格式化,使用sort_keys参数按键名进行排序。
```python
import json
data = {
"name": "张三",
"age": 30,
"isStudent": False,
"courses": ["Python", "数据分析", "机器学习"],
"address": {
"city": "北京",
"postcode": "100000"
},
"phoneNumbers": None
}
# 序列化 将Python数据对象 转为 JSON数据
# indent=4 缩进以4个空格为缩进单位
# ensure_ascii=False 显示中文
# sort_keys=True 按键进行排序 一般而言JSON键都为字符串
json_str = json.dumps(data, indent=4, ensure_ascii=False, sort_keys=True)
print(json_str)
with open("测试数据/user.json",'w', encoding="utf-8") as file:
json.dump(data, file, indent=4, ensure_ascii=False, sort_keys=True)
```
### 35.3 JSON数据解码(反序列化)
```python
import json
json_str = """
{
"address": {
"city": "北京",
"postcode": "100000"
},
"age": 30,
"courses": [
"Python",
"数据分析",
"机器学习"
],
"isStudent": false,
"name": "张三",
"phoneNumbers": null
}
"""
# 反序列化 JSON数据 转为 Python数据
data = json.loads(json_str)
print(type(data))
print(data['courses'][1])
with open("测试数据/user.json", "r",encoding="utf-8") as file:
data = json.load(file)
print(data)
```
### 35.4 自定义编码器与解码器
标准的JSON只支持以下数据类型:
- 字符串(string)
- 数字(number)
- 对象(object)- 在Python中表示为字典
- 数组(array)- 在Python中表示为列表
- 布尔值(boolean)- 在Python中表示为True/False
- 空值(null)- 在Python中表示为None
然而,Python中有许多其他数据类型(如日期时间、自定义类、集合等)无法直接被JSON序列化。这就是为什么我们需要自定义编码器和解码器。
```python
import json
import datetime
data = {
"name": "张三",
"create_at": datetime.datetime.now(),
"tags": {"Pythion", "JSON", "编程"}
}
json_str = json.dumps(data, indent=4)
print(json_str)
# TypeError: Object of type set is not JSON serializable
```
**自定义编码器**
> 就是将Python中不能够直接编码为JSON格式的数据进行转换 转换成能够被JSON识别的数据
最简单的自定义编码方式是使用 json.dumps()/dump() 的 default 参数:
```python
import json
import datetime
data = {
"name": "张三",
"create_at": datetime.datetime.now(),
"tags": {"Pythion", "JSON", "编程"},
"arr": [1, 2, 3, 4, 5]
}
# 自定义编码器
def custom_encoder(item):
# 判断item数据项 是否 属于 datetime.datetime类型
if isinstance(item, datetime.datetime):
return {"__datetime__": True, "value": item.isoformat()}
if isinstance(item, set):
return {"__set__": True, "value": list(item)}
# default 指定一个编码过程 函数
with open("测试数据/user.json", "w", encoding="utf-8") as file:
json.dump(data, file, indent=4, ensure_ascii=False, default=custom_encoder)
```
**自定义解码器**
> 就是将某些JSON数据解码为原先的样子(Python数据类型)
json.loads() /load()函数的 object_hook 参数允许我们自定义JSON对象的解码方式:
```python
import datetime
import json
# 自定义解码器
def custom_decoder(item):
if "__datetime__" in item:
return datetime.datetime.fromisoformat(item['value'])
if "__set__" in item:
return set(item['value'])
return item # 原样返回
with open("测试数据/user.json", 'r', encoding="utf-8") as file:
data = json.load(file, object_hook=custom_decoder)
print(data)
```
### 35.5 处理复杂JSON数据
**嵌套结构**
```json
{
"company": "ABC科技",
"employees": [
{
"id": 1001,
"name": "张三",
"department": "研发",
"skills": ["Python", "Django", "Docker"]
},
{
"id": 1002,
"name": "李四",
"department": "数据",
"skills": ["Python", "数据分析", "机器学习"]
}
],
"address": {
"city": "北京",
"street": "中关村",
"postcode": "100080"
}
}
```
```python
import json
json_str = """
{
"company": "ABC科技",
"employees": [
{
"id": 1001,
"name": "张三",
"department": "研发",
"skills": ["Python", "Django", "Docker"]
},
{
"id": 1002,
"name": "李四",
"department": "数据",
"skills": ["Python", "数据分析", "机器学习"]
}
],
"address": {
"city": "北京",
"street": "中关村",
"postcode": "100080"
}
}
"""
data = json.loads(json_str)
print(data['address']['street'])
print(data['employees'][0]['skills'][1])
for employee in data['employees']:
print(employee['id'])
print(employee['name'])
print(employee['department'])
print(employee['skills'])
```
**动态解析路径**
```python
import json
json_str = """
{
"company": "ABC科技",
"employees": [
{
"id": 1001,
"name": "张三",
"department": "研发",
"skills": ["Python", "Django", "Docker"]
},
{
"id": 1002,
"name": "李四",
"department": "数据",
"skills": ["Python", "数据分析", "机器学习"]
}
],
"address": {
"city": "北京",
"street": "中关村",
"postcode": "100080"
}
}
"""
data = json.loads(json_str)
path1 = "employees.0.department"
path2 = "employees.1.skills.2"
# 自动定义的一个关于JSON路径解析的问题
def get_value_by_path(data, path):
keys = path.split(".")
current = data
for key in keys:
if key.isdigit():
current = current[int(key)]
else:
current = current[key]
return current
print(get_value_by_path(data, path1))
print(get_value_by_path(data, path2))
```
### 35.6 **jsonpath库**
JSONPath提供了一种简洁的方式来导航JSON结构并提取特定数据,而不需要复杂的循环和条件语句。
`pip install jsonpath-ng`
**基本语法元素**
| 语法元素 | 描述 |
| ------------------ | ------------------------- |
| `$` | 根对象/元素 |
| `@` | 当前对象/元素 |
| `.` | 子元素操作符 |
| `..` | 递归下降操作符 |
| `*` | 通配符,匹配所有对象/元素 |
| `[]` | 下标操作符 |
| `[,]` | 并集操作符 |
| `[start:end:step]` | 数组切片操作符 |
| `?()` | 过滤表达式 |
| `()` | 脚本表达式 |
**示例JSON数据**
```json
{
"store": {
"book": [
{
"category": "参考书",
"author": "李明",
"title": "Python编程入门",
"price": 49.99
},
{
"category": "小说",
"author": "王芳",
"title": "梦想之旅",
"price": 29.99,
"isbn": "0-553-21311-3"
}
],
"bicycle": {
"color": "红色",
"price": 599.99
}
}
}
```
**示例路径演示**
| JSONPath | 描述 |
| ------------------------------------- | ---------------------- |
| `$.store.book[*].author` | 所有书籍的作者 |
| `$..author` | 所有作者 |
| `$.store.*` | store下的所有元素 |
| `$.store..price` | store下所有价格 |
| `$..book[2]` | 第三本书 |
| `$..book[-1]` | 最后一本书 |
| `$..book[0,1]` | 前两本书 |
| `$..book[:2]` | 前两本书 |
| `$..book[?(@.isbn)]` | 所有有isbn属性的书 |
| `$..book[?(@.price<10)]` | 所有价格小于10的书 |
| `$..book[?(@.price==8.95)]` | 所有价格等于8.95的书 |
| `$..book[?(@.title =~ /.*REGEX.*/i)]` | 标题匹配正则表达式的书 |
**基本操作**
```python
import json
from jsonpath_ng import parse
json_str = """
{
"store": {
"book": [
{
"category": "参考书",
"author": "李明",
"title": "Python编程入门",
"price": 49.99
},
{
"category": "小说",
"author": "王芳",
"title": "梦想之旅",
"price": 29.99,
"isbn": "0-553-21311-3"
}
],
"bicycle": {
"color": "红色",
"price": 599.99
}
}
}
"""
data = json.loads(json_str)
jsonpath_expr = parse('$.store.book[*].author')
print(jsonpath_expr.find(data))
for match in jsonpath_expr.find(data):
print(match.value)
print(match.path)
print(match.context)
```
### 35.7 案例:头条新闻
数据来源:https://www.juhe.cn/
```python
import os.path
import re
import requests
# 去除标签的正则
pattern_str1 = r'<.*?>'
pattern1 = re.compile(pattern_str1)
# 去除多余空格的正则
pattern_str2 = r' +'
pattern2 = re.compile(pattern_str2)
# 关于头条新闻接口的apikey
apikey = "3719af094e850cf3f4c4aea0bdb361d6"
# 获取某一个新闻的具体内容
def get_news_content(uniquekey):
# 新闻详情的API
apiurl = "http://v.juhe.cn/toutiao/content"
# 请求参数
params = {
'key':apikey,
'uniquekey':uniquekey
}
response = requests.get(apiurl, params=params)
if response.status_code == 200:
data = response.json()
content = data['result']['content']
content = pattern1.sub('', content)
content = pattern2.sub('', content)
return content
else:
print("请求异常!")
def save_news(page, news_dir):
# 新闻列表的API接口
apiurl = "http://v.juhe.cn/toutiao/index"
# 请求参数
params = {
'key':apikey,
'type':'junshi',
'page':page,
'page_size':10,
'is_filter':0
}
# 开始一个网络请求 get请求方式
# 返回一个响应对象 用于接受服务器返回的数据
response = requests.get(apiurl, params=params)
if response.status_code == 200: # 响应码 200成功 404访问失败
# 返回JSON数据的字符串形式
# text = response.text
# print(type(text))
# print(text)
# 返回JSON数据的字符串形式 把其转为Python字典
data = response.json()
# print(type(data))
# print(data)
for item in data['result']['data']:
news_file = os.path.join(news_dir,f'{item['title']}.txt')
with open(news_file, "w",encoding="utf-8") as file:
file.write(f"新闻标题:{item['title']}\n")
file.write(f'新闻时间:{item['date']}\n')
file.write(f'新闻作者:{item['author_name']}\n')
file.write(f'{get_news_content(item['uniquekey'])}\n')
else:
print("请求异常!")
if __name__ == "__main__":
# 创建新闻的目录
news_dir = "新闻列表"
if not os.path.exists(news_dir):
os.mkdir(news_dir)
for page in range(1, 11):
save_news(page, news_dir)
```
## 第36节课 XML数据解析
### 36.1 XML介绍
**(1)基本定义**
XML(可扩展标记语言)是一种**用于存储和传输数据的标记语言**,**它的核心作用是描述数据的结构和含义**。XML 具有自我描述性,允许用户自定义标签,因此适用于各种场景的数据交换,比如配置文件、数据存储、跨平台通信等。XML文档通常以`.xml`为扩展名。
**(2)语法规则**
XML 文档必须以声明开头,定义版本和编码:
```xml
<?xml version="1.0" encoding="UTF-8" ?>
```
- `version`:指定 XML 版本(目前主流为 1.0)
- `encoding`:指定字符编码(如 UTF-8、GBK 等)
标签规则:
- 标签由尖括号 `<>` 包裹,分为开始标签(如 `<book>`)和结束标签(如 `</book>`),必须成对出现;
- 标签区分大小写(`<Book>` 和 `<book>` 是不同标签);
- 可以嵌套标签,但不能交叉嵌套(正确:`<a><b></b></a>`;错误:`<a><b></a></b>`)
- 标签的名称完全可以自定义
根元素:
XML 文档必须有且仅有一个**根元素**,所有其他元素都嵌套在根元素内。例如:
```xml
<?xml version="1.0" encoding="UTF-8" ?>
<library>
<book>
<title>平凡的世界</title>
<author>路遥</author>
<price>25</price>
</book>
<book>
<title>平凡的世界</title>
<author>路遥</author>
<price>25</price>
</book>
</library>
```
对比一下JSON:
```json
{
"book": [
{
"title": "平凡的世界",
"author": "路遥",
"price":25,
},
{
"title": "平凡的世界",
"author": "路遥",
"price":25
}
]
}
```
属性值:
标签可以包含属性,用于提供额外信息,格式为 `属性名="属性值"`。属性也可以自定义,但是有些属性是固定的,例如:
```xml
<?xml version="1.0" encoding="UTF-8" ?>
<library>
<book id="123" page="120" chubanshe="清华大学出版社">
<title>平凡的世界</title>
<author>路遥</author>
<price>25</price>
</book>
<book id="456" page="130" chubanshe="同济大学出版社">
<title>平凡的世界</title>
<author>路遥</author>
<price>25</price>
</book>
</library>
```
- 属性值必须用引号(单引号或双引号)包裹;
- 一个标签中属性名不能重复。
元素与结构:
```xml
<?xml version="1.0" encoding="UTF-8" ?>
<library>
<book id="123" page="120" chubanshe="清华大学出版社">
<title>平凡的世界</title>
<author>路遥</author>
<price>25</price>
</book>
<book id="456" page="130" chubanshe="同济大学出版社">
<title>平凡的世界</title>
<author>路遥</author>
<price>25</price>
</book>
</library>
```
- library是根元素,其中包含了两个子元素 book
- book标签包含了三个子元素,title,author,price,那么book也称之为是他们的父标签
**(3)XML应用场景**
- 配置文件:许多软件(如 Spring、Tomcat)用 XML 存储配置信息;
- 数据交换:不同系统(如 Java 与 Python)通过 XML 传输结构化数据;
- 网页数据:配合 XSLT 可将 XML 转换为 HTML 展示;
- 存储数据:小型应用可直接用 XML 文件存储数据(替代数据库)。
### 36.2 HTML介绍
**(1)基本定义**
HTML(超文本标记语言)是用**于创建网页的标准标记语言**。它通过一系列标签来描述网页的结构和内容,包括文本、图像、链接、表格、表单等元素。HTML 不是编程语言,而是一种标记语言,用于定义网页的结构。HTML 文档通常以 `.html` 或 `.htm` 为扩展名,由浏览器解析并渲染成可视化的网页。
**(2)HTML基本结构**
```html
<!DOCTYPE html> <!-- 声明文档类型为 HTML5 -->
<html> <!--html的根元素 也表示网页的信息内容 -->
<head> <!--头部标签 其内容不会显示在网页上面,一般主要去做数据配置 -->
<meta charset="utf-8">
<title>页面标题</title>
</head>
<body> <!--主体 其内容可以显示在网页上 -->
<h1>这是一个一级标题</h1>
<p style="color:#f00">这是一个段落</p>
<code>print('Hello World!')</code>
</body>
</html>
```
**(3)常见HTMl标签**
| 标签分类 | 标签 | 描述 |
| -------------- | ----------------- | ------------------------------------------------------------ |
| **基本结构** | `<!DOCTYPE html>` | 声明 HTML5 文档类型 |
| | `<html>` | 根元素,包含整个 HTML 文档 |
| | `<head>` | 文档头部,包含元数据 |
| | `<body>` | 文档主体,包含可见内容 |
| **文本标题** | `<h1>` 至 `<h6>` | 标题标签,`<h1>` 最大,`<h6>` 最小 |
| **段落与文本** | `<p>` | 定义段落 |
| | `<br>` | 换行(单标签,无需闭合) |
| | `<hr>` | 水平线(单标签) |
| | `<strong>` | 加粗文本(强调重要性) |
| | `<em>` | 斜体文本(强调语气) |
| | `<span>` | 行内文本容器(无默认样式) |
| | `<div>` | 块级容器(常用于布局) |
| **链接** | `<a>` | 定义超链接,`href` 属性指定链接地址 |
| | | 例:`<a href="https://example.com" target="_blank">访问示例</a>` |
| **图像** | `<img>` | 插入图像(单标签) |
| | | 例:`<img src="image.jpg" alt="图片描述" width="200">` |
| **列表** | `<ul>` | 无序列表(默认圆点标记) |
| | `<ol>` | 有序列表(默认数字标记) |
| | `<li>` | 列表项(包含在 `<ul>` 或 `<ol>` 中) |
| | `<dl>` | 定义列表(包含术语和描述) |
| | `<dt>` | 定义术语(配合 `<dl>` 使用) |
| | `<dd>` | 描述术语(配合 `<dl>` 使用) |
| **表格** | `<table>` | 定义表格 |
| | `<tr>` | 表格行 |
| | `<th>` | 表头单元格(默认加粗居中) |
| | `<td>` | 表格数据单元格 |
| | `<thead>` | 表格头部(语义化标签) |
| | `<tbody>` | 表格主体(语义化标签) |
| | `<tfoot>` | 表格底部(语义化标签) |
| **表单** | `<form>` | 定义表单(用于收集用户输入) |
| | `<input>` | 输入控件,`type` 属性指定类型(text/password/button 等) |
| | `<label>` | 表单元素的标签(提升可访问性) |
| | `<select>` | 下拉选择框 |
| | `<option>` | 下拉选项(包含在 `<select>` 中) |
| | `<textarea>` | 多行文本输入框 |
| | `<button>` | 按钮 |
| **语义化标签** | `<header>` | 页面头部(如导航栏、标题) |
| | `<nav>` | 导航区域 |
| | `<main>` | 页面主要内容(唯一) |
| | `<article>` | 独立文章内容(如博客、新闻) |
| | `<section>` | 文档中的节(如章节、区块) |
| | `<aside>` | 侧边栏(与主要内容相关的附加信息) |
| | `<footer>` | 页面底部(如版权信息) |
**(4)XML与HTML的区别**
共同起源:两者都源于 SGML(标准通用标记语言),继承了 “用标签描述内容” 的核心思想,基础语法有相似性(如 `<标签>` 结构、属性定义等)。
分化方向:
- HTML 专注于**内容的显示与呈现**,标签预定义(如 `<p>` 表示段落、`<img>` 表示图片),直接决定内容在浏览器中的展示形式。
- XML 专注于**数据的结构化描述**,标签可自定义(如 `<学生>`、`<成绩>`),仅定义数据的含义和关系,不涉及显示。
| 维度 | HTML | XML |
| -------------- | -------------------------------------------- | ------------------------------------------------------ |
| **核心目标** | 展示数据(如何显示) | 描述数据(数据是什么、有什么关系) |
| **标签规则** | 标签预定义(如 `<h1>`、`<table>`) | 标签完全自定义(用户可根据需求创建) |
| **语法严格性** | 语法松散(浏览器容错性强,如可省略结束标签) | 语法极其严格(标签必须闭合、区分大小写,否则解析失败) |
| **扩展性** | 不可扩展(标签固定) | 可扩展(用户可定义新标签描述特定数据) |
| **应用场景** | 构建网页、控制页面布局与显示 | 数据存储、数据交换、配置文件、跨平台通信 |
**(5)解析模块**
- 在 Python 中,lxml模块是一个功能强大的库,能够同时高效解析 XML 和 HTML 文档。
```python
pip install lxml
```
- Beautiful Soup(简称 bs4)是 Python 中另一个常用的解析库,主要专注于 **HTML 解析**,但也能处理 XML 文档,更适合以 HTML 为主的场景。
```python
pip install beautifulsoup4
```
### 36.3 BS4模块的使用
Beautiful Soup 本身不具备解析功能,需要依赖解析器(如 `html.parser`、`lxml`、`html5lib`)。其中:
- `lxml` 解析速度快,支持 HTML 和 XML,容错性好(推荐)
```python
pip install lxml
```
- `html5lib` 容错性极强,模拟浏览器解析方式,但速度较慢
```python
pip install html5lib
```
**(1)基本使用流程**
```python
from bs4 import BeautifulSoup
html= """
<html>
<head><title>示例页面</title></head>
<body>
<p class="intro">Hello, Beautiful Soup!</p>
<a href="https://example.com">链接</a>
</body>
</html>
"""
# 传入的是 html源码字符串 解析器名称 lxml
soup =BeautifulSoup(html, 'lxml')
print(soup.prettify())
```
**(2)节点选择**
通过标签名直接访问节点,适合获取简单结构的元素。
```python
from bs4 import BeautifulSoup
html= """
<html>
<head><title>示例页面</title></head>
<body>
<p class="intro">Hello, Beautiful Soup!</p>
<p class="intro">Hello, Python!</p>
<a href="https://example.com1">百度</a>
<a href="https://example.com2">京东</a>
</body>
</html>
"""
# 传入的是 html源码字符串 解析器名称 lxml
soup =BeautifulSoup(html, 'lxml')
# 以下几个获取的方法默认获取第一个
# 获取title标签
print(soup.title) # <title>示例页面</title>
# 获取title标签的名称
print(soup.title.name) # title
# 获取title标签的内容
print(soup.title.string) # 示例页面
# 获取p标签
print(soup.p) # <p class="intro">Hello, Beautiful Soup!</p>
print(soup.p.text) # Hello, Beautiful Soup!
# 获取p标签的属性
print(soup.p['class'])
print(soup.a['href'])
# 获取所有标签包裹的文字
# print(soup.text)
```
**(3)查找节点**
- `find(name, attrs, text)`:返回第一个匹配的节点
- `find_all(name, attrs, text, limit)`:返回所有匹配的节点(列表)
```python
from bs4 import BeautifulSoup
html = """
<div>
<p class="book">Python 编程</p>
<p class="book">Java 编程</p>
<p class="movie">星际穿越</p>
<a href="link1.html">链接1</a>
<a href="link2.html">链接2</a>
<a href="link3.html">链接3</a>
</div>
"""
soup = BeautifulSoup(html, 'lxml')
# 寻找所有的p标签
items = soup.find_all('p')
print(items)
# 根据属性来查找 查找class 属性为 book 的所有p标签
items = soup.find_all('p', class_="book")
print(items)
```
**(4)CSS选择器**
使用 CSS 选择器语法查找节点,灵活且强大。
```python
from bs4 import BeautifulSoup
html = """
<div class="container">
<ul id="menu">
<li class="item">首页</li>
<li class="item">产品</li>
<li class="item">关于我们</li>
</ul>
<ul id="menu2">
<li class="item">首页</li>
<li class="item">产品</li>
<li class="item">关于我们</li>
</ul>
<ol id="menu3">
<li class="item">首页</li>
<li class="item">产品</li>
<li class="item">关于我们</li>
</ol>
<a href="login.html" class="link item">登录</a>
</div>
"""
soup = BeautifulSoup(html, 'lxml')
# 标签选择器 指定查找所有的li标签
items = soup.select('li')
print(items)
# 选择所有类属性为item的标签 class
items = soup.select('.item')
print(items)
# 选择指定ID的标签
items = soup.select('#menu')
print(items)
# 选择ul标签下的li标签 父子关系
items = soup.select('ul > li')
print(items)
# 选择类属性为container标签下的 类属性为link的标签 父子关系
items = soup.select('.container > .link')
print(items)
# 选择div标签下的所有li标签 祖孙关系
items = soup.select('div li')
print(items)
```
### 36.4 批量图片下载
图片网址:https://www.tuiimg.com/fengjing/list_1.html
```python
import os.path
import re
import requests
from bs4 import BeautifulSoup
def download_pic(pic_name, pic_url, subdir_path):
# 创建文件名称
pic_file = os.path.join(subdir_path, f'{pic_name}.jpg')
# 打开链接 寻找大图片的链接
response = requests.get(pic_url)
html = response.text
soup = BeautifulSoup(html,'lxml')
# 大图片的网络地址
img_url = soup.select(f'img[alt="{pic_name}"]')[0]['src']
response = requests.get(img_url)
with open(pic_file, "wb") as file:
file.write(response.content)
def save_pics_by_page(page, dir_path):
print(f"正在下载{page}页....")
# 创建目录的过程
subdir_name = f"第{re.findall(r'list_(\d+)', page)[0]}页"
subdir_path = os.path.join(dir_path,subdir_name)
if not os.path.exists(subdir_path):
os.mkdir(subdir_path)
# 获取数据的过程
url = f"https://www.tuiimg.com/fengjing/{page}"
response = requests.get(url)
html = response.text
# 筛选需要的数据
soup = BeautifulSoup(html, 'lxml')
pic_urls = [a['href'] for a in soup.find_all('a', target="_parent")[::2]]
pic_imags = soup.select('a > img')
pic_imags.pop(0)
pic_names = [img['alt'] for img in pic_imags]
# 开启循环 下载每一页中的10个图片
for pic_name, pic_url in zip(pic_names, pic_urls):
download_pic(pic_name, pic_url, subdir_path)
print(f"{pic_name}图片下载完成!")
if __name__ == "__main__":
dir_path = "图片集合"
if not os.path.exists(dir_path):
os.mkdir(dir_path)
for i in range(1,11):
save_pics_by_page(f"list_{i}.html", dir_path)
```
### 36.5 CSDN文章解析
文章地址:[blog.csdn.net/u010189239/article/details/104833550]()
把爬虫伪装成浏览器
```python
import requests
from requests.adapters import HTTPAdapter
from urllib3.util.retry import Retry
import random
from bs4 import BeautifulSoup
def browse_url(url: str, retries: int = 3, timeout: int = 10) -> str:
# 创建会话
session = requests.Session()
# 浏览器信息
USER_AGENTS = [
'Mozilla/5.0 (Windows NT 10.0; Win64; x64) AppleWebKit/537.36 (KHTML, like Gecko) Chrome/91.0.4472.124 Safari/537.36',
'Mozilla/5.0 (X11; Linux x86_64) AppleWebKit/537.36 (KHTML, like Gecko) Chrome/92.0.4515.107 Safari/537.36',
'Mozilla/5.0 (Windows NT 10.0; Win64; x64; rv:90.0) Gecko/20100101 Firefox/90.0',
'Mozilla/5.0 (X11; Linux i686; rv:89.0) Gecko/20100101 Firefox/89.0',
'Mozilla/5.0 (Macintosh; Intel Mac OS X 11.5; rv:90.0) Gecko/20100101 Firefox/90.0',
'Mozilla/5.0 (Macintosh; Intel Mac OS X 10_15_7) AppleWebKit/605.1.15 (KHTML, like Gecko) Version/14.1.2 Safari/605.1.15',
'Mozilla/5.0 (Windows NT 10.0; Win64; x64) AppleWebKit/537.36 (KHTML, like Gecko) Chrome/91.0.4472.124 Safari/537.36 Edg/91.0.864.59',
]
# 请求头信息 用于模拟浏览器
headers = {
'User-Agent': random.choice(USER_AGENTS),
'Accept': 'text/html,application/xhtml+xml,application/xml;q=0.9,image/webp,*/*;q=0.8',
'Accept-Language': 'en-US,en;q=0.5',
'Connection': 'keep-alive',
'Upgrade-Insecure-Requests': '1',
'Cache-Control': 'max-age=0',
}
# 连接重连设置
retry_strategy = Retry(
total=retries,
backoff_factor=1,
status_forcelist=[429, 500, 502, 503, 504],
allowed_methods=["GET", "POST"]
)
# 同时支持http与https访问
adapter = HTTPAdapter(max_retries=retry_strategy)
session.mount('https://', adapter)
session.mount('http://', adapter)
try:
# 配置session,并发送get请求
response = session.get(
url,
headers=headers,
timeout=timeout,
allow_redirects=True
)
response.raise_for_status()
if not response.encoding or response.encoding == 'ISO-8859-1':
response.encoding = response.apparent_encoding
return response.text
except requests.exceptions.RequestException as e:
print(f"请求异常: {e}")
return ""
except Exception as e:
print(f"未知错误: {e}")
return ""
if __name__ == "__main__":
url = "https://blog.csdn.net/u010189239/article/details/104833550"
html_content = browse_url(url)
soup = BeautifulSoup(html_content, 'html.parser')
elements = soup.find_all("div", id="content_views")
print(elements[0].text)
```
## 第37节课 函数语法进阶
### 37.1 参数类型
**(1)位置参数**
位置参数是最基本的参数类型,必须按照正确的顺序传递,且数量必须与函数定义一致。
```python
def calculate(a, b, c, d):
return a * b - c ** d
print(calculate(2,3,2,2))
# TypeError: calculate() missing 3 required positional arguments: 'b', 'c', and 'd'
# print(calculate(1))
# TypeError: calculate() takes 4 positional arguments but 5 were given
# print(calculate(1,2,3,4,5))
```
位置参数必须按顺序传递,参数顺序改变会导致结果改变:主要还是取决于函数内部对参数是如何计算的。
```python
def calculate(a, b, c, d):
return a * b - c ** d
print(calculate(1,2,3,4))
print(calculate(4,3,2,1))
```
**(2)关键字参数**
关键字参数允许通过参数名来指定参数值,这样可以忽略参数的顺序。
```python
def calculate(a, b, c, d):
return a * b - c ** d
# 既然指定参数名称 那么就和顺序没太大关系了!
print(calculate(a=1, b=2, c=3, d=4))
print(calculate(c=3, a=1, b=2, d=4))
print(calculate(d=4, c=3, a=1, b=2))
```
关键字参数可以与位置参数混合使用,但**位置参数必须放在关键字参数前面**:若干个关键字参数之间顺序可以打乱
```python
def calculate(a, b, c, d):
return a * b - c ** d
# SyntaxError: positional argument follows keyword argument
# print(calculate(a=1, b=2, c=3, 4))
# print(calculate(1, d=4, 2, c=3))
# 从左到右 位置 关键字 关键字 关键字
print(calculate(1, c=3, b=2, d=4))
print(calculate(1, d=4, b=2, c=3))
```
仅限位置参数:使用 `/` 标记之前的参数不能通过关键字传递
```python
def calculate(a, b, /, c, d):
print(a * b - c ** d)
calculate(1, 2, 3, 4)
calculate(1, 2, d=4, c=3)
# calculate(b=2, a=1, 3, 4)
# TypeError: calculate() got some positional-only arguments passed as keyword arguments: 'a, b'
# calculate(b=2, a=1, d=4, c=3)
# calculate(d=4, c=3, b=2, a=1)
```
仅限关键字参数:使用 `*` 标记之后的参数必须通过关键字传递
```python
def calculate(a, b, *, c, d):
print(a * b - c ** d)
# TypeError: calculate() takes 2 positional arguments but 4 were given
# calculate(1, 2, 3, 4)
# TypeError: calculate() missing 2 required keyword-only arguments: 'c' and 'd'
# calculate(1, 2)
calculate(1, 2, c=3, d=4)
calculate(1, b=2, c=3, d=4)
calculate(a=1, b=2, c=3, d=4)
calculate(d=4, c=3, a=1, b=2)
# calculate(c=3,d=4,1,2)
```
**(3)默认参数**
默认参数允许在定义函数时为参数指定默认值,调用函数时如果不提供该参数,则使用默认值。
```python
def calculate(a, b=1, c=1, d=1):
print(a * b - c ** d)
# TypeError: calculate() missing 1 required positional argument: 'a'
# calculate()
calculate(1)
calculate(1, 2)
calculate(1, 2, 3)
calculate(1, 2, 3, 4)
calculate(c=3, a=1, b=2, d=4)
calculate(1, d=4)
# TypeError: calculate() missing 1 required positional argument: 'a'
# calculate(d=4)
# calculate(b=2,c=3,d=4)
```
在函数定义中,默认参数必须放在位置参数后面
```python
# SyntaxError: parameter without a default follows parameter with a default
def calculate(a=1, b=1, c=1, d):
print(a * b - c ** d)
```
多个默认参数:函数可以有多个默认参数,调用时可选择性地覆盖部分或全部默认值
```python
def calculate(a, b=1, c=1, d=1):
print(a * b - c ** d)
# TypeError: calculate() missing 1 required positional argument: 'a'
# calculate()
calculate(1)
calculate(1, 2)
calculate(1, 2, 3)
calculate(1, 2, 3, 4)
calculate(c=3, a=1, b=2, d=4)
calculate(1, d=4)
# TypeError: calculate() missing 1 required positional argument: 'a'
# calculate(d=4)
# calculate(b=2,c=3,d=4)
```
默认参数与关键字参数结合:默认参数通常与关键字参数一起使用,允许跳过某些参数或按任意顺序传递参数
```python
def calculate(a=1, b=1, c=1, d=1):
print(a * b - c ** d)
calculate()
calculate(1,2,3)
calculate(d=4,c=3,a=1,b=2)
calculate(d=4)
# calculate(d=4, 3)
```
默认值在函数定义时被创建,而不是每次调用时重新创建。这可能导致可变对象(如列表、字典)的意外行为。
**默认值只创建一次,第一次函数调用时创建,后续则不创建(可变对象会存在问题)**
```python
def my_append(num, lst=[]):
lst.append(num)
return lst
print(my_append(1)) # 1
print(my_append(2)) # 1 2
arr1 = []
arr2 = []
arr1 = my_append(1, arr1)
print(arr1)
arr2 = my_append(2, arr2)
print(arr2)
def my_append_good(num, lst=None):
if lst is None:
lst = []
lst.append(num)
return lst
print(my_append_good(1)) # 1
print(my_append_good(2)) # 2
```
默认参数尽量不要给个可变对象!
**(4)可变参数**
可变参数允许函数接受**任意数量的位置参数**,在参数名前加`*`表示。这些参数会被打包成一个元组。
```python
def sum_numbers(*args):
print(type(args))
print(len(args))
total = 0
for num in args:
total += num
return total
print(sum_numbers())
print(sum_numbers(1, 2, 3, 4))
```
可以将列表或元组**拆包**后传递给可变参数:
```python
def sum_numbers(*args):
print(type(args))
print(len(args))
total = 0
for num in args:
total += num
return total
lst = [1,2,3,4]
tup = (5,6,7,8)
st = {1,2,3,4}
print(sum_numbers(*lst))
print(sum_numbers(*tup))
print(sum_numbers(*st))
```
**(5)关键字可变参数**
关键字可变参数允许函数接受**任意数量的关键字参数**,在参数名前加`**`表示。这些参数会被打包成一个字典。
```python
def print_info(**kwargs):
print(type(kwargs))
print(len(kwargs))
for key, value in kwargs.items():
print(key, value)
print_info()
print_info(a=1,b=2) # 当成键值对来看
# TypeError: print_info() takes 0 positional arguments but 5 were given
# print_info(1,2,3,4,5)
```
可以将字典拆包后传递给关键字可变参数:
```python
def print_info(**kwargs):
print(type(kwargs))
print(len(kwargs))
for key, value in kwargs.items():
print(key, value)
dic = {
'name':'张三',
'age':18
}
print_info(**dic)
```
**(6)参数组合使用**
在实际应用中,常常需要组合使用不同类型的参数。参数定义的顺序必须是:
1. 位置参数(必选参数)
2. 默认参数
3. 可变参数(*args)
4. 关键字可变参数(**kwargs)
```python
def complex_function(a, b, c=0, *args, **kwargs):
print(f'位置参数:a={a}, b={b}')
print(f'默认参数:c={c}')
print(f'可变参数:args={args}')
print(f'关键字可变参数:kwargs={kwargs}')
# TypeError: complex_function() got multiple values for argument 'a'
# complex_function(1,2,3,4,5,6,7,8,a=666,b=777,c=888)
# 关键字可变参数的名称不要和之前的参数重名
complex_function(x=10, y=20, z=30, c=3, b=2, a=1, d=4, e=5, f=6)
"""
位置参数:a=1, b=2
默认参数:c=3
可变参数:args=()
关键字可变参数:kwargs={'x': 10, 'y': 20, 'z': 30, 'd': 4, 'e': 5, 'f': 6}
"""
# TypeError: complex_function() missing 2 required positional arguments: 'a' and 'b'
# complex_function(x=10,y=20,z=30)
complex_function(a=1, b=2, c=3, d=4, e=5, f=6, x=10, y=10)
"""
位置参数:a=1, b=2
默认参数:c=3
可变参数:args=()
关键字可变参数:kwargs={'d': 4, 'e': 5, 'f': 6, 'x': 10, 'y': 10}
"""
# SyntaxError: positional argument follows keyword argument
# complex_function(1,b=2,c=3,d=4,5,6,7,8,x=10,y=20)
complex_function(1, 2, 3, 4, 5, x=10, y=20)
"""
位置参数:a=1, b=2
默认参数:c=3
可变参数:args=(4, 5)
关键字可变参数:kwargs={'x': 10, 'y': 20}
"""
complex_function(10, 20, y=10, x=20)
"""
位置参数:a=10, b=20
默认参数:c=0
可变参数:args=()
关键字可变参数:kwargs={'y': 10, 'x': 20}
"""
```
> 可以发现,从形式上和表现上来看,**不带等号的必须在带等号的之前**
>
> Python中有一个万能参数:`(*args, **kwargs)`
### 37.2 lambda与高阶函数
lambda 函数是 Python 中一种特殊的**匿名**函数,它提供了一种简洁的方式来创建**简单的函数**。
**(1)lambda 函数的基本语法**
lambda 函数的基本语法如下:
```python
lambda 参数: 表达式
```
- lambda 是 Python 的关键字,用于定义匿名函数
- 参数可以是零个或多个,多个参数用逗号分隔
- 表达式是函数的返回值,只能有一个表达式
对比普通函数与 lambda 函数:
```python
# 定义一个简单的两数之和匿名函数
add = lambda x, y: x + y
print(add(1, 3))
def substract(x,y):
return x - y
print(substract(1,3))
```
**(2)lambda 函数的特性**
匿名性:lambda 函数没有名称,这也是它被称为匿名函数的原因。通常我们会将它赋值给一个变量,以便重复使用。
```python
multiply = lambda a, b: a * b
print(multiply(4, 5))
print((lambda x,y: x ** y)(5,2))
```
lambda 函数的主体只能是一个表达式,不能包含多条语句,也不能使用 return 语句(**表达式的结果会自动返回**)。
```python
# 错误示例
method = lambda x,y:
if x > 0:
return x ** y
else:
return y ** x
# 但可以改成如下形式:
method = lambda x, y: x ** y if x > 0 else y ** x
```
**(3)lambda 函数的常见用法**
对于简单的函数逻辑,使用 lambda 可以使代码更简洁
lambda 函数最常见的用途是作为高阶函数(如 map ()、filter ()、sorted () 等)的参数。
map () 函数将 lambda 函数应用于可迭代对象的每个元素:
```python
# 将列表中的每个元素平方
arr = [1, 2, 3, 4, 5]
# 等效于 [x ** 2 for x in arr]
print([x ** 2 for x in arr])
arr = list(map(lambda x: x ** 2, arr))
print(arr)
# 处理两个列表
arr1 = [1, 2, 3, 4]
arr2 = [5, 6, 7, 8]
# 等效于 [x * y for x , y in zip(arr1, arr2)]
print([x * y for x , y in zip(arr1, arr2)])
arr3 = list(map(lambda x, y: x * y, arr1, arr2))
print(arr3)
```
filter () 函数使用 lambda 函数过滤可迭代对象中的元素:
```python
# 得到所有的偶数
arr = [1, 2, 3, 4, 5, 6, 7, 8, 9, 10]
print([x for x in arr if x % 2 == 0])
arr = list(filter(lambda x: x % 2 == 0, arr))
print(arr)
# 获取所有长度小于等于3的字符串
arr = ['app','oppo','ab','pp','abc','banana']
print([s for s in arr if len(s) <= 3])
arr = list(filter(lambda s: len(s) <= 3, arr))
print(arr)
```
sorted () 函数可以使用 lambda 函数指定排序键:
```python
arr = ['apple', 'banan', 'cherry', 'date']
# 默认按照字母顺序排序
print(sorted(arr))
# 按照字符串长度排序
print(sorted(arr, key=lambda s: len(s)))
people = [
{'name': 'alic', 'age': 15},
{'name': 'charlia', 'age': 30},
{'name': 'bob', 'age': 25},
]
# 按照年龄排序
print(sorted(people, key=lambda x: x['age']))
# 按照姓名的最后一个字母排序
print(sorted(people, key=lambda x: x['name'][-1]))
words = {
"apple":5,
"orange":6,
"banana":4
}
print(sorted(words)) # 传入字典 默认按键排序
print(sorted(words, key = lambda x:words[x],reverse=True))
```
reduce () 函数可以使用 lambda 对迭代对象中的元素进行累积操作:
```python
from functools import reduce
arr = [1, 2, 3, 4, 5]
print(reduce(lambda x, y: x + y, arr)) # 前者x + 后者y -> 累加
print(reduce(lambda x, y: x * y, arr)) # 前者x * 后者y -> 累乘
```
lambda 函数在函数式编程范式中非常有用,可以作为其他函数的返回值:
```python
# 传入一个操作符 返回该操作符对应的函数
def make_operation(operator):
if operator == "+":
return lambda x, y: x + y
elif operator == '-':
return lambda x, y: x - y
elif operator == '*':
return lambda x, y: x * y
elif operator == '/':
return lambda x, y: x / y
add = make_operation("+")
print(add(3, 4))
multiply = make_operation("*")
print(multiply(3, 4))
```
**(4)lambda 函数的参数形式**
lambda 函数支持多种参数形式,与普通函数类似:
```python
# 无参数
func = lambda: "Hello World!"
print(func())
# 一个位置参数
func = lambda x: x ** 2
print(func(3))
# 多个位置参数
func = lambda x, y, z: x * y * z
print(func(1, 2, 3))
# 默认参数
func = lambda x, y=2: x ** y
print(func(2))
print(func(2, 3))
print(func(y=3, x=3))
# 可变参数
func = lambda *args: [x for x in args if x % 2 == 1]
print(func(1, 2, 3, 4, 5, 6, 7, 8, 9, 10))
# 关键字可变参数
func = lambda **kwargs:[f'{key}:{value}' for key, value in kwargs.items() if len(key) == 3]
print(func(name="张三",age=18,height=1.85,sex="男"))
```
**(5)lambda 与普通函数的选择**
虽然 lambda 函数很方便,但并不是所有情况都适合使用:
适合使用 lambda 的情况:
- 函数逻辑简单,只有一行表达式
- **作为高阶函数的临时参数**(如 sorted、map、filter 等)
- 需要在短时间内创建简单的函数对象
适合使用普通函数的情况:
- 函数逻辑复杂,需要多行代码
- 函数需要被多次**复用**
- 函数需要文档字符串来解释其功能
- 函数需要处理异常
### 37.3 函数的嵌套与作用域
在 Python 中,函数不仅可以独立定义,还可以嵌套在其他函数内部,这种结构为代码组织和数据封装提供了更多可能性。
**(1)函数嵌套的基本概念**
函数嵌套指的是在一个函数内部定义另一个函数。外部的函数称为外函数,内部的函数称为内函数。
```python
# 定义了一个外部函数
def outer_function():
print("outer function....")
# 定义了一个内部函数
# 将内部函数理解为外部函数中的一个局部变量
# 只有在外部函数内部才能访问
def inner_function():
print("inner function....")
# 在外函数内部调用内部函数
inner_function()
# 调用外部函数
outer_function()
# 在外部调用不到内部函数
# inner_funciton()
```
函数嵌套主要有以下几个作用:
- 封装性:内函数只能在外函数内部被调用,外部无法直接访问,实现了一定程度的封装
- 代码组织:将相关的函数放在一起,提高代码的可读性和维护性
- 闭包基础:为创建闭包(一种特殊的函数)提供了基础
**(2)变量作用域**
变量作用域指的是变量的可访问范围。Python 中有四种基本的作用域:
- 局部作用域(Local):在函数内部定义的变量,仅在该函数内部可访问
- 嵌套作用域(Enclosing):在嵌套函数中,内函数可以访问外函数中定义的变量
- 全局作用域(Global):在模块(文件)级别定义的变量,整个模块中均可访问
- 内置作用域(Built-in):Python 内置的变量和函数,如`print()`、`len()`等
当访问一个变量时,Python 会按照以下顺序查找:
- 局部作用域 → 嵌套作用域 → 全局作用域 → 内置作用域
如果在所有作用域中都找不到变量,会抛出NameError
```python
global_var = "我是全局变量"
def outer_function():
outer_var = "我是外部函数变量"
def inner_function():
inner_var = "我是内部函数变量"
print("内函数访问:", inner_var)
print("内函数访问:", outer_var)
print("内函数访问:", global_var)
inner_function()
# print("外函数访问:", inner_var)
print("外函数访问:", outer_var)
print("外函数访问:", global_var)
outer_function()
print("全局访问:", global_var)
```
当需要修改不同作用域的变量时,需要使用特定的关键字:
- `global`关键字用于在函数内部修改全局变量。
- `nonlocal`关键字用于在嵌套函数中修改外函数的变量。
如果不使用`nonlocal`关键字,内函数会创建一个新的局部变量:
```python
numA = 10
numB = 20
def outer_function():
print("outer numA:", numA) # 访问全局numA
global numB # 声明准备修改全局numB
numB = 30
print("outer numB:", numB) # 访问全局numB
numC = 50 # 新建局部变量numC
print("outer numC:", numC) # 访问局部numC
def inner_function():
print("inner numA:", numA) # 访问全局numA
global numB # 声明准备修改全局numB
numB = 40
print("inner numB:", numB) # 访问全局numB
nonlocal numC # 声明修改嵌套numC
numC = 60
print("innter numC:", numC) # 访问嵌套numC
inner_function()
print("outer numC:", numC) # 访问局部numC
outer_function()
print("numA:", numA)
print("numB:", numB)
```
总之:
- 内层能调用到外层,但是外层不能调用内层
- 但凡想修改外层的数据,那就考虑global后者nonlocal
### 37.4 闭包与装饰器
闭包和装饰器是 Python 中两个强大的函数特性,它们基于函数嵌套和作用域规则构建,能够大幅提高代码的灵活性和可复用性。
**(1)闭包**
闭包是一种特殊的函数嵌套结构,指的是内函数引用了外函数的变量,并且外函数返回了内函数。这种结构可以 "记住" 外函数的变量状态。即使外部函数已经执行完毕。
> 局部变量是在函数中创建的,随着函数的加载运行(进栈)而创建,随着函数的运行结束(出栈)而销毁。
```python
def outer_function(x):
def inner_function(y):
return x + y
return inner_function
inner_function = outer_function(3)
print(inner_function(5))
```
形成闭包需要满足三个条件:
- 存在函数嵌套结构(内函数嵌套在外函数中)
- 内函数引用了外函数的变量
- 外函数返回了内函数
闭包最强大的特性是能够 "记住" 外函数的变量状态,这使函数拥有了 "记忆" 能力。
闭包在许多场景中都非常有用,特别是需要创建具有特定配置的函数时。
```python
# 示例1 计数器
def counter():
count = 0
def increment():
nonlocal count
count += 1
return count
return increment
counterA = counter()
print(counterA())
print(counterA())
print(counterA())
counterB = counter()
print(counterB())
print(counterA())
# 示例2 文本格式化
"""
给某些字符串加标记前缀标记和后缀标记
Hello World -> <p>Hello World</p>
Python -> [Hello World]
Java -> 'Java'
"""
def format_text(text, prefix, suffix):
return f'{prefix}{text}{suffix}'
print(format_text("Hello World","<p>","</p>"))
print(format_text("Hello World","[","]"))
print(format_text("Hello World","'","'"))
def make_formatter(prefix, suffix):
def formatter(text):
return f'{prefix}{text}{suffix}'
return formatter
html_formatter = make_formatter('<p>',"</p>")
bracket_formatter = make_formatter("[",']')
quote_formatter = make_formatter("'","'")
print(html_formatter("Hello"))
print(bracket_formatter("Hello"))
print(quote_formatter("Hello"))
print(html_formatter("haha"))
# 示例3 常见的幂运算
# 2 3 4
def my_pow(a, b):
return a ** b
def power_generator(exponent):
def power(base):
return base ** exponent
return power
square = power_generator(2) # 平方函数
cube = power_generator(3) # 立方函数
fourth = power_generator(4) # 四次方函数
print(square(2))
print(square(3))
print(cube(3))
print(cube(4))
"""
画图形
相关坐标 画笔大小 画笔颜色 画笔线形 填充......
def draw_shape(相关坐标,画笔大小,画笔颜色,画笔线形,填充....)
pass
def create_shape(画笔大小,画笔颜色,画笔线形,填充....)
def draw_shape(相关坐标):
pass
return draw_shape
circle = create_shape()
circle(相关坐标)
rectangle(相关坐标)
"""
```
**(2)装饰器**
装饰器是 Python 中一种特殊的语法,**它允许在不修改原函数代码的情况下,为函数添加额外功能**。装饰器本质上是一个接受函数作为参数并返回新函数的闭包。
```python
def decorator(func):
def wrapper():
print("函数执行前的操作")
func()
print("函数执行后的操作")
return wrapper
def say_hello():
print("Hello 你好!")
say_hello()
# 使用方式1 将被扩展的函数传入到装饰器中
say_hello = decorator(say_hello)
say_hello()
# 使用方式2 语法糖
@decorator
def say_goodbye():
print("Good Bye 再见!")
say_goodbye()
```
装饰器本质上是闭包的一种特殊应用:
- 装饰器接受一个函数作为参数(外函数参数)
- 装饰器定义了一个包装函数(内函数),该函数引用并调用了被装饰的函数
- 装饰器返回这个包装函数
可以说,装饰器是专门用于**增强函数功能的闭包**。
实际应用中,函数通常带有参数,装饰器需要能够处理任意参数的函数。
```python
def decorator(func):
def wrapper(*args, **kwargs):
print(f'调用函数:{func.__name__}')
print(f'位置参数:{args}')
print(f'关键字参数:{kwargs}')
result = func(*args, **kwargs)
return result
return wrapper
@decorator
def add(a, b):
return a + b
@decorator
def greet(name, message="Hello"):
return f'{name},{message}'
# print(add(1,2))
# print(greet("张三"))
print(add(1,2))
print(greet("李四","炸了"))
print(greet(message="炸了", name="李四"))
#=========================================================================
import time
import random
# 记录函数执行时间的装饰器
def decorator(func):
def wrapper(*args, **kwargs):
start = time.time()
result = func(*args, **kwargs)
end = time.time()
print(f"耗时:{(end-start) * 1000} ms")
return result
return wrapper
arr = []
for i in range(1,10001):
arr.append(random.randrange(1,10000))
@decorator
def selection_sort(arr):
for i in range(len(arr) - 1):
for j in range(i + 1, len(arr)):
if arr[i] > arr[j]:
arr[i],arr[j] = arr[j],arr[i]
return arr
arr = selection_sort(arr)
print(arr)
```
装饰器本身也可以接受参数,这需要在原有装饰器基础上再嵌套一层函数。
```python
import datetime
def repeat_decorator(times):
def decorator(func):
def wrapper(*args, **kwargs):
results = []
for i in range(times):
result = func(*args, **kwargs)
results.append(result)
return results
return wrapper
return decorator
@repeat_decorator(3)
def say_hello(name):
return f"{name} 你好!"
print(say_hello("张三"))
#========================
# 日志信息
def log_level(level,user):
def decorator(func):
def wrapper(*args, **kwargs):
timestamp = datetime.datetime.now().isoformat()
result = func(*args, **kwargs)
return f'{user} >>> [{timestamp}] {level} : {result}'
return wrapper
return decorator
@log_level("INFO","haha")
def process_data(disk):
return f'{disk}正在清理!'
@log_level('WARRNING','root')
def low_disk_space(disk):
return f"{disk}磁盘空间不足!"
print(process_data("C盘"))
print(low_disk_space("D盘"))
```
一个函数可以同时应用多个装饰器,装饰器的执行顺序是从内到外(从下到上)。
```python
def div_decorator(func):
def wrapper(*args, **kwargs):
result = func(*args, **kwargs)
return f'<div>{result}</div>'
return wrapper
def p_decorator(func):
def wrapper(*args, **kwargs):
result = func(*args, **kwargs)
return f'<p>{result}</p>'
return wrapper
def span_decorator(func):
def wrapper(*args, **kwargs):
result = func(*args, **kwargs)
return f'<span>{result}</span>'
return wrapper
@div_decorator
@p_decorator
@span_decorator
def make_html(content):
return content
print(make_html("Hello Python!"))
```
使用装饰器时,原函数的元信息(如函数名、文档字符串)会被包装函数覆盖,`functools.wraps`可以解决这个问题。
```python
import functools
def div_decorator(func):
@functools.wraps(func) # 保留原函数信息
def wrapper(*args, **kwargs):
"""
wrapper函数的文档信息
:param args: 位置参数
:param kwargs: 关键字参数
:return: 添加div后的内容
"""
result = func(*args, **kwargs)
return f'<div>{result}</div>'
return wrapper
@div_decorator
def make_html(content):
"""
make_html原函数的文档信息
:param content: 需要被标签包裹的文本
:return:包装过后的文本
"""
return content
@div_decorator
def make_html_other(content):
"""
make_html_other原函数的文档信息
:param content: 需要被标签包裹的文本
:return:包装过后的文本
"""
return content
# 原函数被包装函数覆盖了
print("函数名:",make_html.__name__)
print("文档信息:",make_html.__doc__)
print(make_html("Hello"))
print("函数名:",make_html_other.__name__)
print("文档信息:",make_html_other.__doc__)
print(make_html_other("Hello"))
```
## 第38节课 面向对象编程
### 38.1 面向对象编程思想
**(1)面向过程与面向对象**
面向过程:**重在流程**,我们属于执行者,亲力亲为,费时间费精力,结果不一定完美
> 自己去做饭:买菜-洗菜-切菜-做饭-吃饭-刷锅洗碗
>
> 我们要对一个列表进行排序,定义一个排序的函数,将列表传入该函数中,调用函数执行即可
>
> 一件事情要被解决/处理,就肯定存在解决/处理的流程。
面向对象:**重在调度**,我们属于指挥者,专业的事情交给专业的人做,省时间省精力,结果比较完美。
> 让餐厅/外卖/家人做
>
> 我们要对一个列表进行排序,直接调用列表的sort()即可。
>
> 说白就是遇到一件事情,让别人帮你解决/处理。
它俩之间并不是一个互斥的关系,恰恰是一个互融的关系。可以存在纯粹的面向对象代码,但不可能存才纯粹的面向对象的代码。
```python
# 面向过程的思路 去求解圆的面积和周长
# 计算圆形的面积
def circle_area(radius):
return math.pi * radius ** 2
# 计算圆形的周长
def circle_perimeter(radius):
return 2 * math.pi * radius
radius = 1
print(circle_area(radius))
print(circle_perimeter(radius))
# 面向对象的思路 去求解圆的面积和周长
# 可以将一些事物进行拟人化
class Circle:
def __init__(self, radius):
self.radius = radius
def area(self):
return math.pi * self.radius ** 2
def perimeter(self):
return 2 * math.pi * self.radius
c = Circle(10)
print(c.area())
print(c.perimeter())
```
**(2)类和对象**
类:`class Circle`,就是对某些事物的描述,主要描述的内容就是属性(变量)和行为(函数)【模版/设计图纸】,一个类可以对应多个对象。
- 实例属性:`self.radius = radius`,成员变量,是每个对象独有的'个人属性',每个对象相互独立,且可以各自修改各自的实例属性,不会影响其他对象。
- 实例函数:`def area(self):`,对象能够执行的'个人行为',操作对象的实例属性。
对象:`c = Circle(10)`,就是按照某一个类的描述,而创建出来的一个具体的实例。【按照模版/设计图纸 真真正正创建出来的一个实物个体】
构造函数:`def __init__(self, radius)`,在创建对象时自动调用,用于给我们对象进行一些初始化的操作。
类属性:`pi = 3.14`,所有对象共享的'集体属性',所有对象共享。
析构函数:`def __del__(self):`,在对象被销毁时自动调用,用于执行一些清理工作,不是我们程序员调用的,而是Python解释器自己调用的。
```python
# 面向对象的思路 去求解圆的面积和周长
# 可以将一些事物进行拟人化
# 类
class Circle:
pi = 3.14
# 构造函数
def __init__(self, radius):
print(f"一个半径为{radius}的圆创建了")
# 创建一个实例属性 self.radius 赋值为传入进来的radius
self.radius = radius
# 实例函数
def area(self):
return self.pi * self.radius ** 2
# 实例函数
def perimeter(self):
return 2 * self.pi * self.radius
# 析构函数
def __del__(self):
print("一个圆对象正在销亡")
c1 = Circle(10)
print(c1.area())
print(c1.perimeter())
c2 = Circle(20)
print(c2.area())
print(c2.perimeter())
"""
Python解释器自动调用
c1.__del__()
c2.__del__()
"""
```
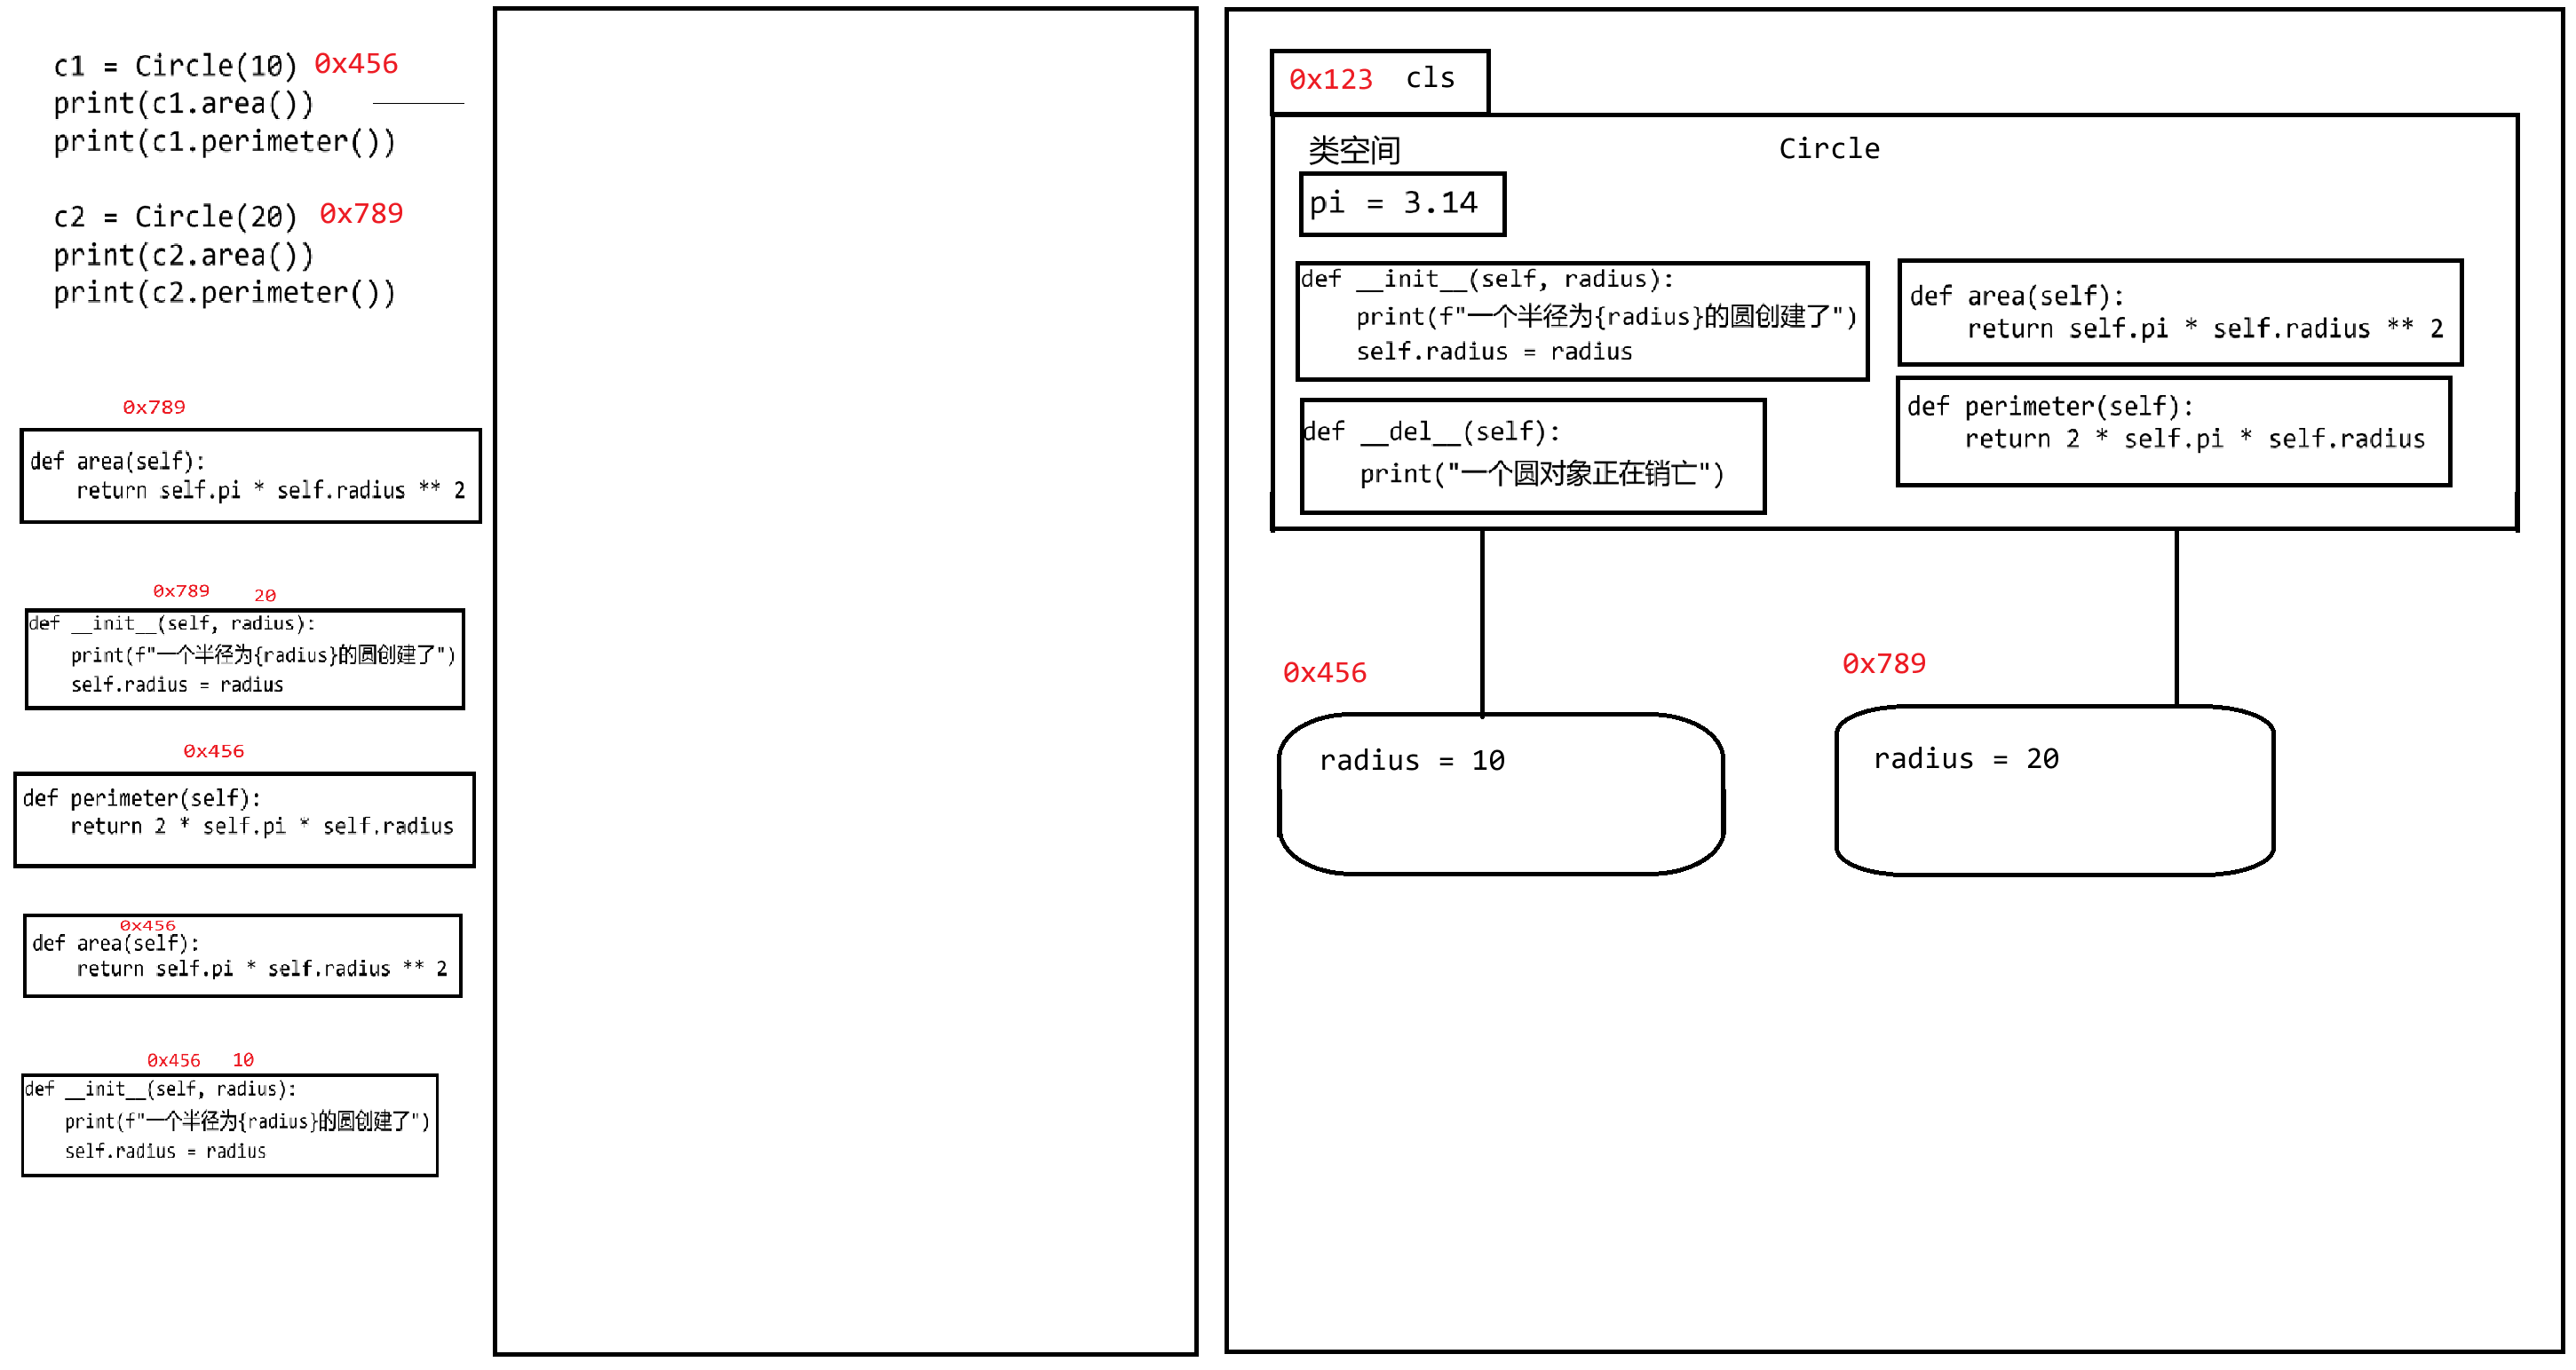
**(3)权限问题**
```python
class Human:
def __init__(self, name, age, gender):
self.name = name
self.age = age
self.gender = gender
def introduce(self):
print(f'我叫{self.name},性别{self.gender},今年{self.age}岁')
h1 = Human("张三",18,"男")
h2 = Human("李梅",18,"女")
h1.introduce()
h2.introduce()
print(h1.age)
h1.age = -18
h1.introduce()
```
目前,该对象中的所有属性和行为,均为公开的,外部的所有人都可以访问甚至修改!这就会出现业务逻辑的错误!可能代码不报错,但业务逻辑不符合现实需求。
行为和属性有些可以公开访问,有些是私有内容不会向外暴露。
可以使用下划线前缀来表示属性或方法的访问级别:
- 公开权限:无前缀,类外部和内部均可自由访问、修改
- 受保护权限:单下划线`_`前缀,建议类内部使用,外部仅可访问
- 私有属性:双下划线`__`前缀,类外部无法直接访问,只能在类中使用!
```python
class Human:
# 公开的魔法函数
def __init__(self, name, age, gender):
# 私有属性
self.__name = name
self.__age = age
self.__gender = gender
# 公开函数
def introduce(self):
print(f'我叫{self.__name},性别{self.__gender},今年{self.__age}岁')
h1 = Human("张三",18,"男")
h2 = Human("李梅",18,"女")
h1.introduce()
h2.introduce()
# AttributeError: 'Human' object has no attribute 'age'
# print(h1.age)
# AttributeError: 'Human' object has no attribute '__age'
# print(h1.__age)
```
新的问题又出现了,初始化的值就没有办法再修改了!不是说属性不让改,而是不能让外界随意修改!所以取一个折中的方案,通过实例函数来实现Setter和Getter的功能。
```python
class Human:
# 公开的魔法函数
def __init__(self, name, age, gender):
# 私有属性
self.__name = name
self.__age = age
self.__gender = gender
# 公开函数
def introduce(self):
print(f'我叫{self.__name},性别{self.__gender},今年{self.__age}岁')
# age属性的修改器 setter
def set_age(self, age):
if age <= 0 or age > 100:
print("年龄值异常!不允许修改!")
else:
self.__age = age
# age属性的访问器 getter
def get_age(self):
return self.__age
h1 = Human("张三", 18, "男")
h1.set_age(-100)
h1.set_age(30)
print(h1.get_age())
h1.introduce()
```
> 总而言之,一般都会把实例属性进行私有化,并提供相关属性的公开的Setter和Getter方法让外界调用。避免外界直接修改属性值!
属性装饰器:使用`@property`装饰器可以将方法为转成属性对外界而言可以修改或访问。
```python
class Human:
def __init__(self, name, age, gender):
self.__name = name
self.__age = age
self.__gender = gender
def introduce(self):
print(f'我叫{self.__name},性别{self.__gender},今年{self.__age}岁')
@property
def age(self):
return self.__age
@age.setter
def age(self, age):
if age <= 0 or age > 100:
print("年龄值异常!不允许修改!")
else:
self.__age = age
h1 = Human("张三", 18, "男")
print(h1.age)
h1.age = 10
h1.introduce()
h1.age = -100
h1.introduce()
```
**(4)类方法和静态方法**
类方法:用`@classmethod`装饰器声明的函数,第一个参数必须是`cls`,可以访问和修改类属性,也可以调用其他的类方法,但不能直接访问实例属性和实例方法。同过类名或者实例对象名来调用。【主要作用,就是修改类属性;一般不会让对象去修改类属性;类的生命周期大于对象】
静态方法:用`@staticmethod`装饰器声明的函数,没有所谓的`cls`和`self`,它和类与对象是无关的。不能访问或修改类属性和实例属性,完全独立于类的状态。通过类名或者实例对象名调用。【与类和对象无关,主要用于设计一些辅助工具去使用;就跟普通函数没什么区别了,】
```python
class Student:
# 类属性 表示每一个学生所属的学校
school = "西铁一中"
# 类属性 表示学生的个数
total_students = 0
# 构造函数
def __init__(self, name, age, score):
# 实例属性初始化
self.__name = name
self.__age = age
self.__score = score
# 修改类属性
Student.total_students += 1
# 实例函数
# 可以通过self或者 类名 访问所有内容
def student_info(self):
return f'姓名{self.__name},年龄{self.__age}岁,成绩{self.__score}分,{"及格" if self.__score >= 60 else "不及格"}'
# 类函数
# 可以通过访问cls或类名 访问类属性 类函数 静态函数
# 不能直接访问 实例函数 实例属性 静态函数
@classmethod
def update_school(cls,school):
cls.school = school
Student.school = school
cls.is_adult()
Student.is_adult()
# 静态函数 判断是否成年
# 不能通过cls访问类属性和类方法
# 可以通过类名访问类属性和类方法 静态函数
# 不能直接访问对象的实例属性和实例函数
@staticmethod
def is_adult(age):
if age < 18:
print("未成年")
else:
print("已成年")
print(Student.school)
print(Student.total_students)
Student.update_school("haha")
s1 = Student("李雷",18,80)
s2 = Student("韩梅梅",17, 50)
# 在类的外面:
# 对象可以调用实例函数
print(s1.student_info())
# 对象和类都可以调用类属性
print(s1.school)
print(Student.school)
# 对象和类都可以调用类函数
s1.update_school("高新一中")
print(s1.school)
Student.update_school("高新十三中")
print(Student.school)
# 对象和类都可以调用静态函数
s1.is_adult(20)
Student.is_adult(16)
```
### 38.2 继承与多态
**(1)继承概念**
```python
class Dog:
def __init__(self, name, age, species):
self.name = name
self.age = age
self.species = species # 品种
def eat(self):
print(f'{self.age}岁的{self.species}小狗{self.name}在吃东西...')
def bark(self):
print(f'{self.age}岁的{self.species}小狗{self.name}在汪汪叫...')
def lookdoor(self):
print(f'{self.age}岁的{self.species}小狗{self.name}在看家护院...')
class Cat:
def __init__(self, name, age, color):
self.name = name
self.age = age
self.color = color # 毛色
def eat(self):
print(f'{self.age}岁的{self.color}小猫{self.name}在吃东西...')
def bark(self):
print(f'{self.age}岁的{self.color}小猫{self.name}在喵喵叫...')
def catchjerry(self):
print(f'{self.age}岁的{self.color}小猫{self.name}在捉老鼠...')
d = Dog("旺财",2,"拉布拉多")
c = Cat("多福",1,"鎏金黑")
d.eat()
d.bark()
d.lookdoor()
c.eat()
c.bark()
c.catchjerry()
```
从代码的角度而言,如果有若干各类存在重复的内容,我们就可以把这些重复的内容提取出来,产生一个新的类,新的类就称之为前者的父类(前者为后者的子类),为了表示这种关系,之前若干个类就得需要继承该父类。子类再去调用时,可以直接从父类获取。【去除重复!】
```python
class Animal:
def __init__(self, name, age):
self.name = name
self.age = age
def eat(self):
print(f"{self.age}岁的动物{self.name}在吃饭")
def bark(self):
print(f"{self.age}岁的动物{self.name}在叫")
class Dog(Animal): # Dog类 继承自 Animal类
def __init__(self, name, age, species):
# 使用父类的构造函数帮我们子类初始化一些属性
super().__init__(name,age)
self.species = species # 品种
def lookdoor(self):
print(f'{self.age}岁的{self.species}小狗{self.name}在看家护院...')
class Cat(Animal): # Cat类 继承自 Animal类
def __init__(self, name, age,color):
# 使用父类的构造函数帮我们子类初始化一些属性
super().__init__(name, age)
self.color = color # 毛色
def catchjerry(self):
print(f'{self.age}岁的{self.color}小猫{self.name}在捉老鼠...')
d = Dog("旺财", 2, "拉布拉多")
c = Cat("多福", 1, "鎏金黑")
d.eat() # eat()来自于父类
d.bark() # bark()来自于父类
d.lookdoor() # lookdoor() 来自于Dog子类
c.eat()
c.bark()
c.catchjerry()
```
从现实业务的角度而言,继承必须符合`is a`关系,至少是同一个系列/品种。父类就会把功能留给子类去使用【子承父业】。但是不要因为为了获取功能而选择继承【鸟会飞,人类继承鸟,人类也能飞?】。
子类到底是继承了父类的**功能内容**还是**功能声明**?是功能声明,那么说明子类其实就具有可该功能,但是具体功能是如何执行的,可以由子类自行发扬光大。
```python
class Animal:
def __init__(self, name, age):
self.name = name
self.age = age
def eat(self):
print(f"{self.age}岁的动物{self.name}在吃饭")
def bark(self):
print(f"{self.age}岁的动物{self.name}在叫")
class Dog(Animal): # Dog类 继承自 Animal类
def __init__(self, name, age, species):
# 使用父类的构造函数帮我们子类初始化一些属性
super().__init__(name,age)
self.species = species # 品种
def lookdoor(self):
print(f'{self.age}岁的{self.species}小狗{self.name}在看家护院...')
class Cat(Animal): # Cat类 继承自 Animal类
def __init__(self, name, age,color):
# 使用父类的构造函数帮我们子类初始化一些属性
super().__init__(name, age)
self.color = color # 毛色
def catchjerry(self):
print(f'{self.age}岁的{self.color}小猫{self.name}在捉老鼠...')
# 此时Cat实际上已经继承到了Animal的eat功能和bark功能
# Cat可以选择发扬光大 -> 重新/更新该功能的内容
# 函数的重写
def eat(self):
super().eat()
print(f'{self.age}岁的{self.color}小猫{self.name}在吃烤鱼、香肠、火锅...')
def bark(self):
super().bark()
print(f'{self.age}岁的{self.color}小猫{self.name}在喵喵叫,嘻嘻叫、啦啦叫...')
d = Dog("旺财", 2, "拉布拉多")
c = Cat("多福", 1, "鎏金黑")
d.eat() # eat()来自于父类
d.bark() # bark()来自于父类
d.lookdoor() # lookdoor() 来自于Dog子类 独有功能
c.eat() # eat() 功能声明来自于父类 内容是Cat子类重新定义的
c.bark() # bark() 功能声明来自于父类 内容是Cat子类重新定义的
c.catchjerry() # catchjerry() 来自于Cat子类 独有功能
```
**(2)多继承问题**
Python支持一个类同时拥有多个父类!最多有一个父类表示`is a`关系,剩下的父类表示`like a / can do`关系。
```python
拉布拉多 -> 狗 -> 动物 -> 生物
黑背 -> 狗 -> 动物 -> 生物
缉毒犬? 导盲犬? 防爆犬?
缉毒、导盲、防爆 后天培养的 can do 关系
犬 先天形成的 is a关系
```
```python
class Animal:
def __init__(self, name, age):
self.name = name
self.age = age
def eat(self):
print(f"{self.age}岁的动物{self.name}在吃饭")
def bark(self):
print(f"{self.age}岁的动物{self.name}在叫")
# 缉毒类-后期可培养的功能
class DrugDetectionable:
def drug_detection(self):
print("可以缉毒!")
# 导盲类-后期可培养的功能
class Guidable:
def guid(self):
print("可以导盲!")
class Dog(Animal, DrugDetectionable, Guidable): # Dog类 继承自 Animal类
def __init__(self, name, age, species):
# 使用父类的构造函数帮我们子类初始化一些属性
super().__init__(name, age)
self.species = species # 品种
def lookdoor(self):
print(f'{self.age}岁的{self.species}小狗{self.name}在看家护院...')
def drug_detection(self):
print(f'名叫{self.name}的狗狗可以缉毒了,帮助警察查获多起走私案例!')
def guid(self):
print(f'名叫{self.name}的狗狗可以导盲了,帮助多位障碍人士出行!')
d = Dog("旺财",3,"哈士奇")
d.eat() # 没重写
d.bark()# 没重写
d.lookdoor() # 自己的特有行为
d.drug_detection()
d.guid()
```
如果多个父类当中有重复名称的函数,子类是如何继承的呢?
按照继承顺序来获取,先到先继承!`class Dog(Animal, DrugDetectionable, Guidable):`
```python
class Animal:
def __init__(self, name, age):
self.name = name
self.age = age
def eat(self):
print(f"{self.age}岁的动物{self.name}在吃饭")
def bark(self):
print(f"{self.age}岁的动物{self.name}在叫")
def A(self):
print("Animal A")
# 缉毒类-后期可培养的功能
class DrugDetectionable:
def drug_detection(self):
print("可以缉毒!")
def A(self):
print("drug A")
# 导盲类-后期可培养的功能
class Guidable:
def guid(self):
print("可以导盲!")
def A(self):
print("guid A")
class Dog(Animal, DrugDetectionable, Guidable): # Dog类 继承自 Animal类
def __init__(self, name, age, species):
# 使用父类的构造函数帮我们子类初始化一些属性
super().__init__(name, age)
self.species = species # 品种
def lookdoor(self):
print(f'{self.age}岁的{self.species}小狗{self.name}在看家护院...')
def drug_detection(self):
print(f'名叫{self.name}的狗狗可以缉毒了,帮助警察查获多起走私案例!')
def guid(self):
print(f'名叫{self.name}的狗狗可以导盲了,帮助多位障碍人士出行!')
d = Dog("旺财",3,"哈士奇")
d.eat() # 没重写
d.bark()# 没重写
d.lookdoor() # 自己的特有行为
d.drug_detection()
d.guid()
d.A()
```
**(3)抽象类和接口**
发现父类中的某些函数不知道如何具体实现(动物怎么叫,动物怎么吃),而是由具体子类去实现(狗怎么叫,狗怎么吃),那么该函数就可以忽略函数体不写,只保留函数声明,此时该函数就变为了抽象函数!包含抽象函数的类叫做抽象类!
- 是一个不完整的类,有些地方是需要子类去实现的(抽象函数),同时有些地方抽象类可以自己实现(实例函数)。抽象函数就得需要用`@abstractmethod`,抽象类就得继承自`ABC`类。
- 不能实例化,就是不能创建抽象类的对象!只能作为父类被继承。
- 包含至少一个抽象函数。
- 可以包含普通函数和属性,甚至包括构造函数和析构函数等,子类继承后可以直接使用。与普通类的唯一区别就在于抽象类包含了抽象函数而已!
- 子类必须重写抽象类的抽象函数,否则子类也是一个抽象类!
接口,就是一个特殊的抽象类,只能包含抽象函数,其他一律不能包含!
- 接口不能创建对象!
- 接口的抽象函数等待子类实现(子类重写该方法)
抽象类/普通类:用于继承,表示`is a`关系!子类先天的内容
接口:用于实现,表示`can do`关系!子类后天的内容
```python
from abc import ABC,abstractmethod
class Animal(ABC):
def __init__(self, name, age):
self.name = name
self.age = age
@abstractmethod
def eat(self):
pass
@abstractmethod
def bark(self):
pass
def info(self):
print(f'{self.name},{self.age}')
class DrugDetectionable(ABC):
@abstractmethod
def drug_detection(self):
pass
class Guidable(ABC):
@abstractmethod
def guid(self):
print("可以导盲!")
class Dog(Animal, DrugDetectionable, Guidable): # Dog类 继承自 Animal类
def __init__(self, name, age, species):
# 使用父类的构造函数帮我们子类初始化一些属性
super().__init__(name, age)
self.species = species # 品种
def eat(self):
print("必须重写 否则该函数为继承自父类的抽象函数!")
def bark(self):
print("必须重写 否则该函数为继承自父类的抽象函数!")
def lookdoor(self):
print(f'{self.age}岁的{self.species}小狗{self.name}在看家护院...')
def drug_detection(self):
print(f'名叫{self.name}的狗狗可以缉毒了,帮助警察查获多起走私案例!')
def guid(self):
print(f'名叫{self.name}的狗狗可以导盲了,帮助多位障碍人士出行!')
d = Dog("旺财", 3, "哈士奇")
d.eat() # 没重写
d.bark() # 没重写
d.lookdoor() # 自己的特有行为
d.drug_detection()
d.guid()
```
**(4)多态**
在Python中,多态的实现是基于其动态类型特性和"鸭子类型''机制来决定的。
- 动态类型:变量的类型不需要预先声明,而是在运行时根据赋值去确定。意味着,一个函数接收的参数可以使任意类型,只要它实现了所需的方法。调用方法时,Python会在运行时检查对象是否有该方法,而不关心对象的类型。
- 鸭子类型:"如果一个东西走路像鸭子,叫起来也像鸭子,那么它就是鸭子!",不要求对象必须继承特定的类,只要求它实现了所需的方法即可!
```python
# 无需共同的父类,只要有相同方法即可实现多态
class Dog:
def make_sound(self):
return "汪汪汪"
class Cat:
def make_sound(self):
return "喵喵喵"
class Car:
def make_sound(self):
return "滴滴滴"
# 接收任何有make_sound方法的对象
def make_noise(something):
print(something.make_sound())
car = Car()
dog = Dog()
cat = Cat()
make_noise(dog)
make_noise(cat)
make_noise(car)
```
```python
from abc import ABC,abstractmethod
class Animal(ABC):
@abstractmethod
def make_sound(self):
pass
class Dog(ABC):
def make_sound(self):
return "汪汪汪"
def lookdoor(self):
return "看门"
class Cat(ABC):
def make_sound(self):
return "喵喵喵"
class Car:
def make_sound(self):
return "滴滴滴"
def make_noise(a):
print(a.make_sound())
# 对a的类型做判断
if isinstance(a, Dog):
print(a.lookdoor())
car = Car()
dog = Dog()
cat = Cat()
make_noise(dog)
make_noise(cat)
make_noise(car)
```
### 38.3 魔法函数
是Python当中一类特殊的方法,它们的名字都是以双下划线开头和结尾的`__init__`、`__del__`。这些方法不由开发者直接调用,而是在 **特定场景** 下被Python解释器自动触发!
- 序列可以被`len()`获取长度,`__len__`
- 打印对象有内容字符串,`__str__`
- 让两个对象相加,`__add__`
- 有些对象可以被循环,`__iter__`
```python
class MagicBox:
def __init__(self, items):
self.items = items if items is not None else []
def __str__(self):
# 返回对象的数据内容
return str(self.items)
def __len__(self):
# 返回对象的长度
return len(self.items)
def __getitem__(self, index):
# 通过角标/键获取元素
return self.items[index]
def __setitem__(self, key, value):
# 通过角标/键修改元素
self.items[key] = value
def __delitem__(self, key):
# 通过角标/键删除元素
del self.items[key]
def __contains__(self, item):
# 判断元素存在性
return item in self.items
def __iter__(self):
# 返回迭代器 支持for循环
return iter(self.items)
def __next__(self):
# 迭代器下一个元素配合__iter__使用
return next(iter(self.items))
def __add__(self, other):
# 两个对象相加 other另一个对象 生成一个新的对象
# __sub__ 减法 __mul__ 乘法 __truediv__ 除法
if isinstance(other, MagicBox):
itemA = self.items
itemB = other.items
itemC = itemA + itemB
return MagicBox(itemC)
def __eq__(self, other):
# 比较两个对象的相等性
if isinstance(other, MagicBox):
return self.items == other.items
def __lt__(self, other):
# 比较当前对象是否小于other <
# __gt__ >
return self.items < other.items
"""
__call__ 将对象作为函数调用 box()
__bool__ 将对象作为布尔比较结果 if box:
__hash__ 计算对象的哈希值 {box:1, "name":"张三"}
__new__ 在内存中创建对象 实际上在__init__中就已经使用了
......
"""
box = MagicBox([1, 2, 3])
print(box) # 调用__str__函数
print(len(box)) # 调用__len__函数
print(box[0]) # 调用__getitem__函数
box[0] = 10 # 调用__setitem__函数
print(box[0])
del box[0] # __delitem__
print(box)
print(4 in box)
for b in box: # __getitem__
print(b)
it = iter(box) # __iter__
print(next(it)) # __next__
print(next(it))
box2 = MagicBox([4, 5, 6])
box3 = box + box2 # __add__
print(box3)
box4 = MagicBox([2, 3, 4, 5, 6])
print(box3 == box4) # __eq__
print(box4 == box2)
print(box2 < box4)
```
About
35/F,Tencent Building,Kejizhongyi Avenue,Nanshan District,Shenzhen